MemberShops Documentation
Managing products
Managing products
Managing products
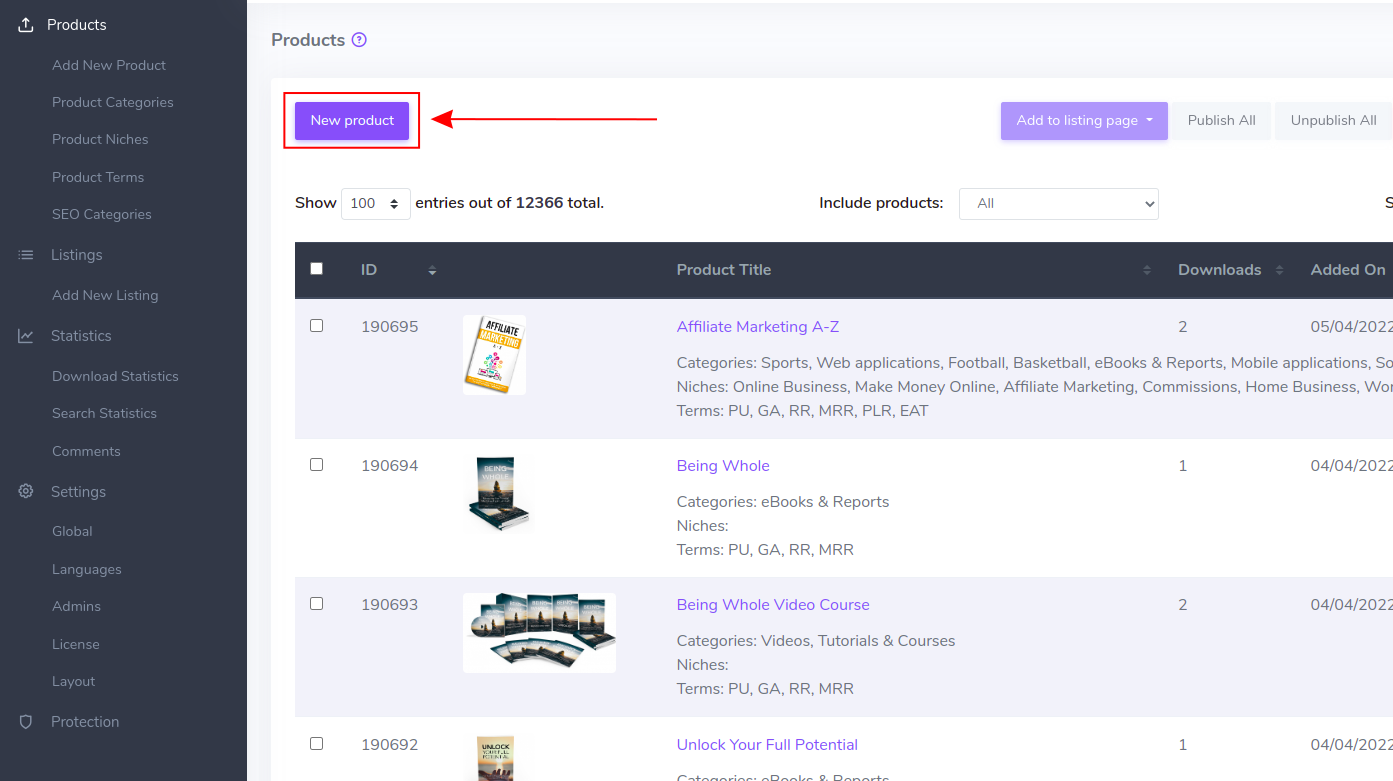
When you sign up to the plr.pub platform you'll already receive master products that are available for you to sell to your users. You can also upload your own products and distribute them the same way as master products. All product operations are done on the plr.pub administration website. When you log in, you click on the "Products" sidebar menu. In order to let your users download products, you'll have to organize them in listing pages which we covered in previous chapters.
In order to upload your own product, you click "New product" on the products page.
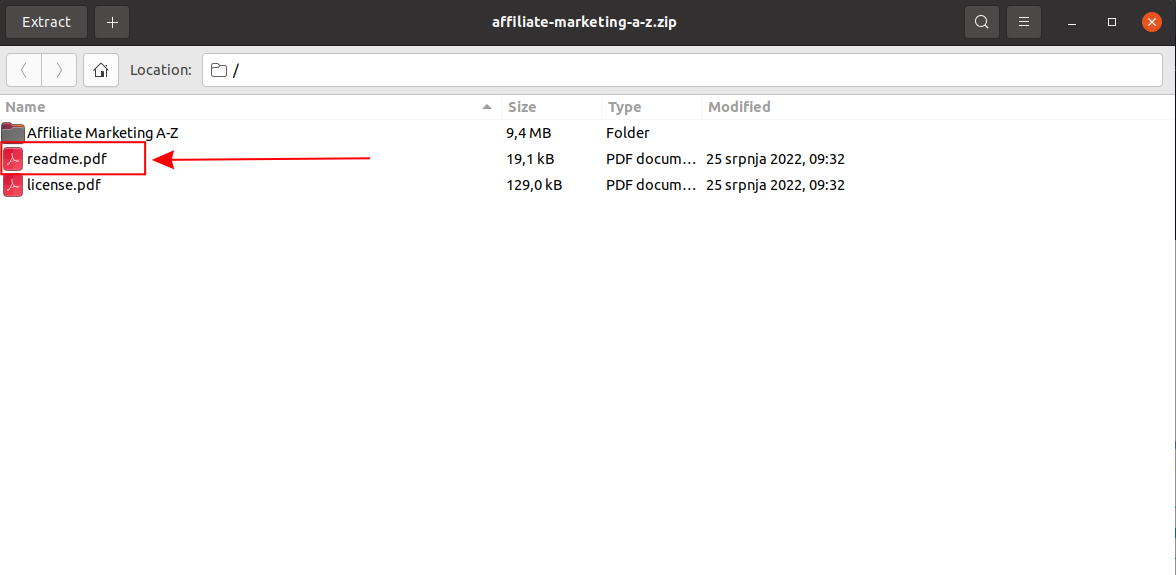
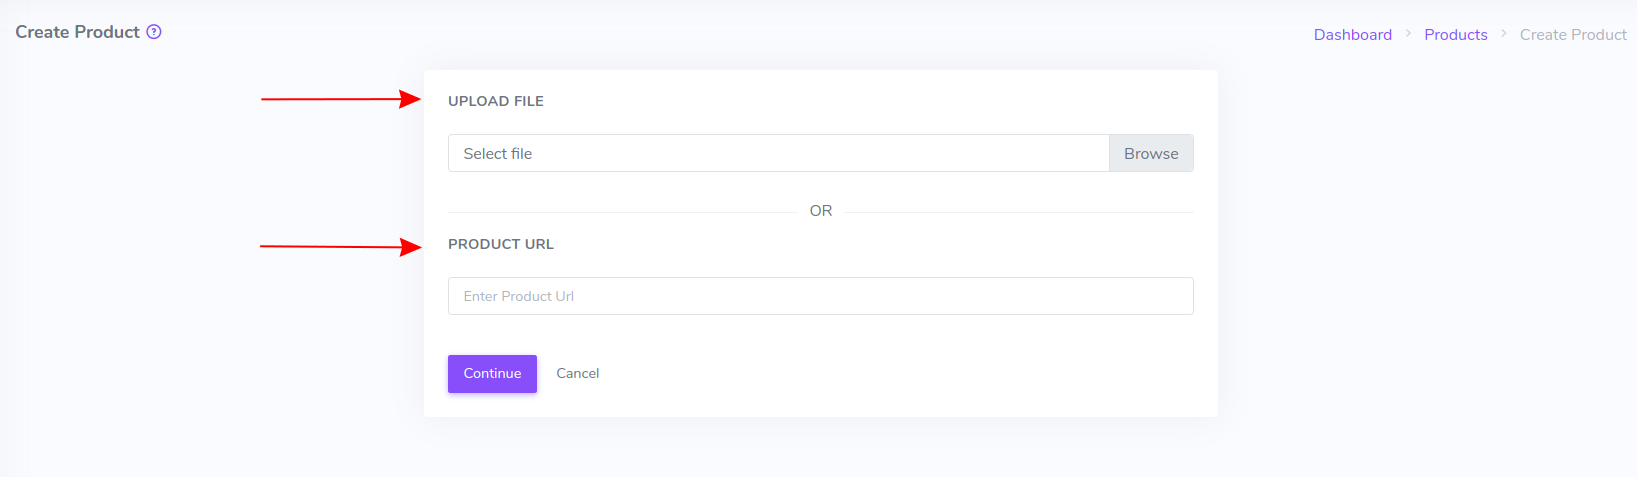
Products are uploaded as ZIP archives. So if your product has multiple files, put them all into the one ZIP archive before uploading. You can either upload the ZIP archive or provide the URL where the ZIP archive is located on the web. After the zip file has been uploaded, the product file counter process will start analyzing the files contained inside the archive. Once this process finishes, you can finish editing and publishing the product.
After the product ZIP archive is uploaded and extracted, you'll need to populate product details. Every product has the following attributes:
Product Title
The main product title.
Long Description
The product's long description is displayed on the product details page.
Short Description
The product's short description is automatically generated from the long description if the “Autogenerate” checkbox is checked. Otherwise, the short description can be entered manually. The product's short description is usually shown on product listing and search result pages but it's configurable and can be hidden.
Categories
Product categories are used to organize your products more easily. You can use categories to categorize your products and later create listing pages filtering only specific categories.
Niches
Product niches are used to organize your products more easily. You can use niches to categorize your products and later create listing pages filtering only specific niches.
Terms
Terms are permissions regarding what the user, as a member, is entitled to do with it. There are system terms that are inherited but you can enter and manage your own terms on the terms page and assign them to products. Every product has its own specific terms and has to have at least one term assigned to it.
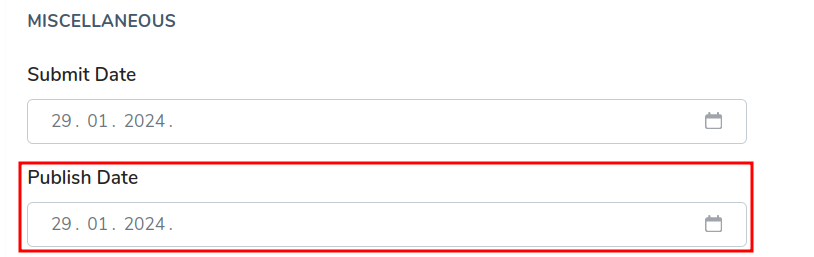
Submit Date
The date when the product was uploaded to the platform.
Publish Date
The date when the product was or will be published. You can schedule the date in the future when you want your product to be published.
Product Featured
Marks products as featured can later be used for creating listings of featured products.
Price
The product selling price in credits.
Language
Product's default language. You can enter as many translations of the product as you wish. First, you have to create a new language on the Languages page and then you can come back to the product and enter the translation.
Author Name
Product's author name.
Author URL
Product's author URL (if any).
Meta title
Product's page title. If empty, the Product Title will be used instead.
Meta keywords
Product's page meta keywords value.
Meta description
Product's page meta description value.
SEO Category
SEO categories are used to build SEO-friendly URLs. They act as folders where your products are hosted.
SEO categories are managed on an SEO categories page. First, you have to create one and then come back to the product and set it. You can also use bulk operations on the products table page where you can set SEO categories to selected products at once.
For example: if your SEO category slug is called ‘books’ then the product's URL might look like this:
https://example.com/books/your-product-title-or-a-custom-alias
Custom Alias
Custom aliases, like SEO categories, are used to build SEO-friendly URLs. Each published and listed product, hosted on a platform, will have public URL where the URL will look something like this:
https://example.com/your-product-title
If you wish to customize your product's URL, you can enter Custom Alias and the product's URL will change like this:
https://example.com/custom-alias
Custom aliases and SEO categories can be used together to build strong SEO URLs that will grow your organic traffic.
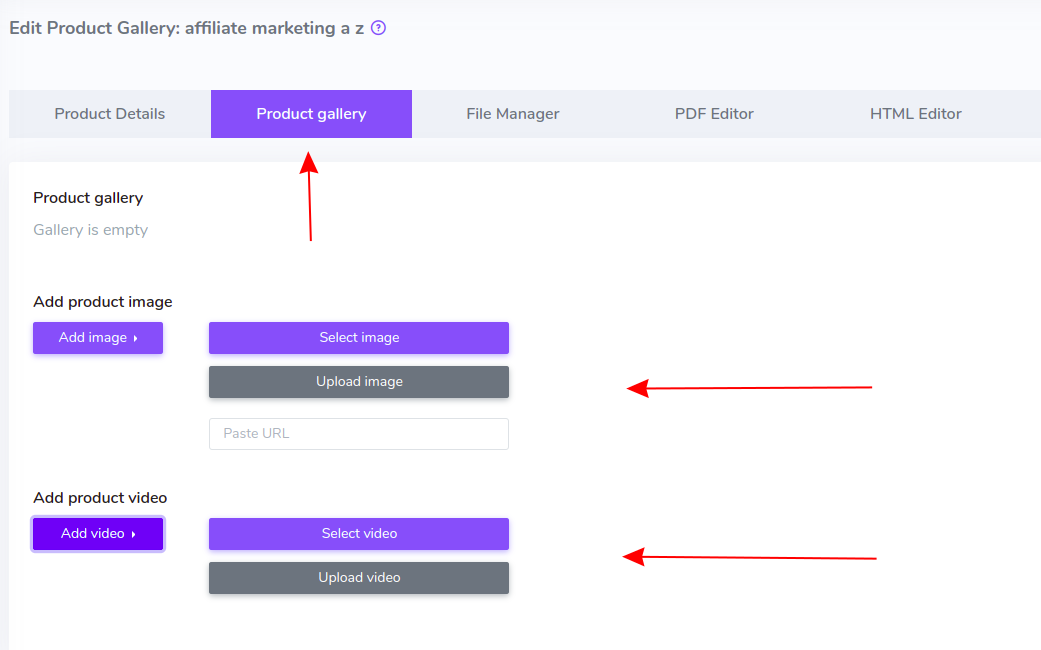
Product Gallery
Every product must have the main image that's shown on product details and product listing pages. You can also upload other images and videos and create a gallery. Images and videos can be reorganized and sorted arbitrarily. Images can be uploaded from your device, selected from product files, or downloaded from a given URL. Videos can be uploaded from your device, or selected from product files.
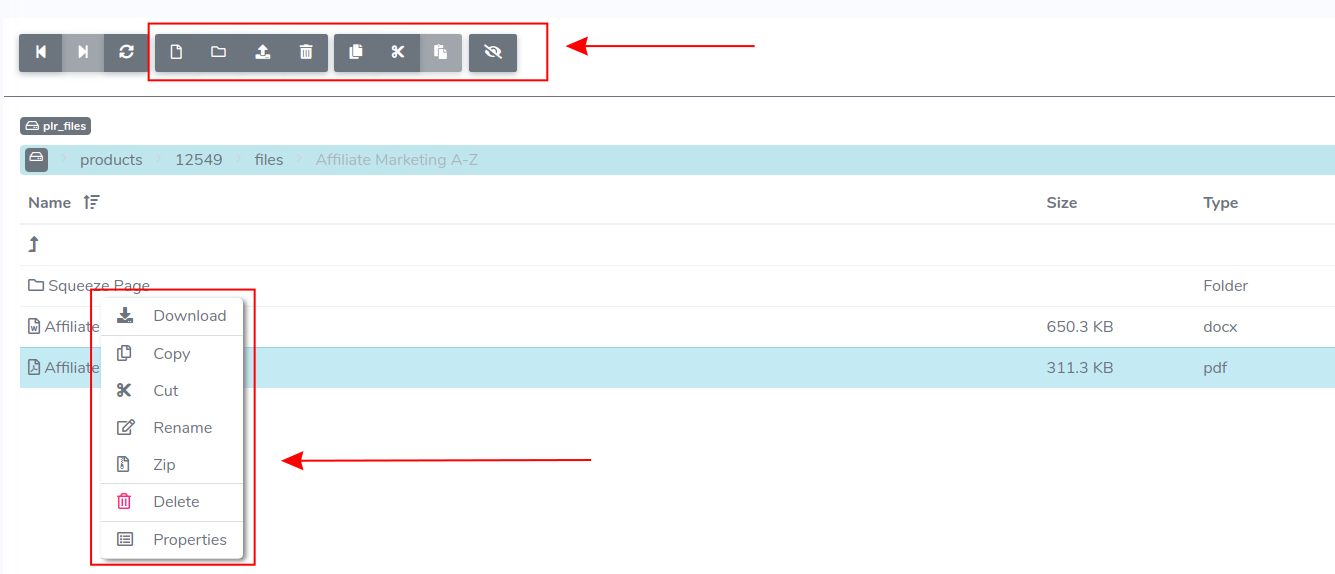
You have several tools that will help you manage products and their files. The tools are:
File manager helps you manage files on an already uploaded product. Every product has the same directory structure consisting of several directories:
-
files - this directory contains files and directories extracted from the product's ZIP archive. In other words, this directory contains the product itself. If you wish to add a new file to the product or delete an existing one, you go to this directory.
-
images - this directory contains gallery images
-
original - this is the place where the original ZIP archive is stored and serves as a backup of your product's original files. So usually, you don't want to change this directory or its content.
-
preview - here is where the product's preview files and directories are stored.
The file manager has the usual file and directory functions like create, upload, delete, rename, cut, paste, download, etc.
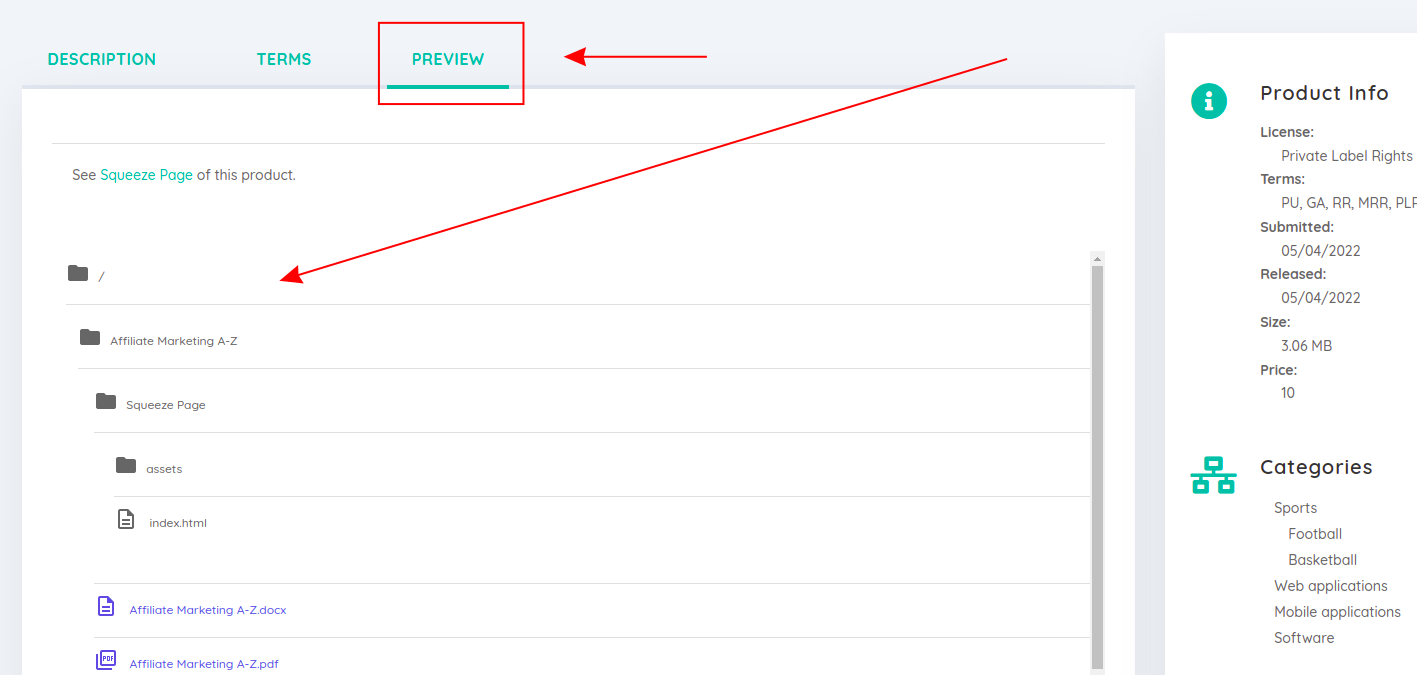
The preview creator tool creates a preview file tree of the product files. It creates a preview for your end users that's going to be available on the product details page. The user will be able to preview the product if he/she has the right membership that allows for product preview. The membership must be configured to allow for product preview. Please check chapter 2.2. Creating membership subscriptions.
To generate the product preview click the "Generate Preview" button.
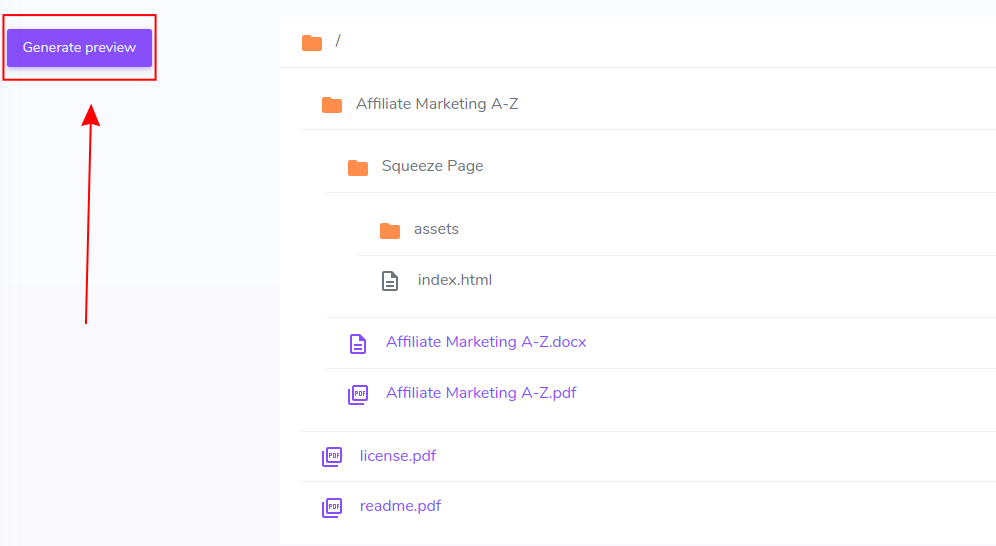
The preview creator tool will create a file preview for the following content types:
|
pdf, doc/x |
It will create a JPG image of the first five pages of the document. |
|
txt |
Text files are first converted to PDF, and then the first two pages of the PDF are converted to a JPG image. |
|
images |
All images are converted to JPG format. |
|
mp3 |
First 20 seconds of the audio file is captured. |
|
mp4, avi, wmv, mov, flv |
First 20 seconds of the video file is captured. |
HTML extractor tool checks if the product has static websites like sales pages, demo pages, etc. If found, they are extracted and are available for end users to preview. The preview is available on the product details page, regardless of the user membership status.

To extract the HTML pages click "Generate HTML" button.

If some of the pages you don't want to be available for preview, you can delete their preview by clicking the small minus button at the top right of the link.
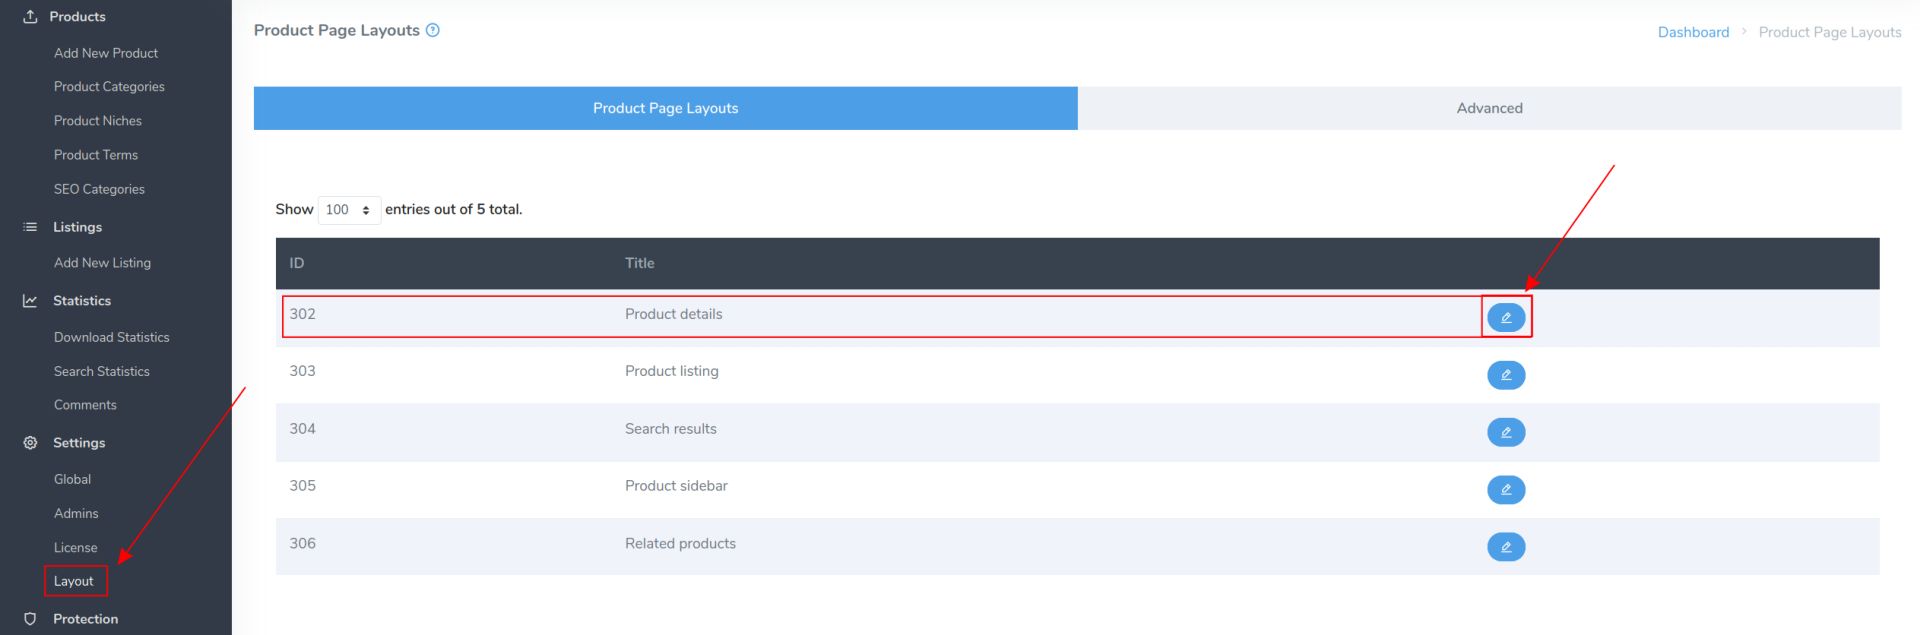
The product details page layout determines how the product details page is presented to the end users.
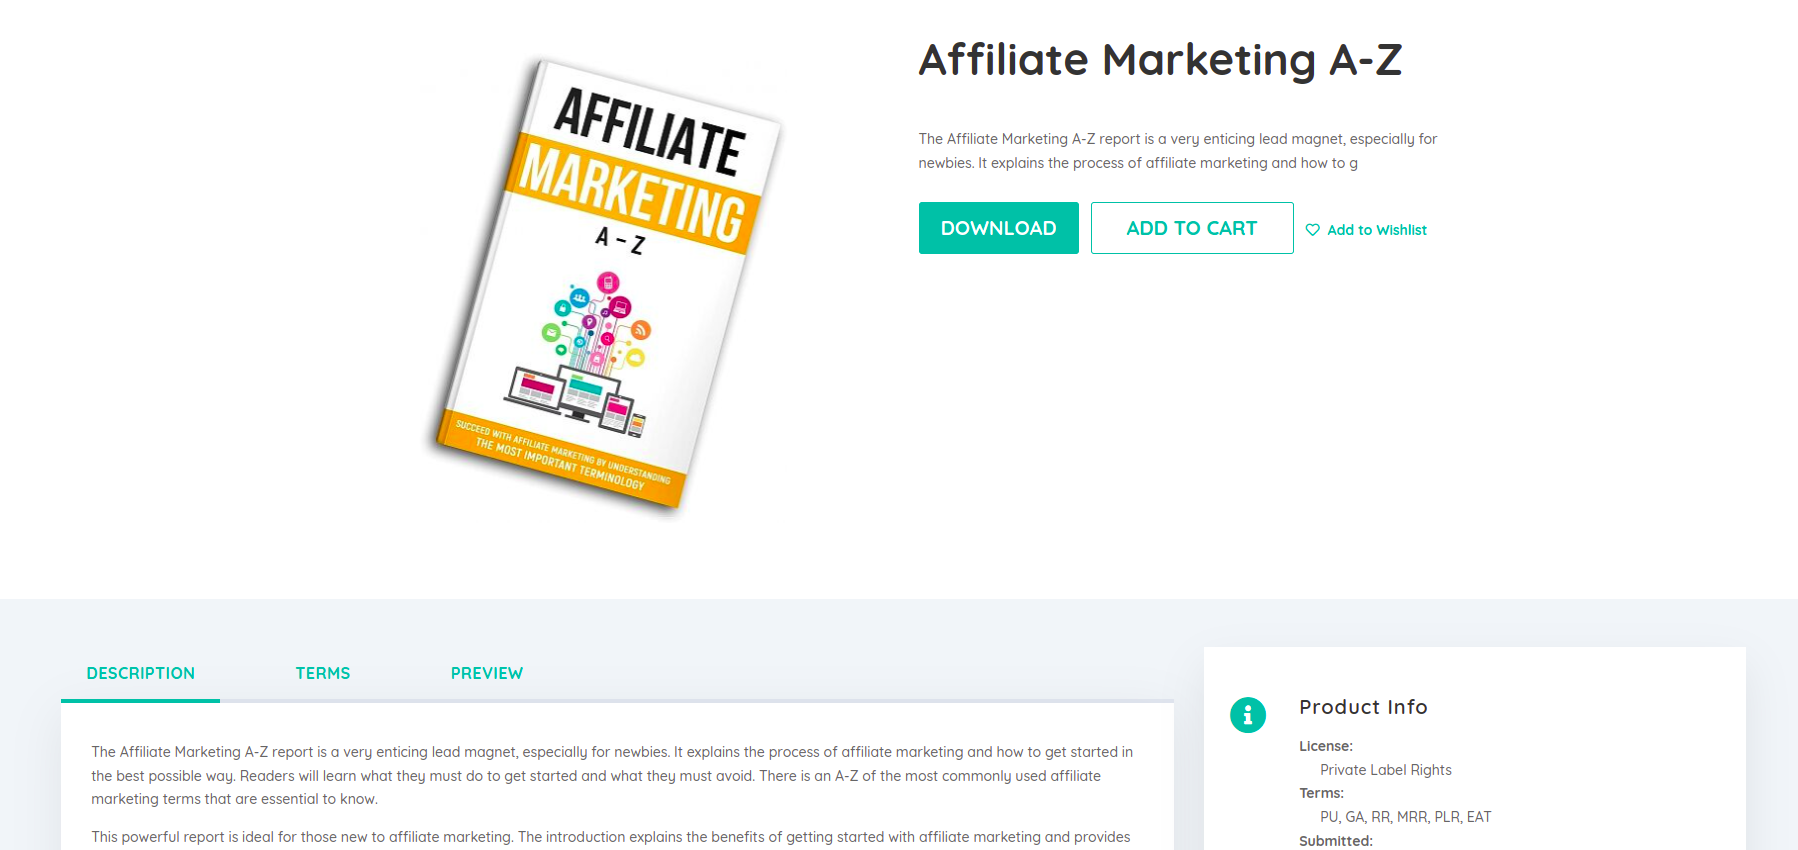
You can change the layout and the information visible on the product details page via the administration page by clicking on the "Layout" sidebar menu entry and then clicking the little pen icon next to the "Product details" layout area.
Just like in the "Listing page layout" section, this one is the same. You'll be greeted by the main editing screen, which is split between "Layout selection area" and "Action tabs".
In layout selection area, you can select between 3 different layouts already created for you. Each layout can be renamed/deleted, so you can organise them in way it makes sense for you.
To change the currently active layout, click on the "Set as default" button. This will apply the layout to ALL of the product detail pages across the website.
To add your own custom layout, click on the "Add new layout" button on the right.
Each individual layout has its own set of "Action tabs", which allow you to modify the look and feel of each layout. This means that if you currently have "Layout 1" selected, any changes you make will only be applied to that layout. This allows you to create multiple unique layouts which you can then toggle between with a single button click.
The action tabs currently consist of:
- Preview - a live preview of the changes you're making
- Edit code - here you can edit a source code of a layout. A knowledge of HTML, CSS and Bootstrap is required
- CSS - you can add your own custom CSS here, which will only be applied to the selected layout
- Visible information - show/hide different fields on the listing page
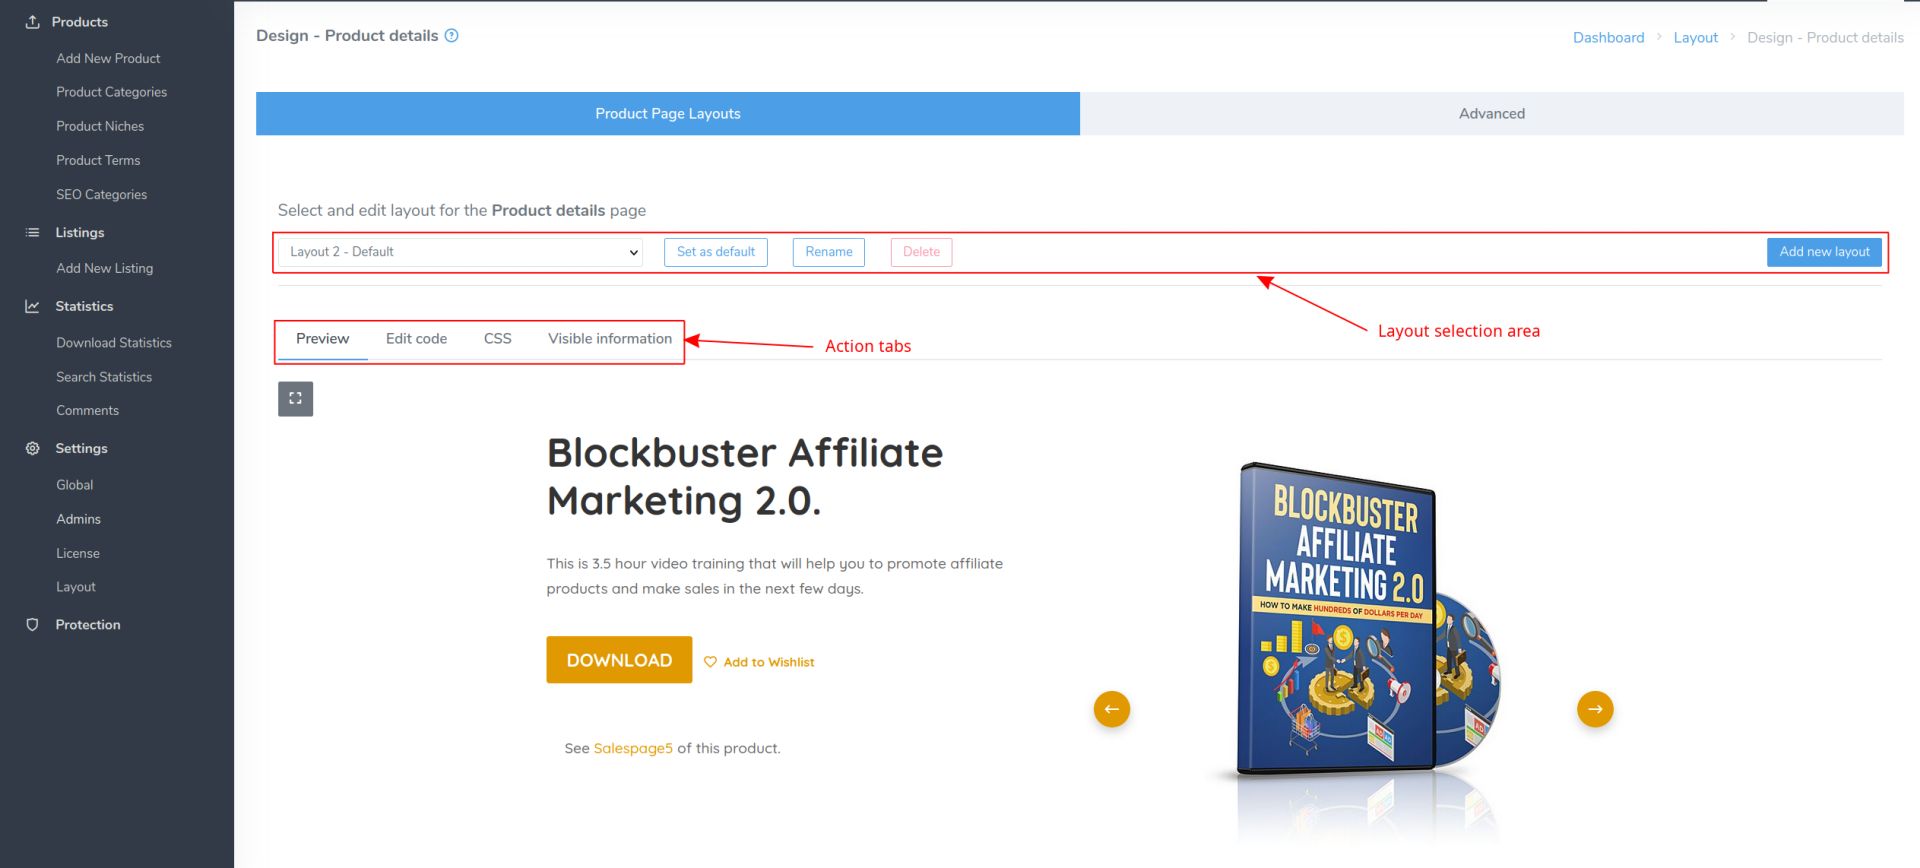
You can learn more about layouts and layout areas at the "Website look and feel" section, under the "Product Page Layouts" sub-section.
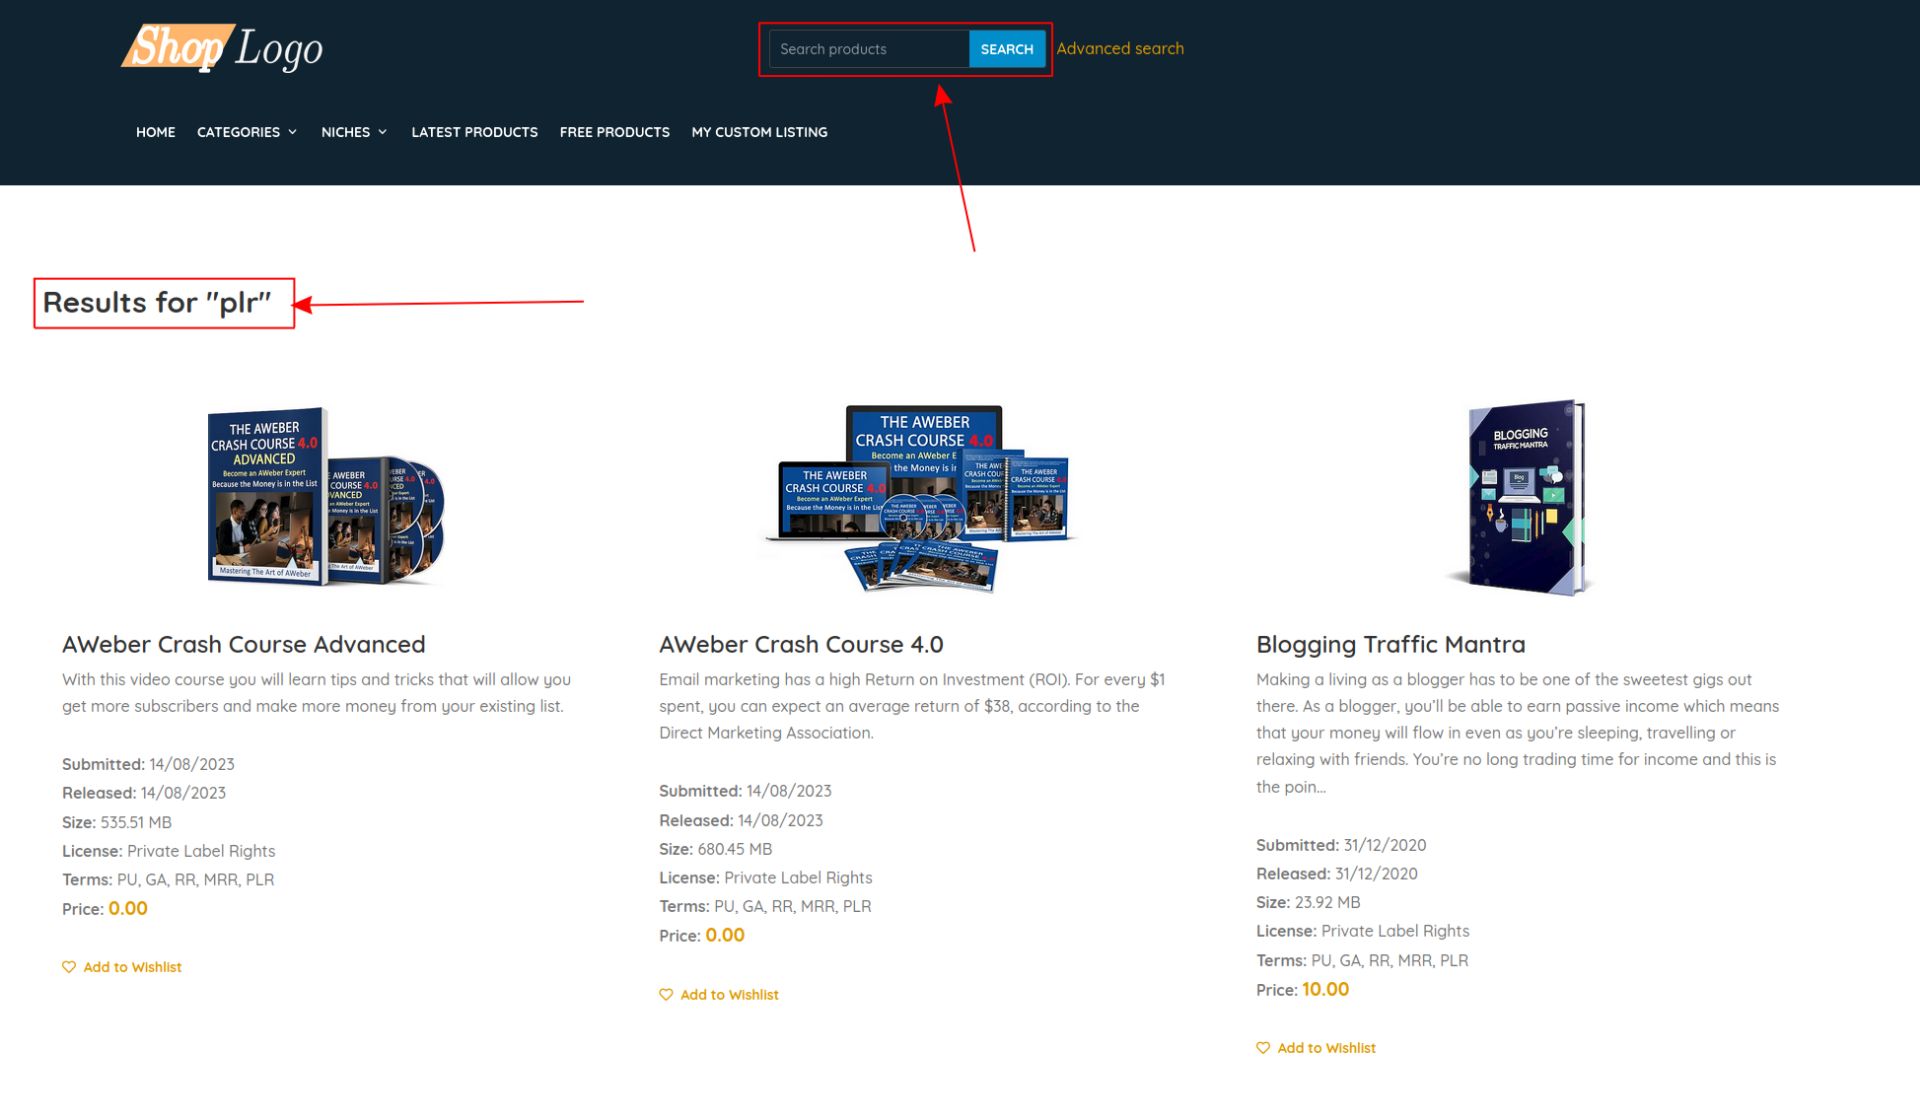
Products can be searched using the header search form. The "search results" page will show the search results. The layout of the search results page can be change the same way as for the product details, and listing pages.
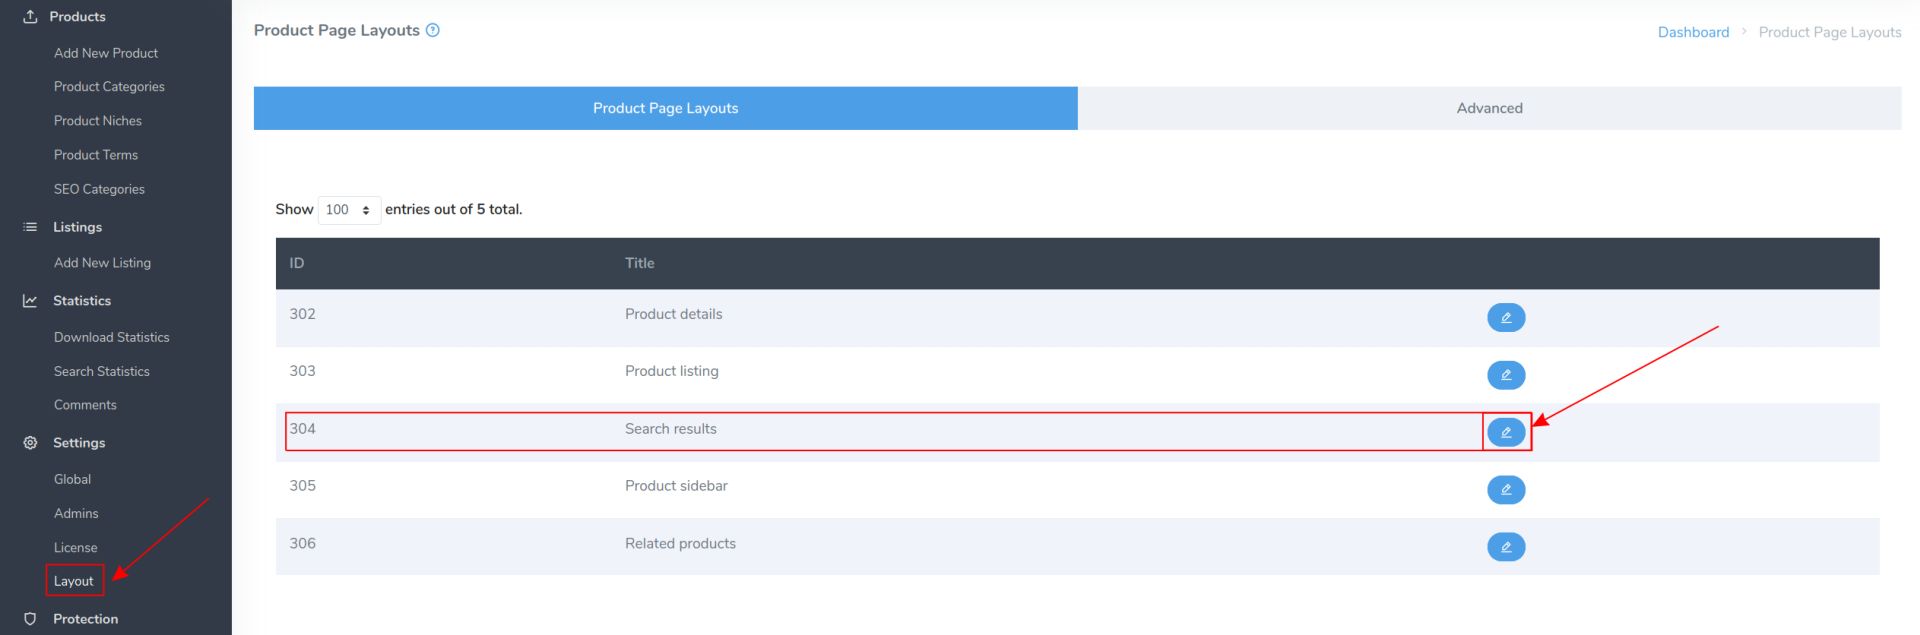
You can change the layout and the information visible on the search results page via the administration page by clicking on the "Layout" sidebar menu entry and then clicking the little pen icon next to the "Search results" layout area.
Just like in previous two areas, you'll be greeted by the main editing screen, which is split between "Layout selection area" and "Action tabs".
In layout selection area, you can select between 3 different layouts already created for you. Each layout can be renamed/deleted, so you can organise them in way it makes sense for you.
To change the currently active layout, click on the "Set as default" button. This will apply the layout to search results.
To add your own custom layout, click on the "Add new layout" button on the right.
Each individual layout has its own set of "Action tabs", which allow you to modify the look and feel of each layout. This means that if you currently have "Layout 1" selected, any changes you make will only be applied to that layout. This allows you to create multiple unique layouts which you can then toggle between with a single button click.
The action tabs currently consist of:
- Preview - a live preview of the changes you're making
- Edit code - here you can edit a source code of a layout. A knowledge of HTML, CSS and Bootstrap is required
- CSS - you can add your own custom CSS here, which will only be applied to the selected layout
- Visible information - show/hide different fields on the listing page
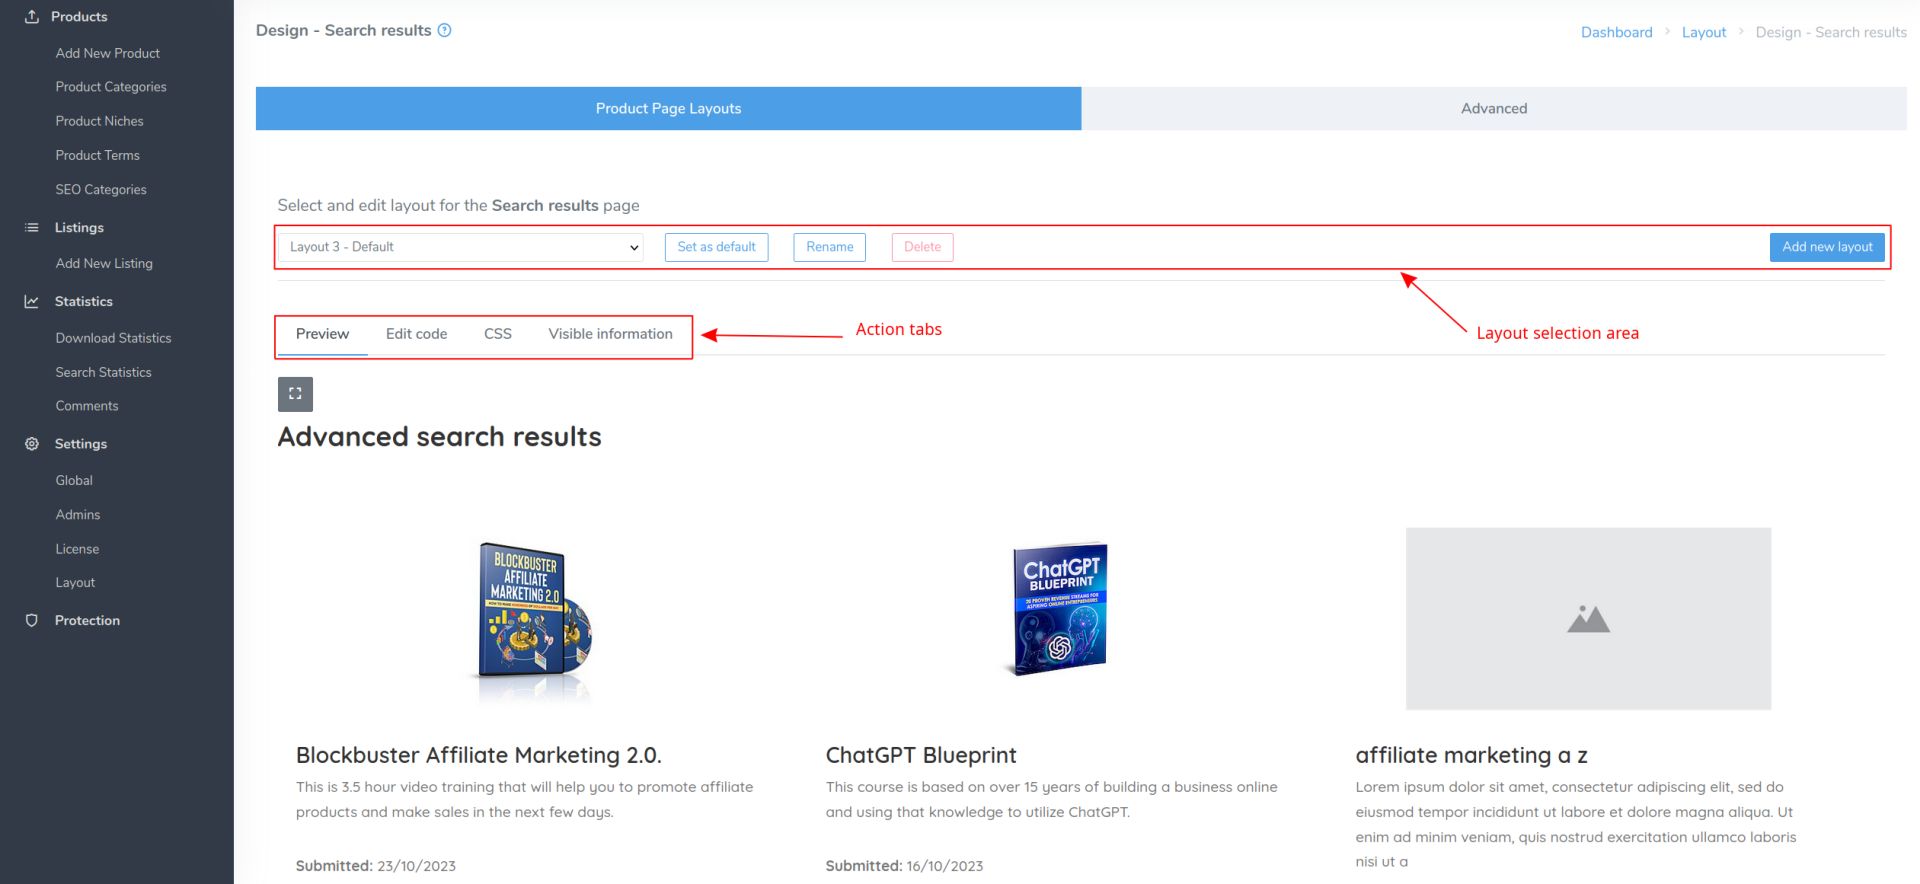
You can learn more about layouts and layout areas at the "Website look and feel" section, under the "Product Page Layouts" sub-section.
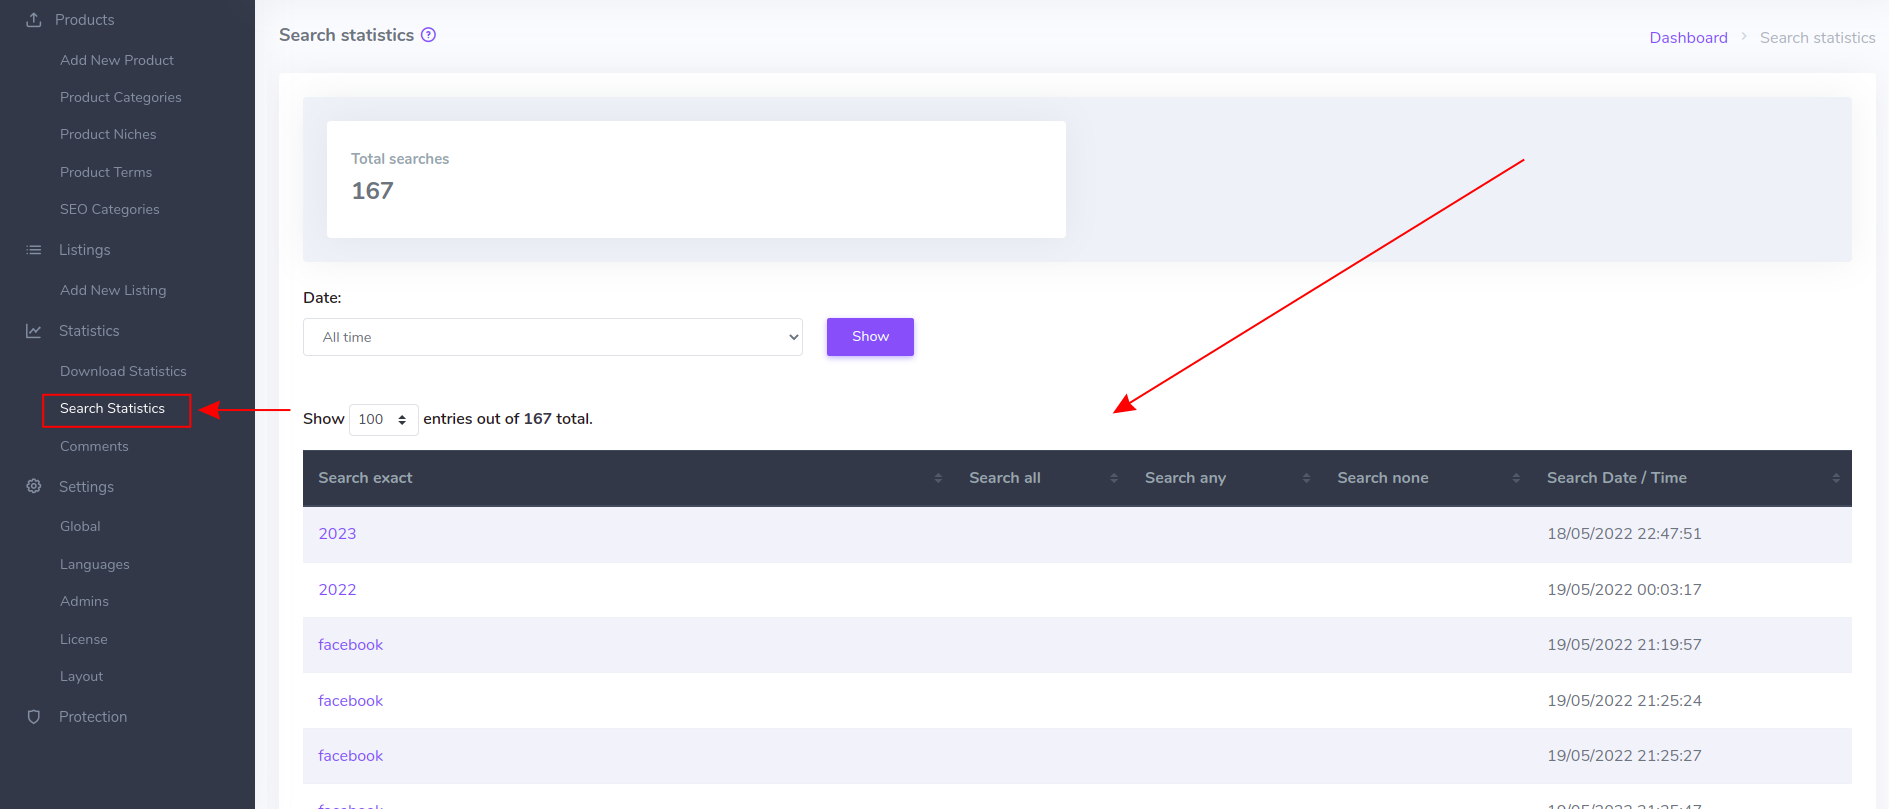
Search statistics can be seen on plr.pub administration page if you click "Statistics / Search Statistics" sidebar menu. There you can filter the stats based on time, and search keyword.
Product sidebars are used to add a product listing at the page's sidebar. For example, if you wish to show the latest or some featured products on every listing page you can achieve that easily.
There are 2 ways to add product listing to your sidebar, either via the Divi code module or via the WordPress widgets. We'll show you how to do it both ways, but preferred way would be via widgets since they can be defined in one place and then used across your entire website.
1. Divi code module
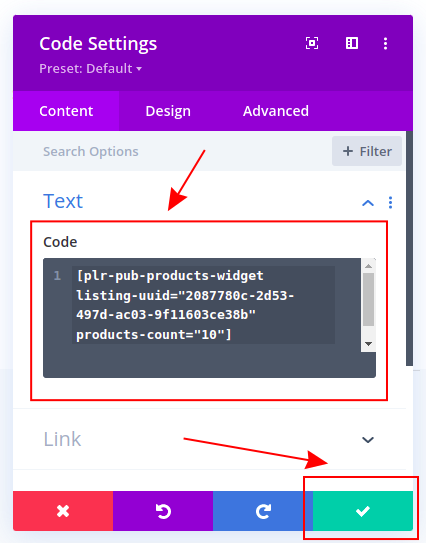
First, you go to the https://plr.pub administration page, and copy the Listing WordPress short code from the Listings page you wish to show in the sidebar.
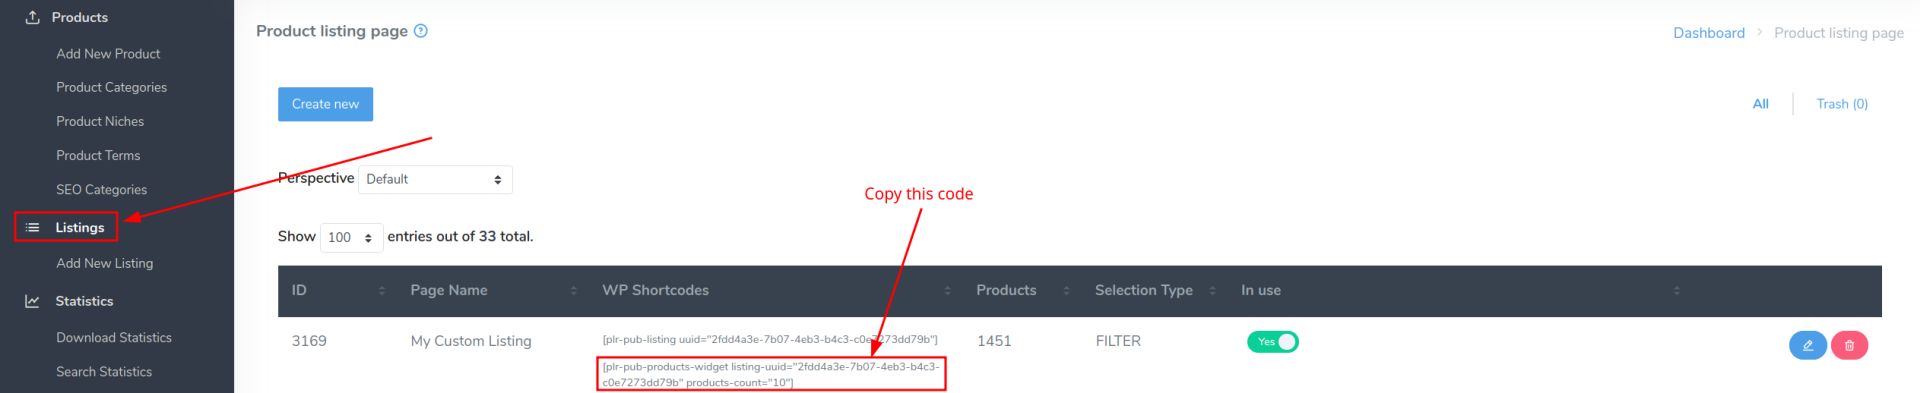
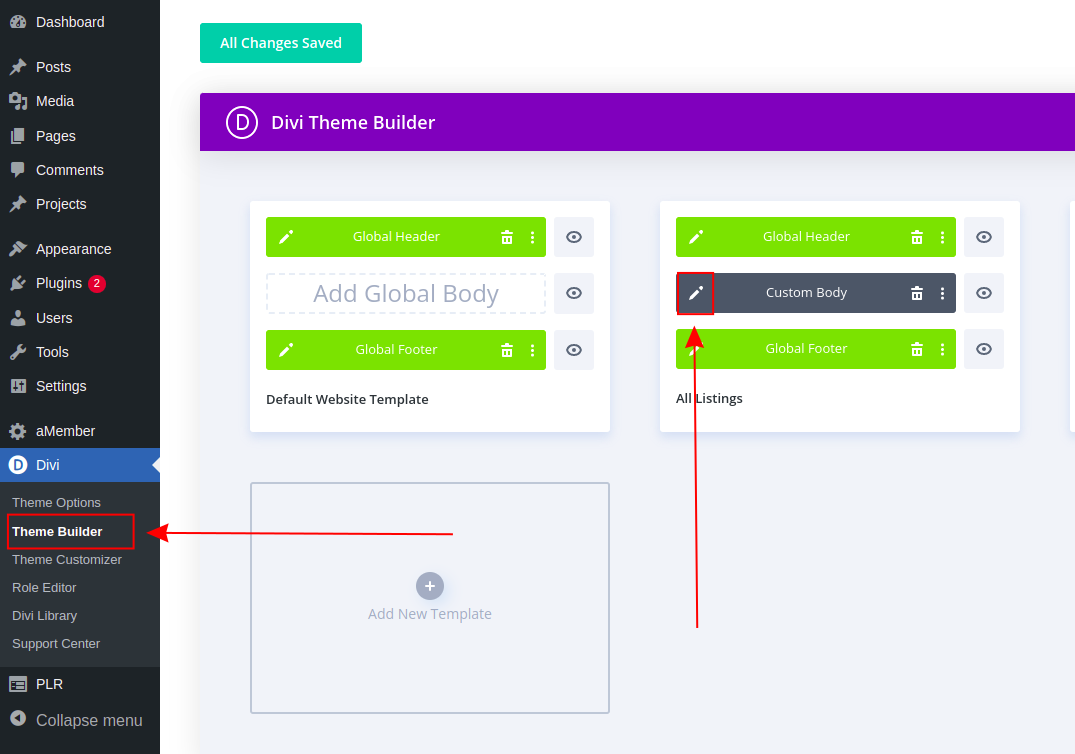
Then you go to the Divi layouts, click on the "Custom Body" edit icon of the "All Listings" layout.
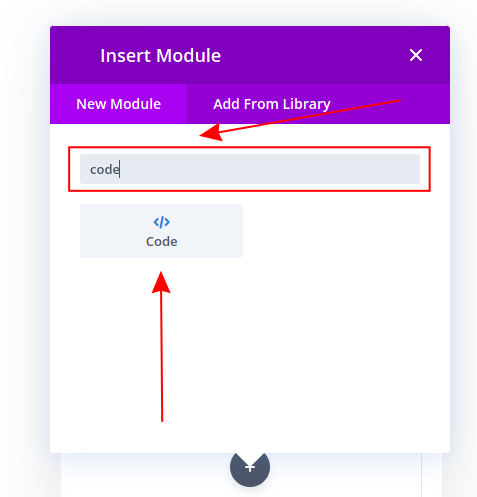
Click on the "Add New Module" plus icon at the bottom of the sidebar menu.
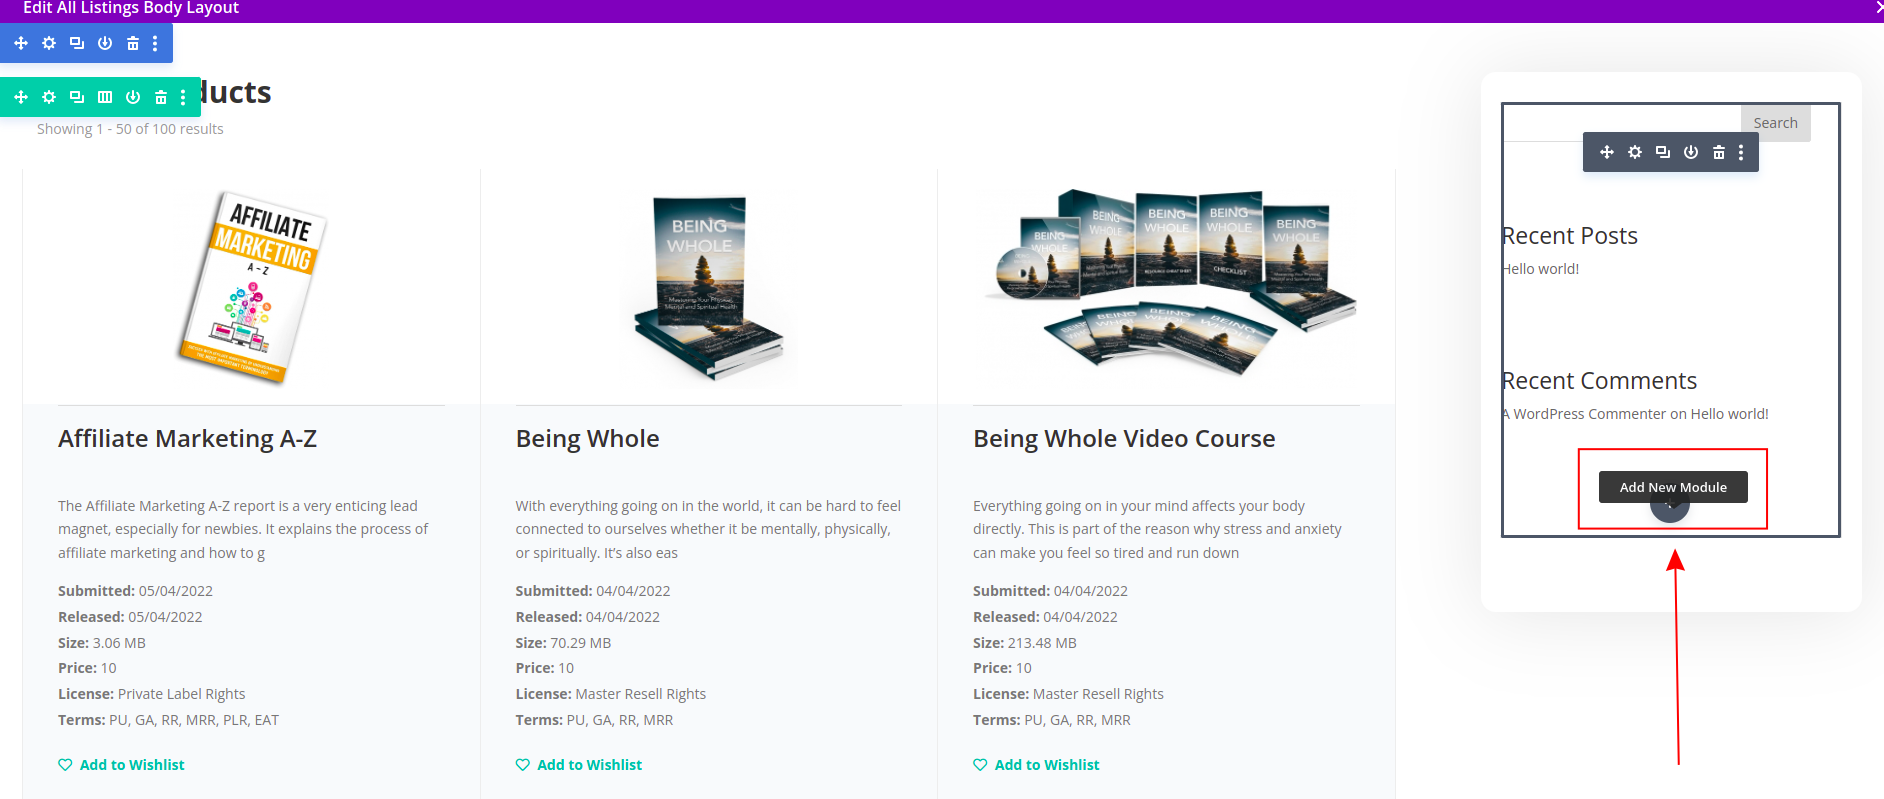
Type in the "code" in the "New Module" search field, and click on the "Code" button.
Now, paste the short code we have previously copied in the first step to the "Code" text box you've opened before, and click apply button.
The sidebar listing will appear below. Don't forget to save the changes by clicking the "Save" button at the bottom right.
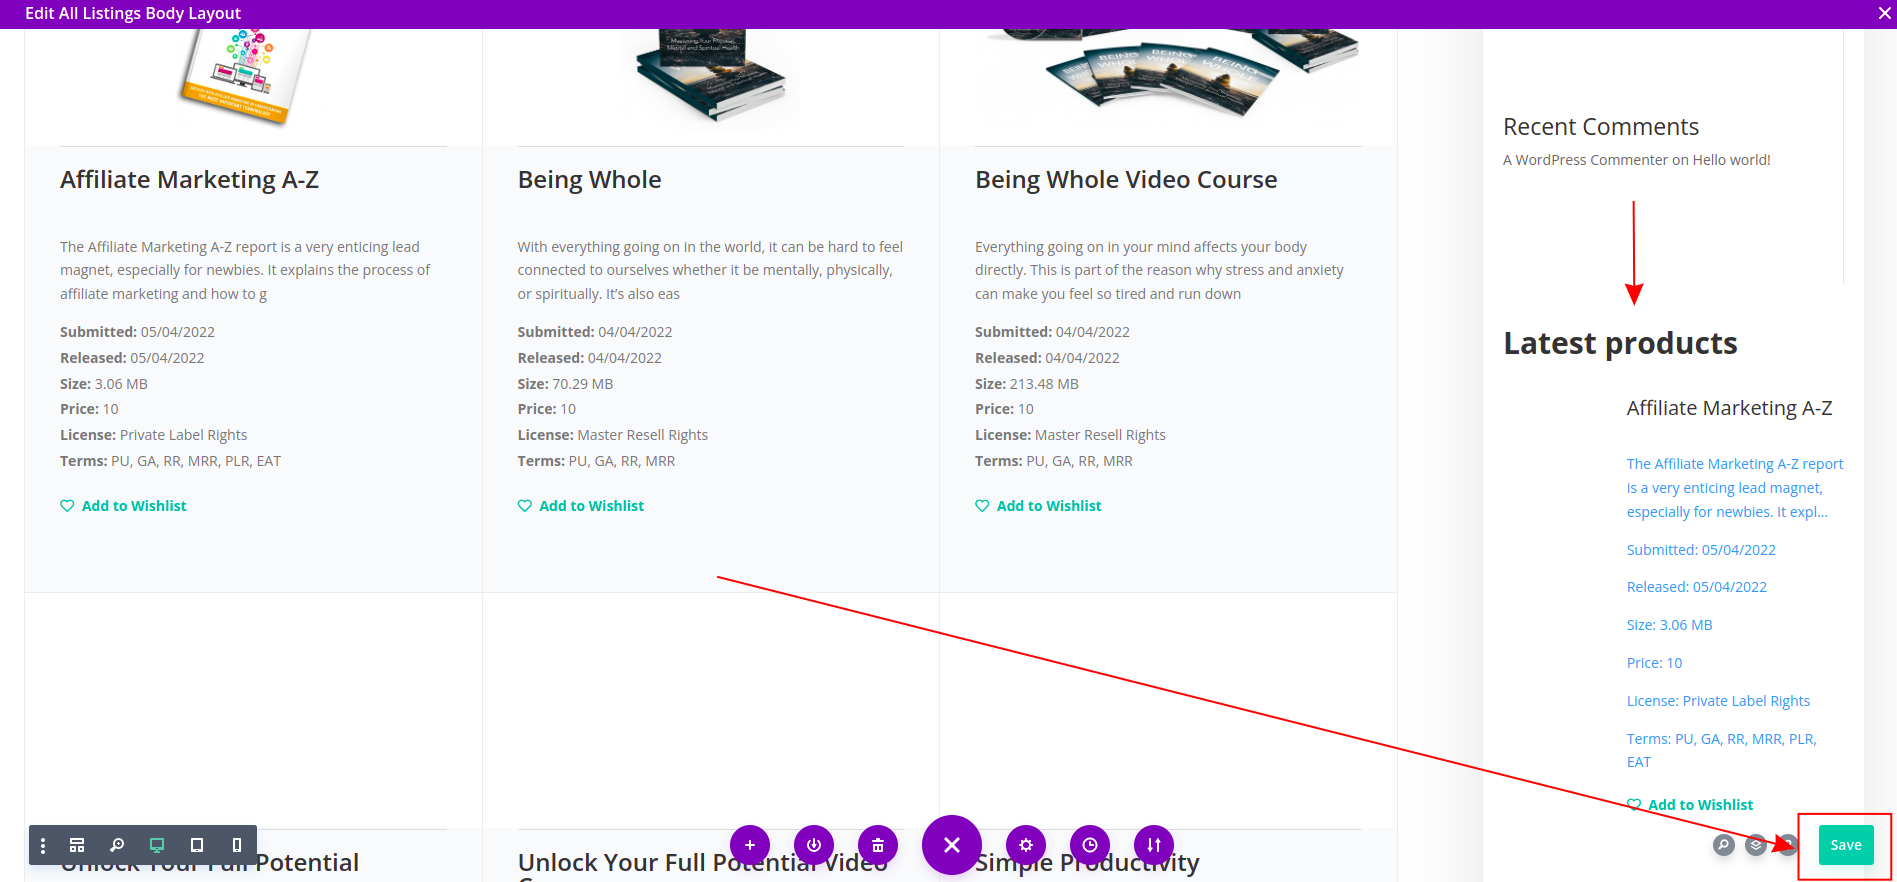
Now, when you open any of your listing pages on the website, the sidebar latest products will be loaded also.

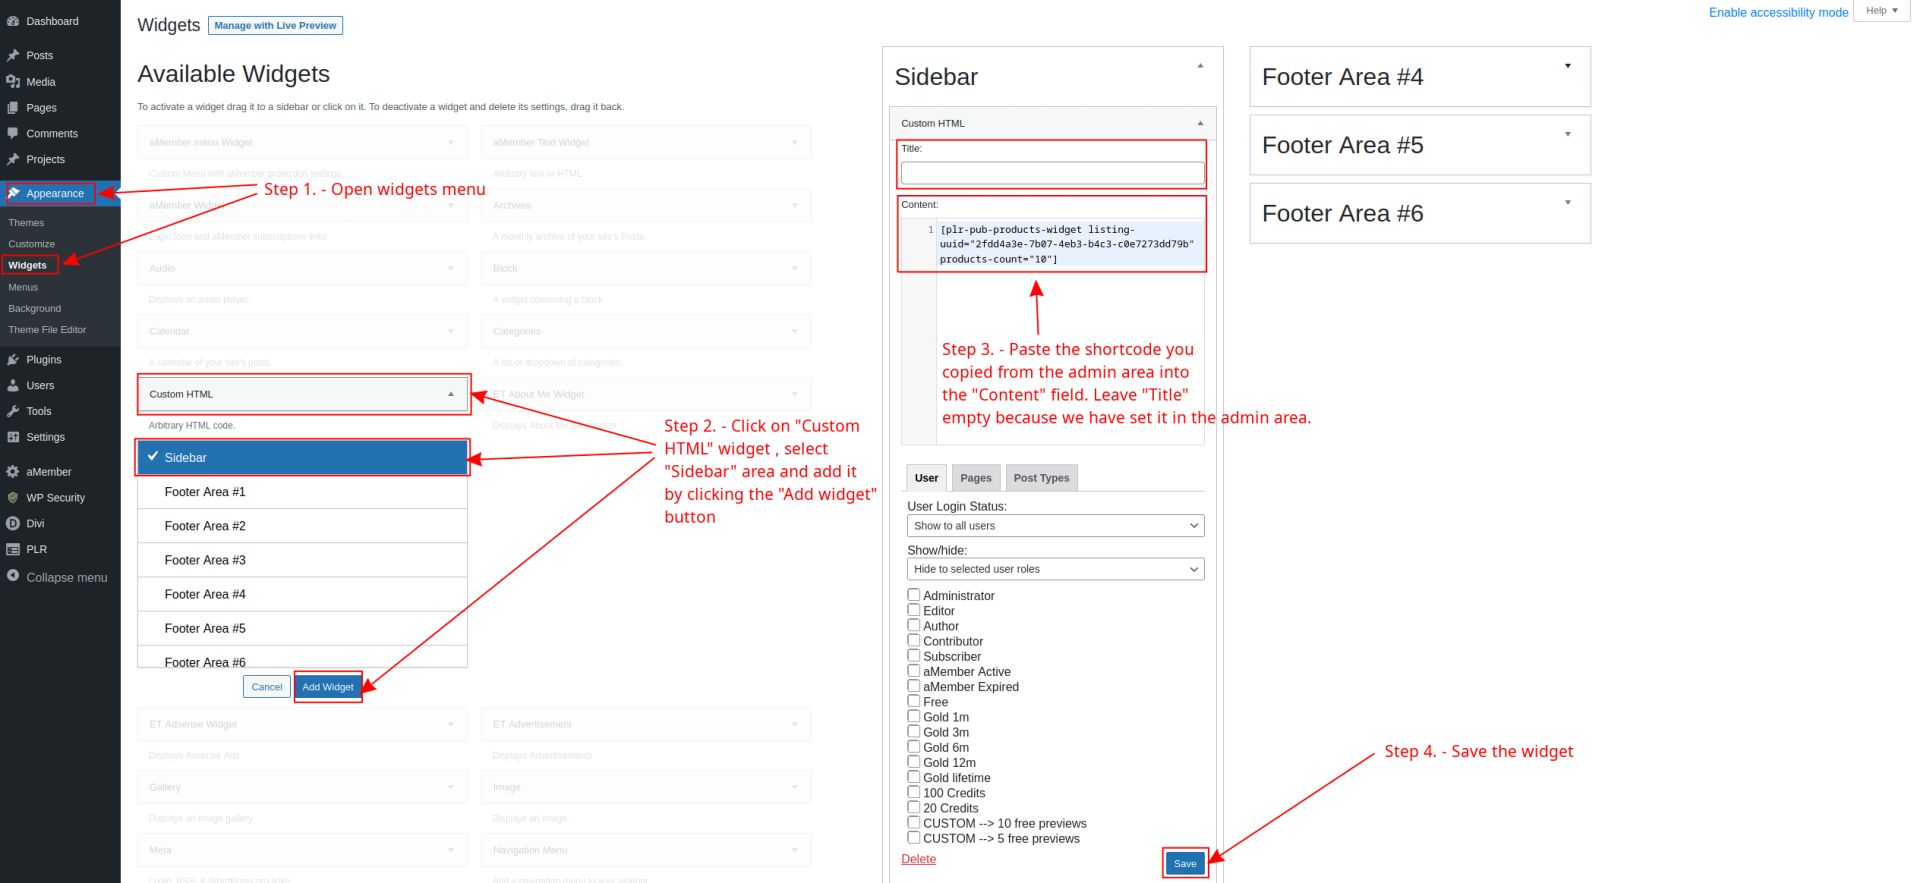
2. WordPress widgets
The beginning of this step is very similar to the first one. You go to the https://plr.pub administration page, and copy the Listing WordPress short code from the Listings page you wish to show in the sidebar.
Then we go to the widgets area in WordPress. Widgets are added by going to the "Widgets" sub-menu under the "Appeareance" menu in the sidebar. We will have to add the "Custom HTML" widget in which we will paste our shortcode we have copied in the previous step. To confirm the changes, click on the "Save" button.
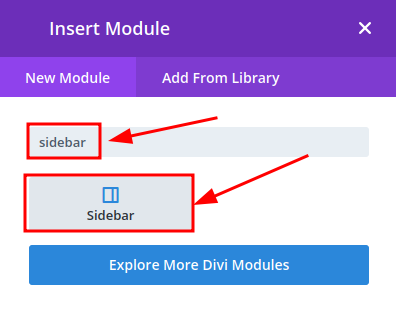
Then you go to the Divi layouts, click on the "Custom Body" edit icon of the "All Listings" layout.
Then you click on the "Add New Module" plus icon at the bottom of the sidebar menu.
Type in the "sidebar" in the "New Module" search field, and click on the "Sidebar" button.
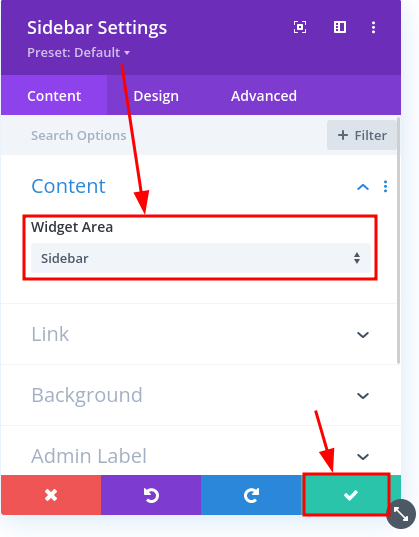
The sidebar listing will appear below. Don't forget to save the changes by clicking the "Save" button at the bottom right.
Now, when you open any of your listing pages on the website, the sidebar latest products will be loaded also.
Those are the two ways you can add products to the sidebar of your website. They both have their pros and cons and it's up to you to decide which one you prefer more.
You can change the layout and the information visible on the products sidebar page via the administration page by clicking on the "Layout" sidebar menu entry and then clicking the little pen icon next to the "Product sidebar" layout area.

Just like in other areas, you'll be greeted by the main editing screen, which is split between "Layout selection area" and "Action tabs".
In layout selection area, you can select between 3 different layouts already created for you. Each layout can be renamed/deleted, so you can organise them in way it makes sense for you.
To change the currently active layout, click on the "Set as default" button. This will apply the layout.
To add your own custom layout, click on the "Add new layout" button on the right.
Each individual layout has its own set of "Action tabs", which allow you to modify the look and feel of each layout. This means that if you currently have "Layout 1" selected, any changes you make will only be applied to that layout. This allows you to create multiple unique layouts which you can then toggle between with a single button click.
The action tabs currently consist of:
- Preview - a live preview of the changes you're making
- Edit code - here you can edit a source code of a layout. A knowledge of HTML, CSS and Bootstrap is required
- CSS - you can add your own custom CSS here, which will only be applied to the selected layout
- Visible information - show/hide different fields on the listing page
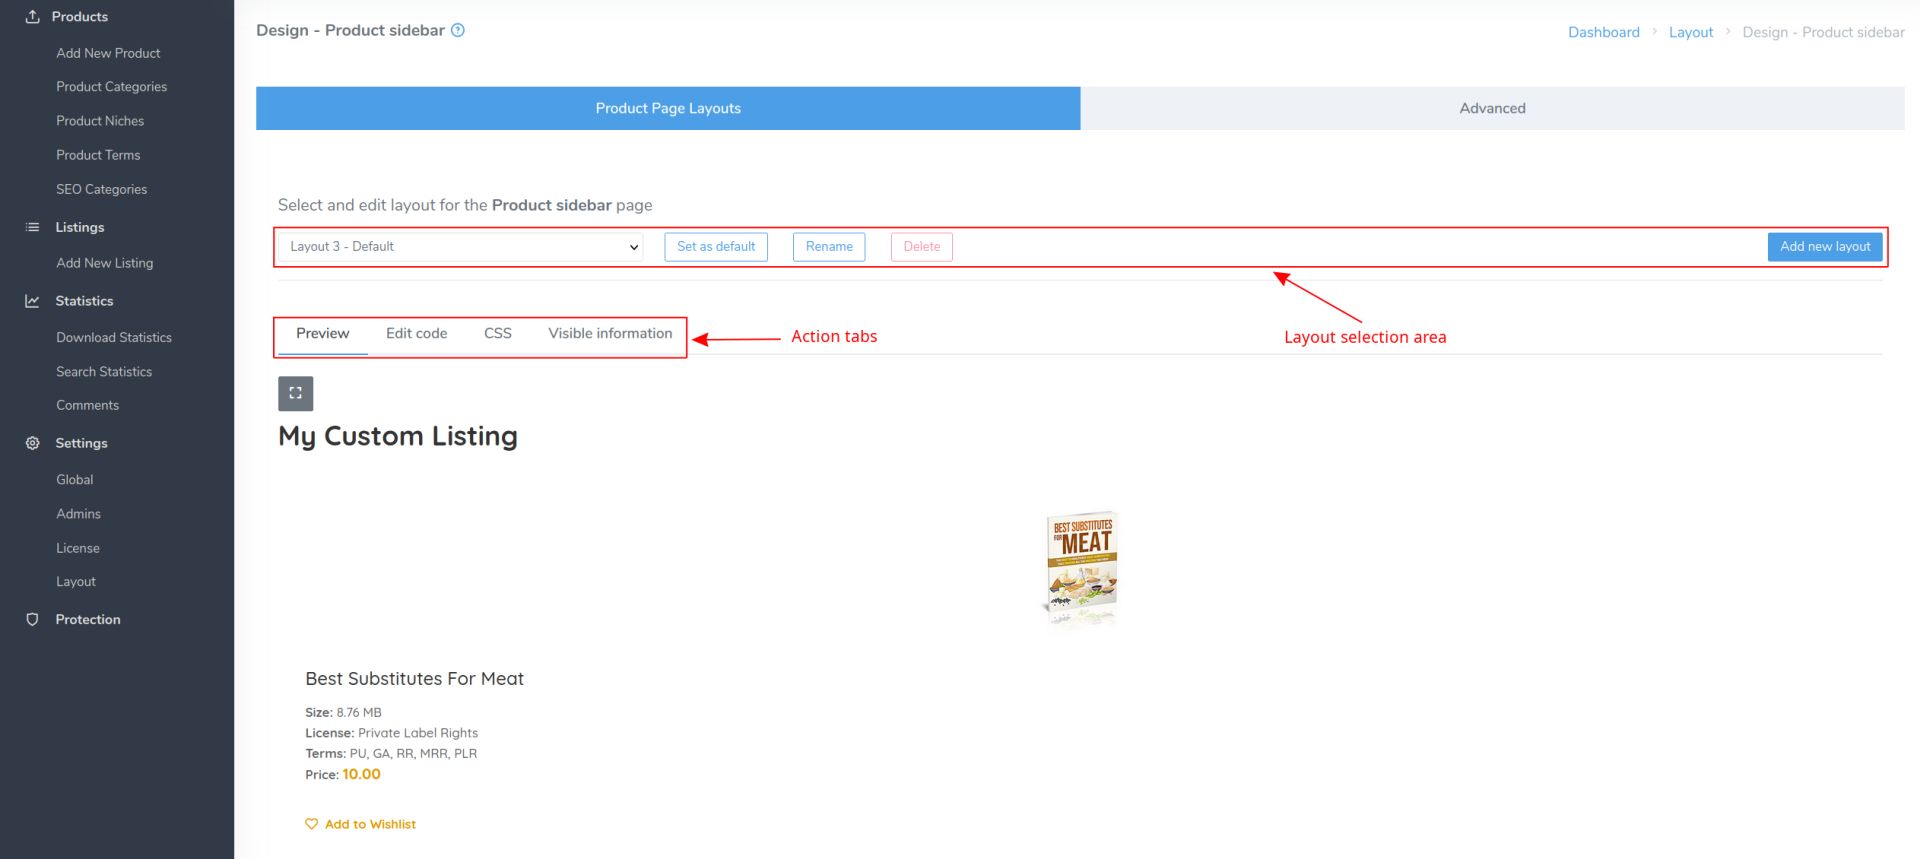
You can learn more about layouts and layout areas at the "Website look and feel" section, under the "Product Page Layouts" sub-section.
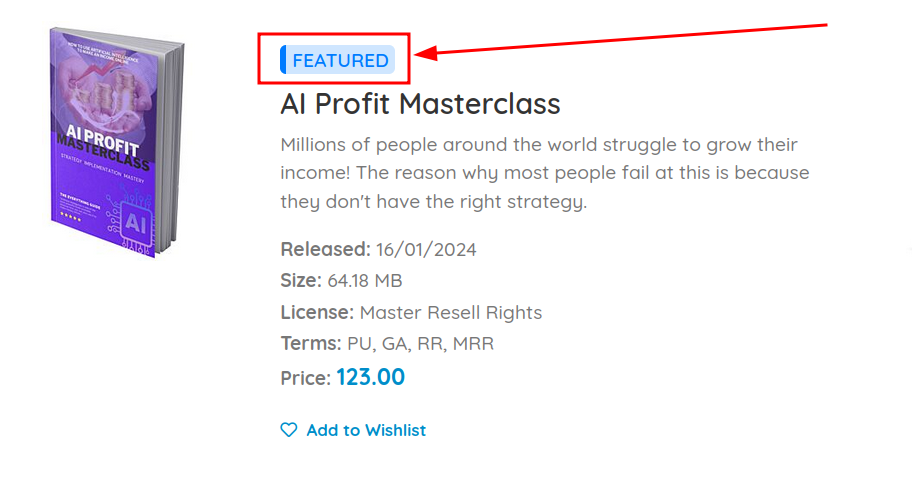
In order to make some of the products stand out a bit more, you have the option to add product tags to any product you want.
There are 3 tags available:
- Featured
- New
- Sale (with the percentage amount)
Each tag gets automatically added to the product when the appropriate options are selected on the product edit page.
To add tags to the product, click on the "All Products" menu entry in the sidebar, then click the "Edit" button next to the product you wish to modify.
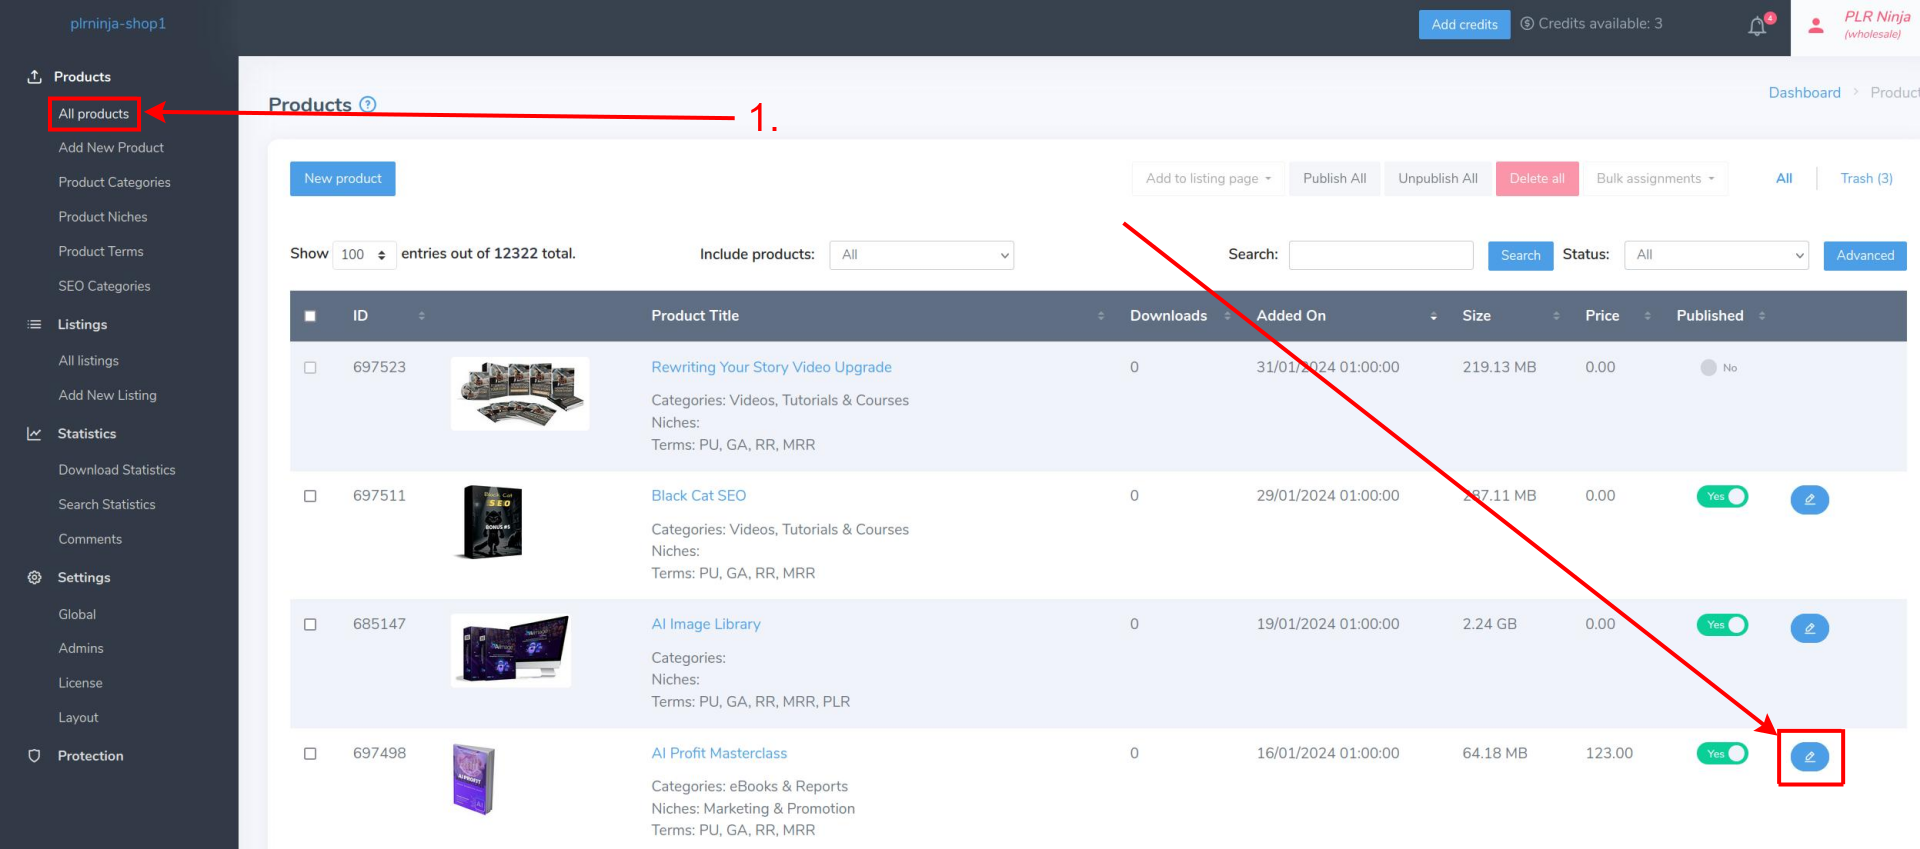
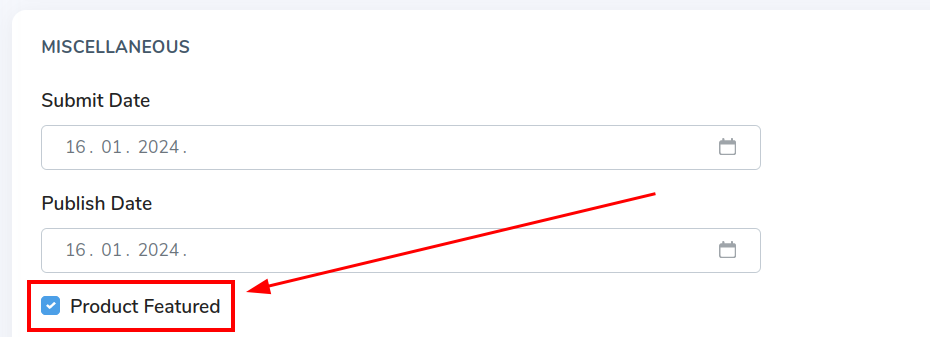
Scroll down to the "Miscellaneous" section and you will see the options that define whether the tag appears or not.
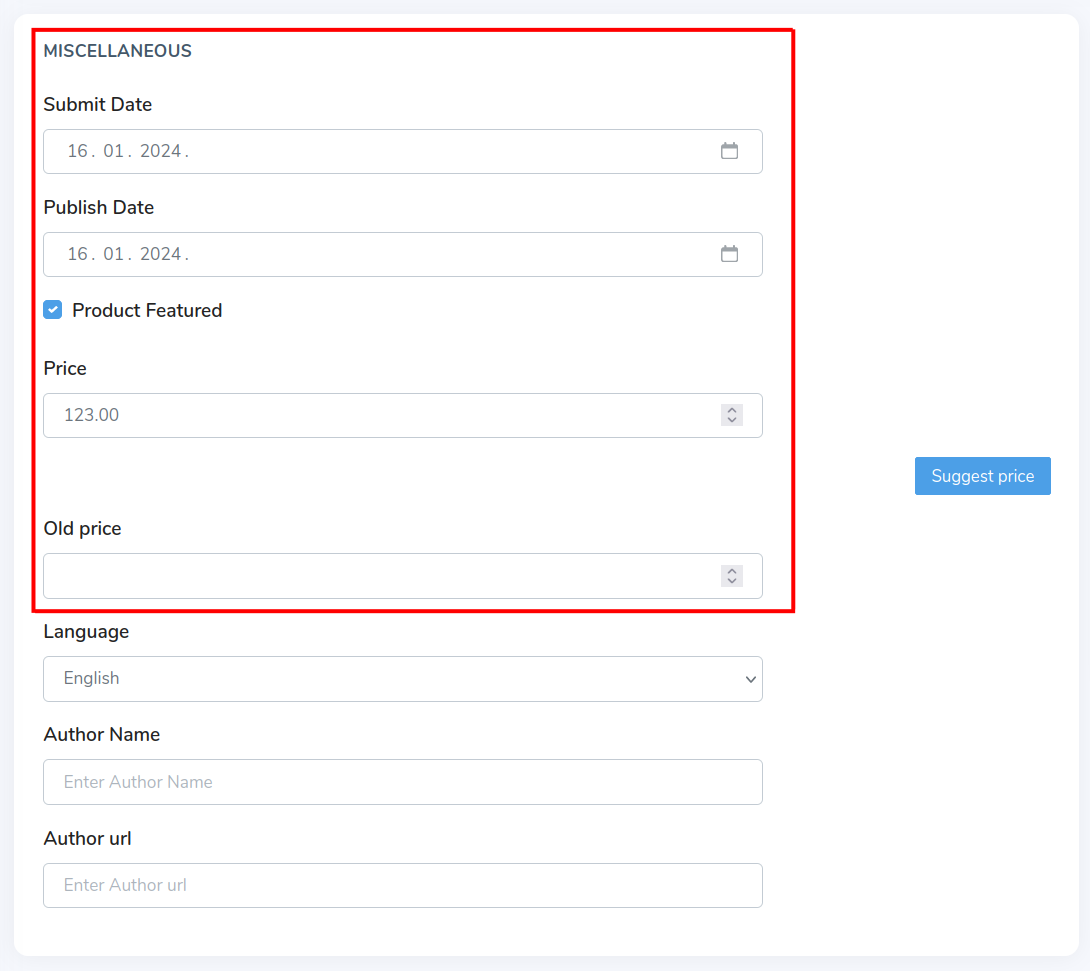
Featured
Featured tag appears on products that have the "Product Featured" checkmark selected. The products that are featured always appear on top of the listing, even before the newly uploaded products.
New
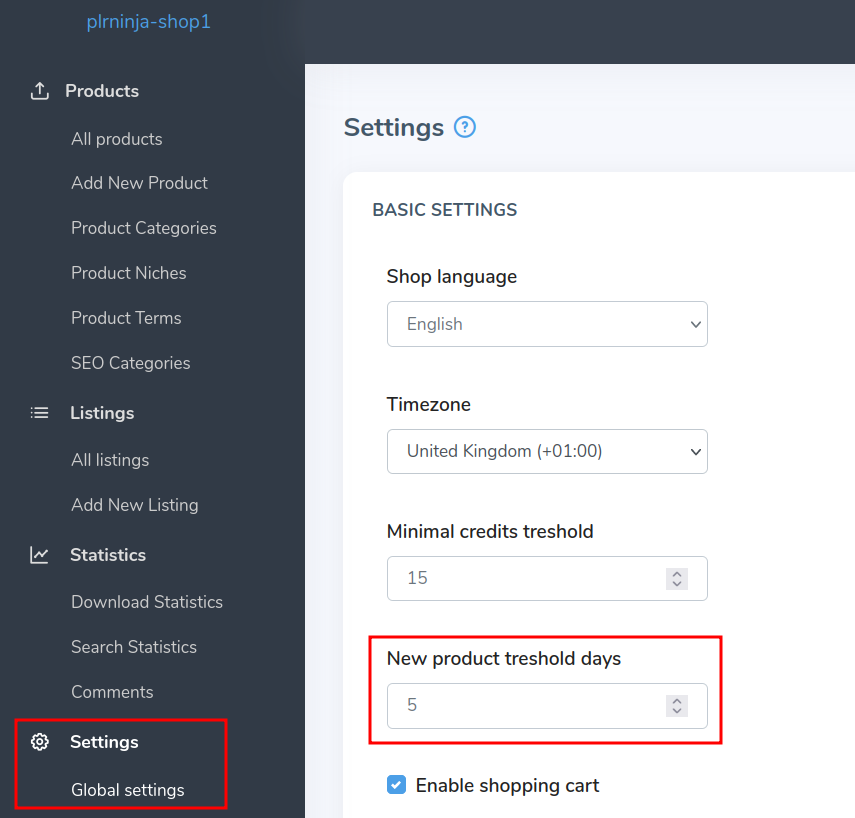
"New" tag is applied to products with a "Publish date" within the specified timeframe, which can be configured via settings.
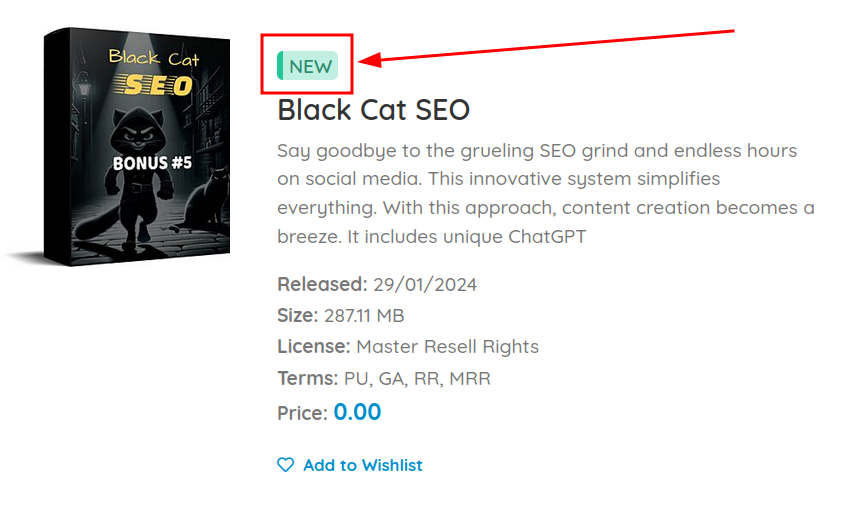
To specify the amount of days for the "New" tag, go to Settings and look for the "New product treshold days" setting.
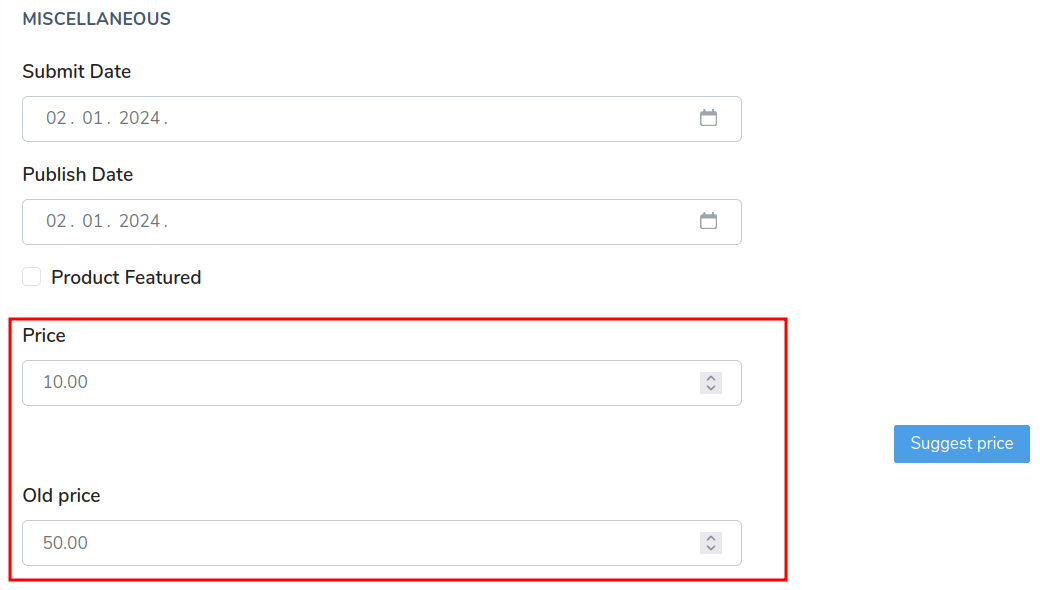
Sale
"Sale" tag appears on products that have both the price and the old price set, where the old price is higher than the current price. It is displayed in the percentage amount.
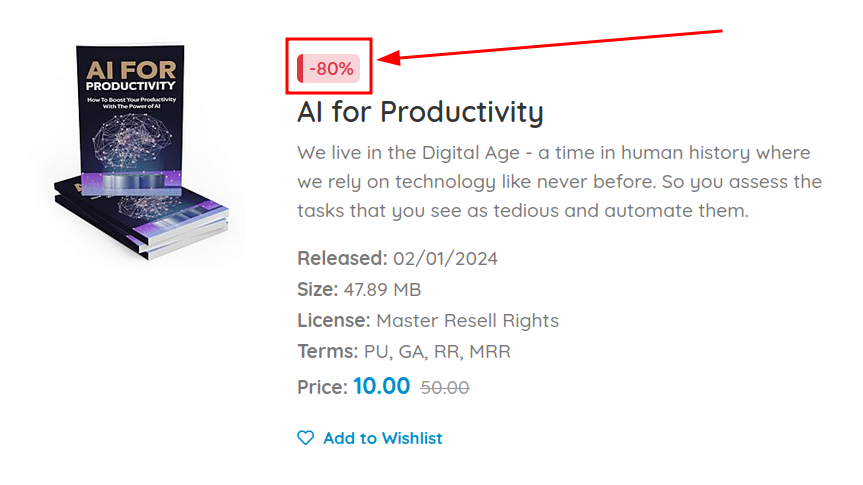
As you can see by the examples above, the product tags are appearing above the product title. That looks fine with layouts where the images are sideways from the content, but what if we want to use the layout that has an image on top of the content?

As you can see, it looks okay-ish, but it's not something we want. We want to put the product tag above the image.
In order to do that, we have to edit the code of the layout area we want to make our changes for. If you're unsure how to do that, it is explained very well in our documentation here, so make sure to check that out.
Once you are inside the "Edit Code" area, you will see the code for the current layout.
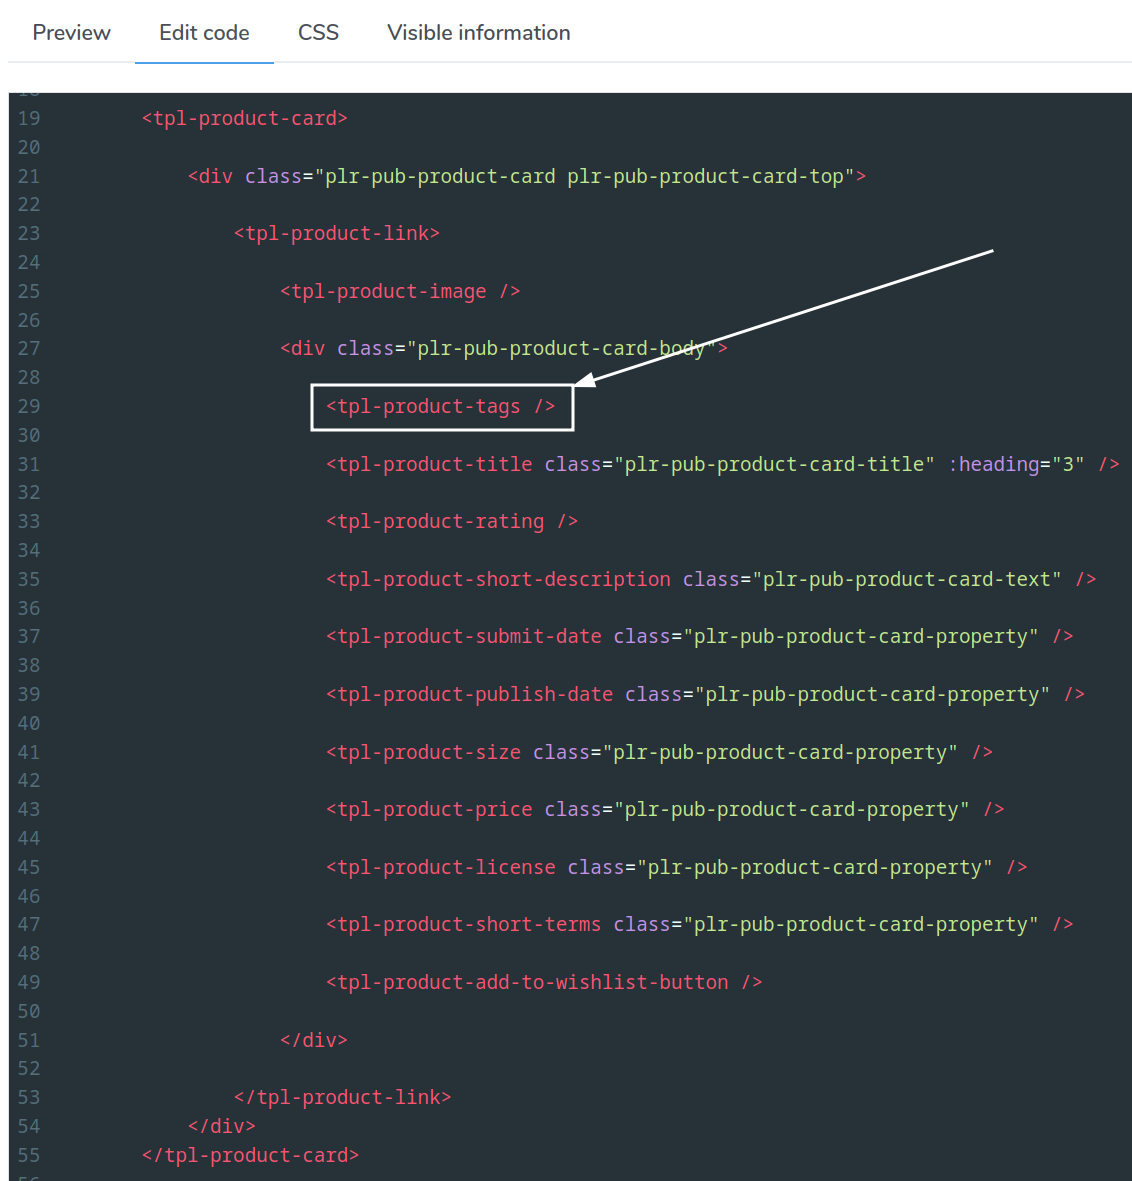
The code shows us that the shortcode for tags is currently positioned above the title. In order for them to appear above the image instead, we simply have to delete the shortcode from the current location and put it above the product image shortcode, like this:
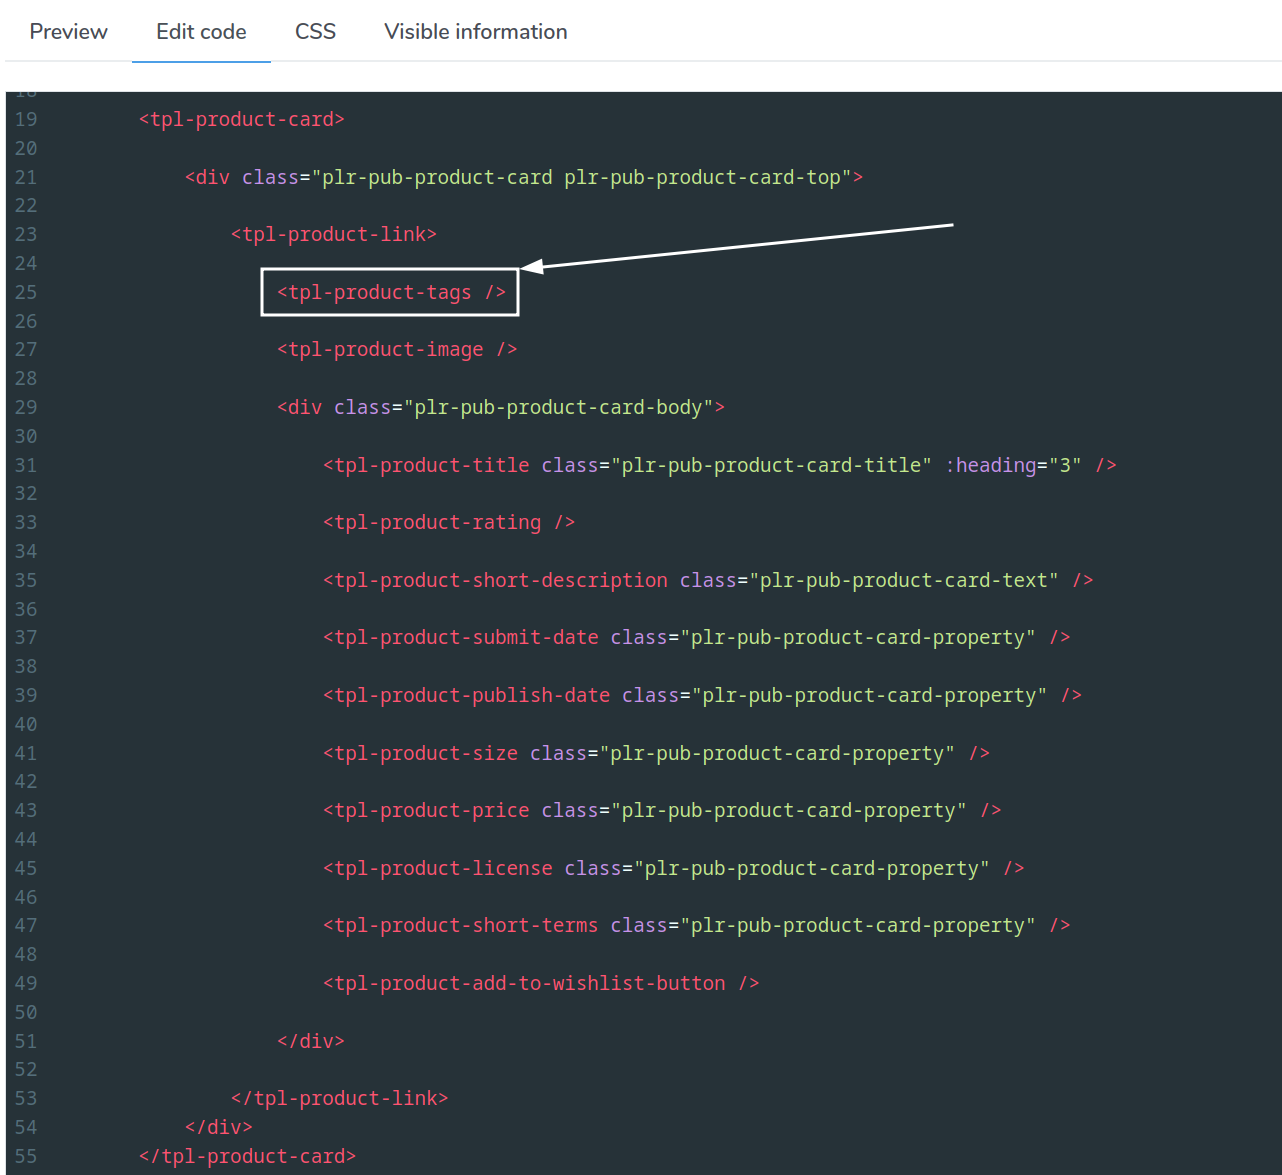
Once you are happy with the modifications, you can save the changes. The tags will now appear above the images.

Users download products from the product details page. They have two ways of downloading the product:
- downloading with a membership subscription
- purchasing a product with credits
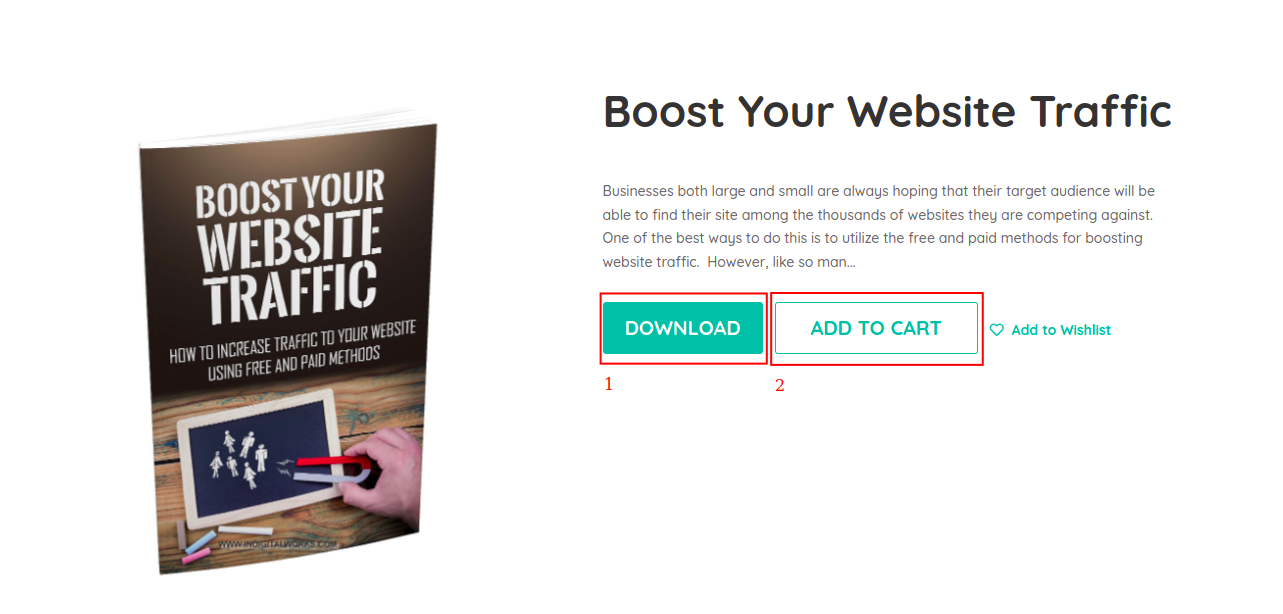
Membership subscription we already covered in the chapter "Creating membership plans". Every user that has a membership subscription can download products that are available for that membership plan. If the product is not available in that membership plan, they can upgrade the membership or they can purchase products using credits.
Purchasing products with credits is the way to download products without a membership plan. Every download costs a certain amount of credits the user must buy before they want to purchase a product. You can define the product price in credits on the product edit page on the plr.pub administration page.

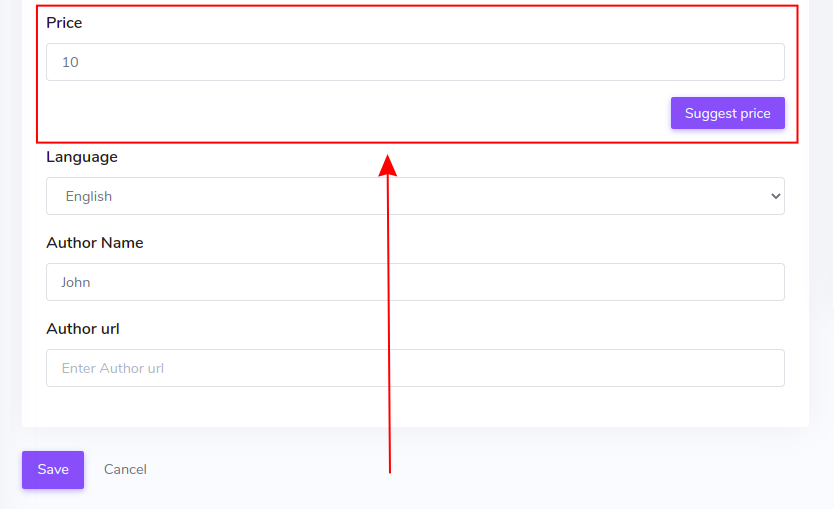
You can enter any integer number for the price. Also, you can click the "Suggest Price" button to use the price suggestion tool that will calculate the price based on certain system criteria like the number of certain file types, number of pages, words, audio/video durations, etc.
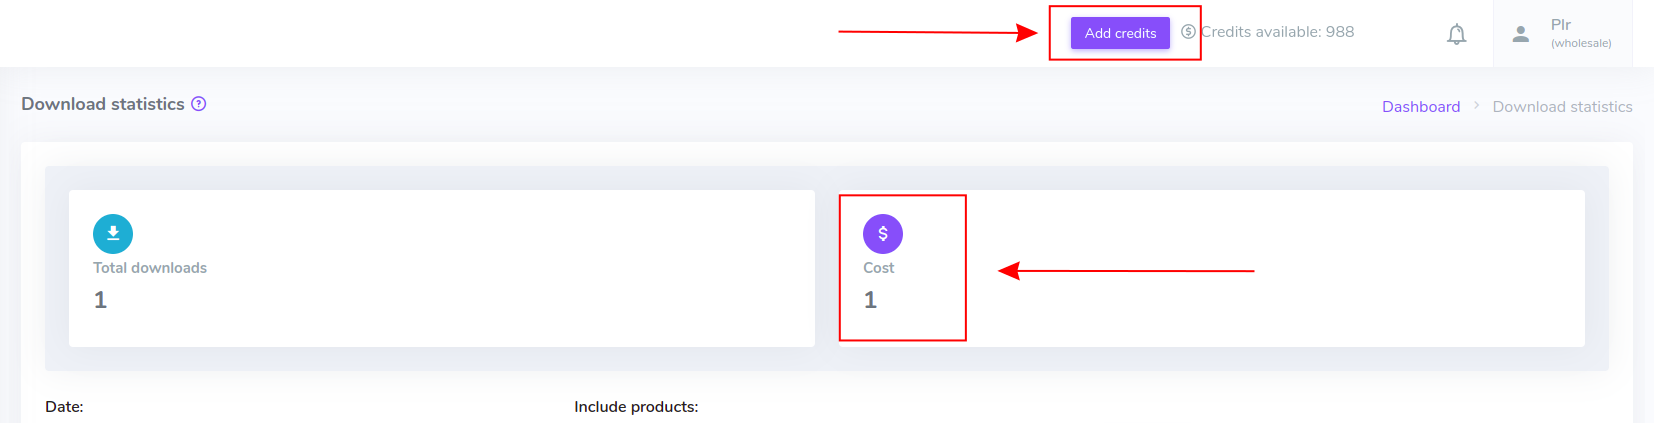
Every user download, wheater a membership or credit based is visible on the plr.pub administration page if you click on the "Statistics / Download Statistics" sidebar menu. There you can filter the stats based on time, use, and product.
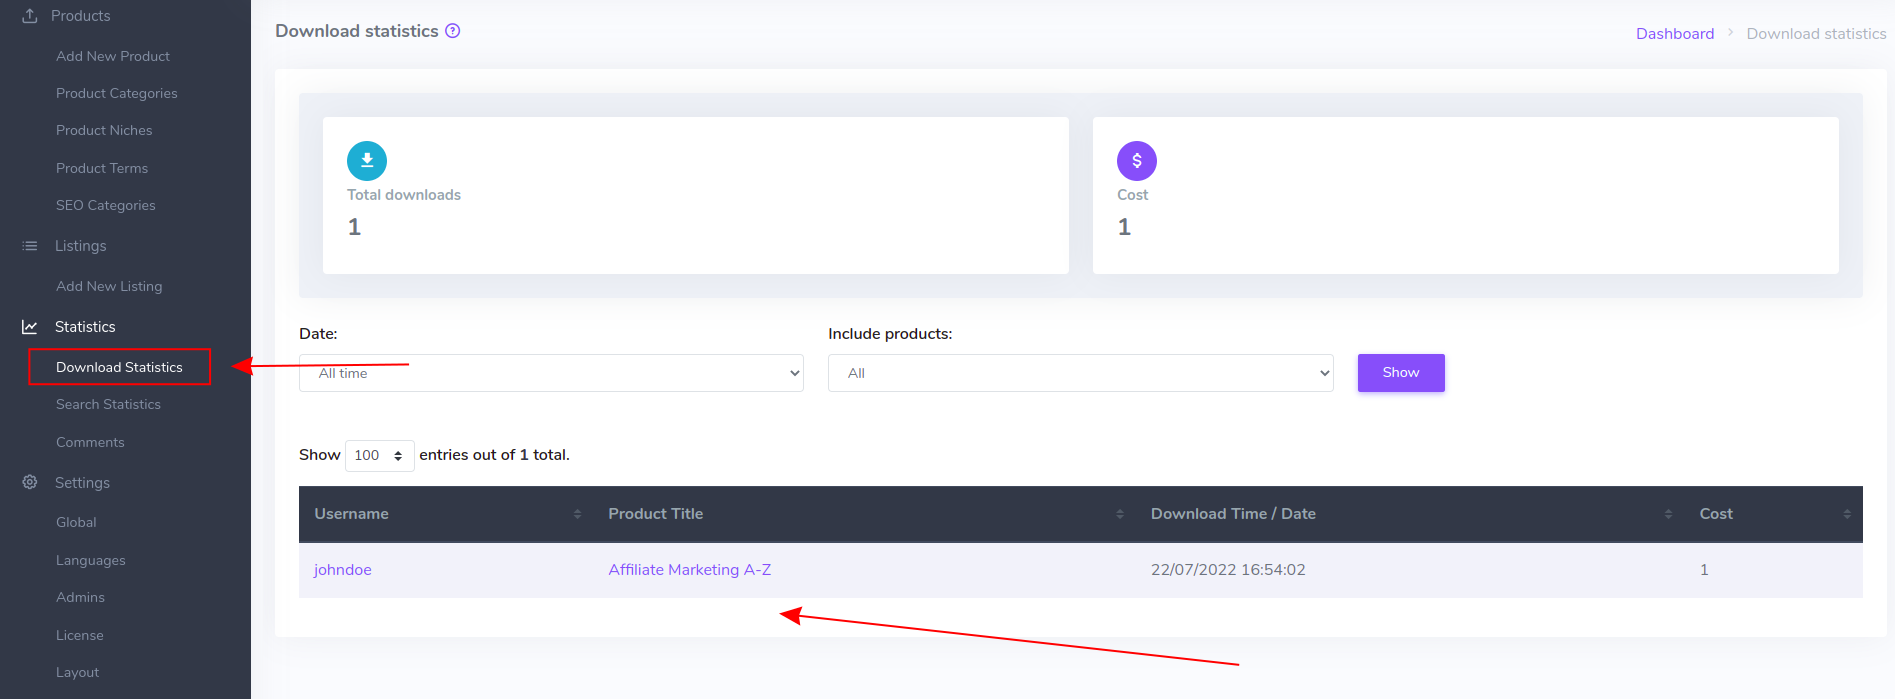
Also, there you can check your total cost in credits for the time period. Every user download costs you one credit. You can add more credits if you click the "Add credits" button in the header.
When the product is being downloaded, a PDF license file is created on demand and put into the ZIP archive. Users can check the license file in the archive after they download it. License files contain information what the user can and can't do with the product. You can also:
- manage how the license header looks like and put your logo
- change the license file font
- add additional text
- add signature row
- create additional "readme" file
License file management is done on the plr.pub administration page if you click "Settings / License" sidebar menu.
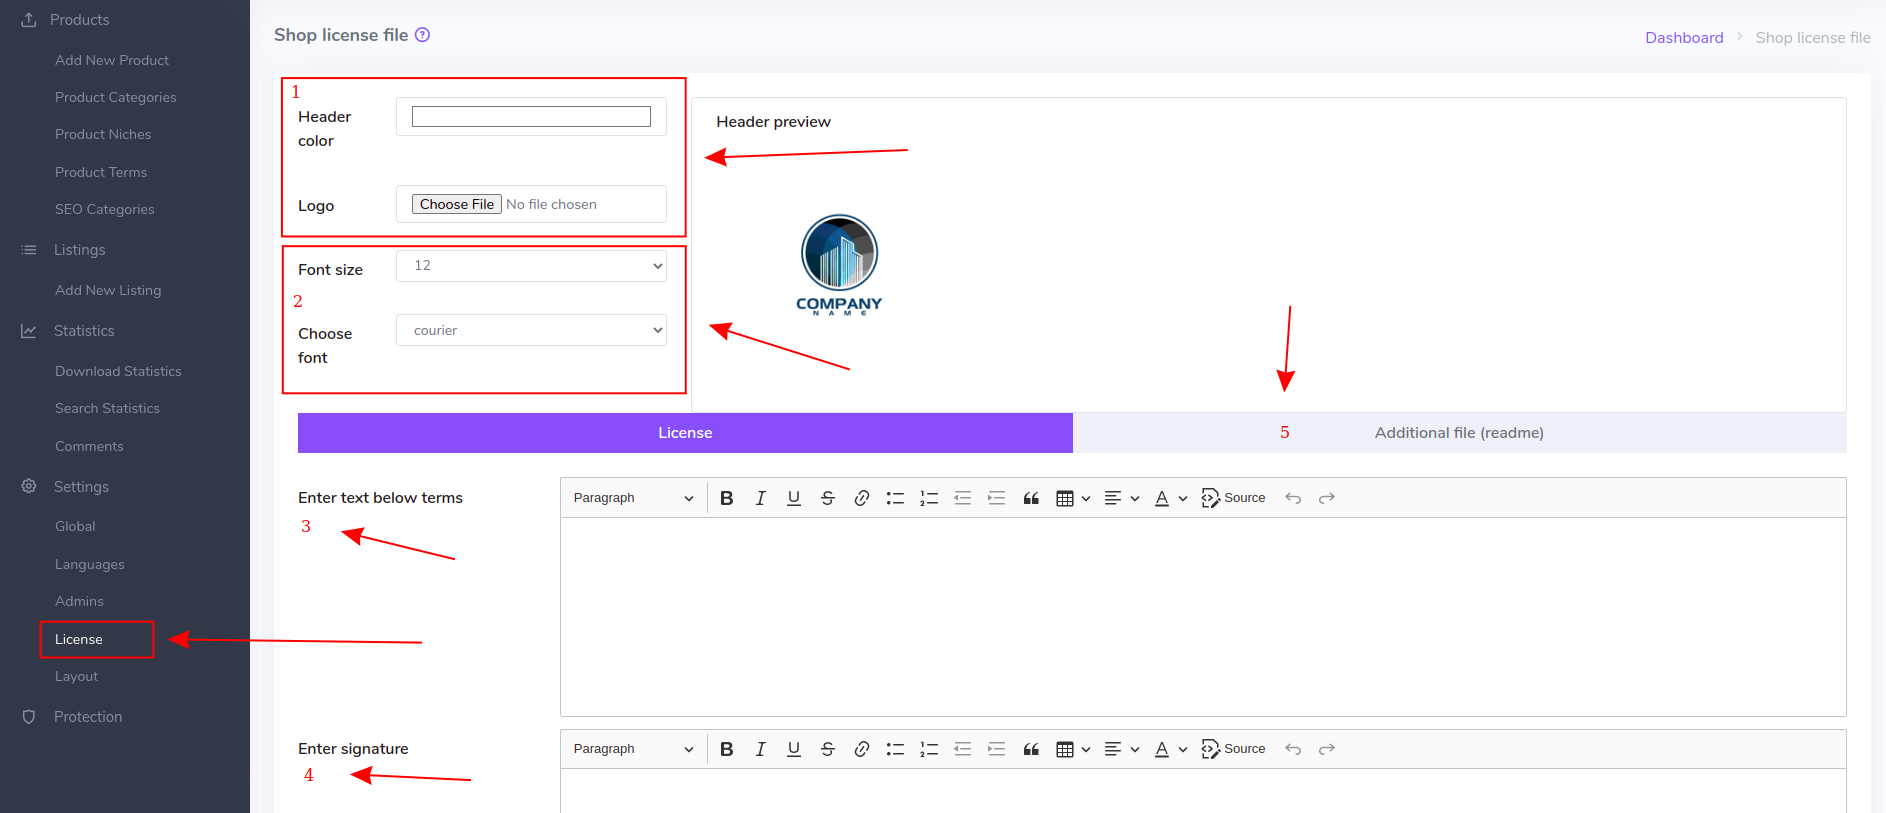
You can check what the license file looks like if you click the "Preview" button.
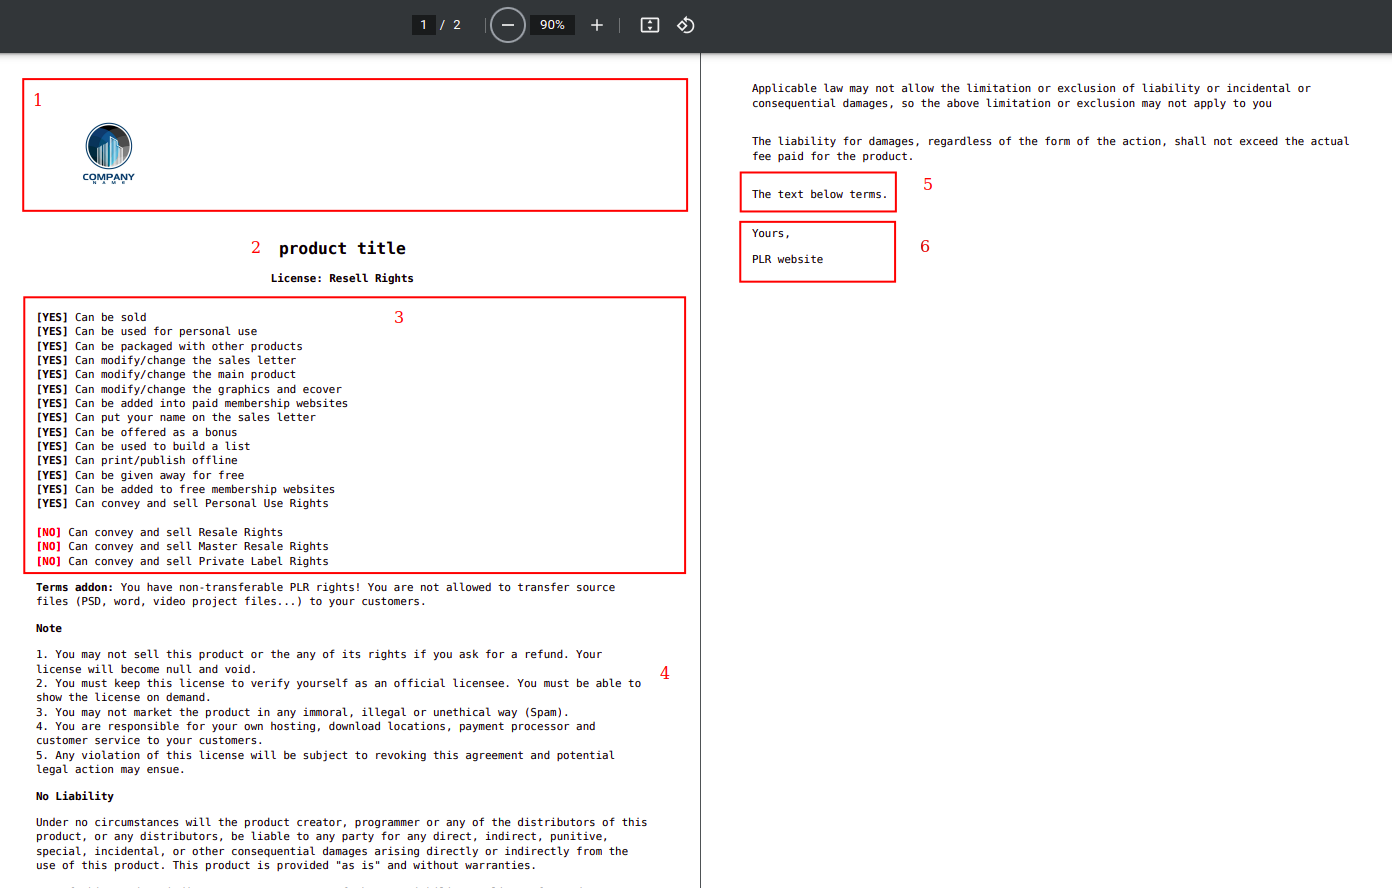
The license PDF file contains the:
- Header - contains the logo and an optional background.
- Product title - represents the product title.
- Product terms - this is the list of what the user can and can't do. It's based on the selection of the terms on the product itself. If you open the product edit page, you can check the terms that are applied to that product. If the term is checked it will appear in the license as a [YES] term, otherwise, it will be a [NO] term. Please check the "Product operations" chapter to see more details on the terms.
- Terms text - this is a text that's always added to the license.
- The text below the terms - this is an optional text that you can add below the terms text.
- Signature - this is an optional signature.
To create an additional "readme" file click on the "Additional file (readme)" tab and enter the file name and file content.
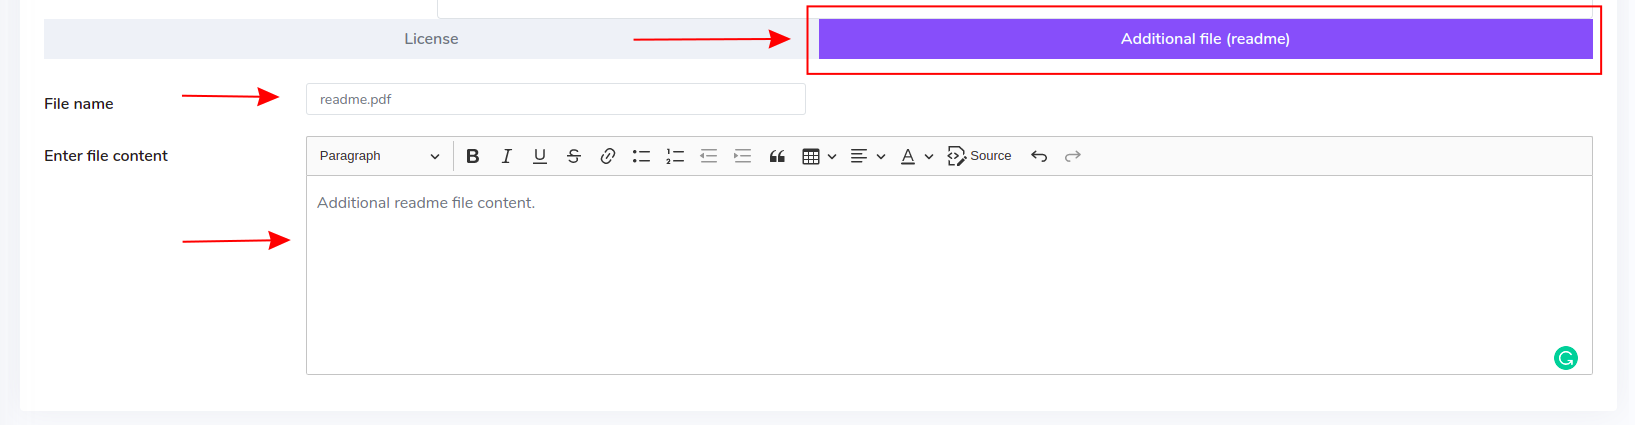
The readme file, just like the license will be put to the ZIP archive on every download.