MemberShops Documentation
Website look & feel
Website look & feel
Website look & feel
Shop logo needs to be changed on 3 places.
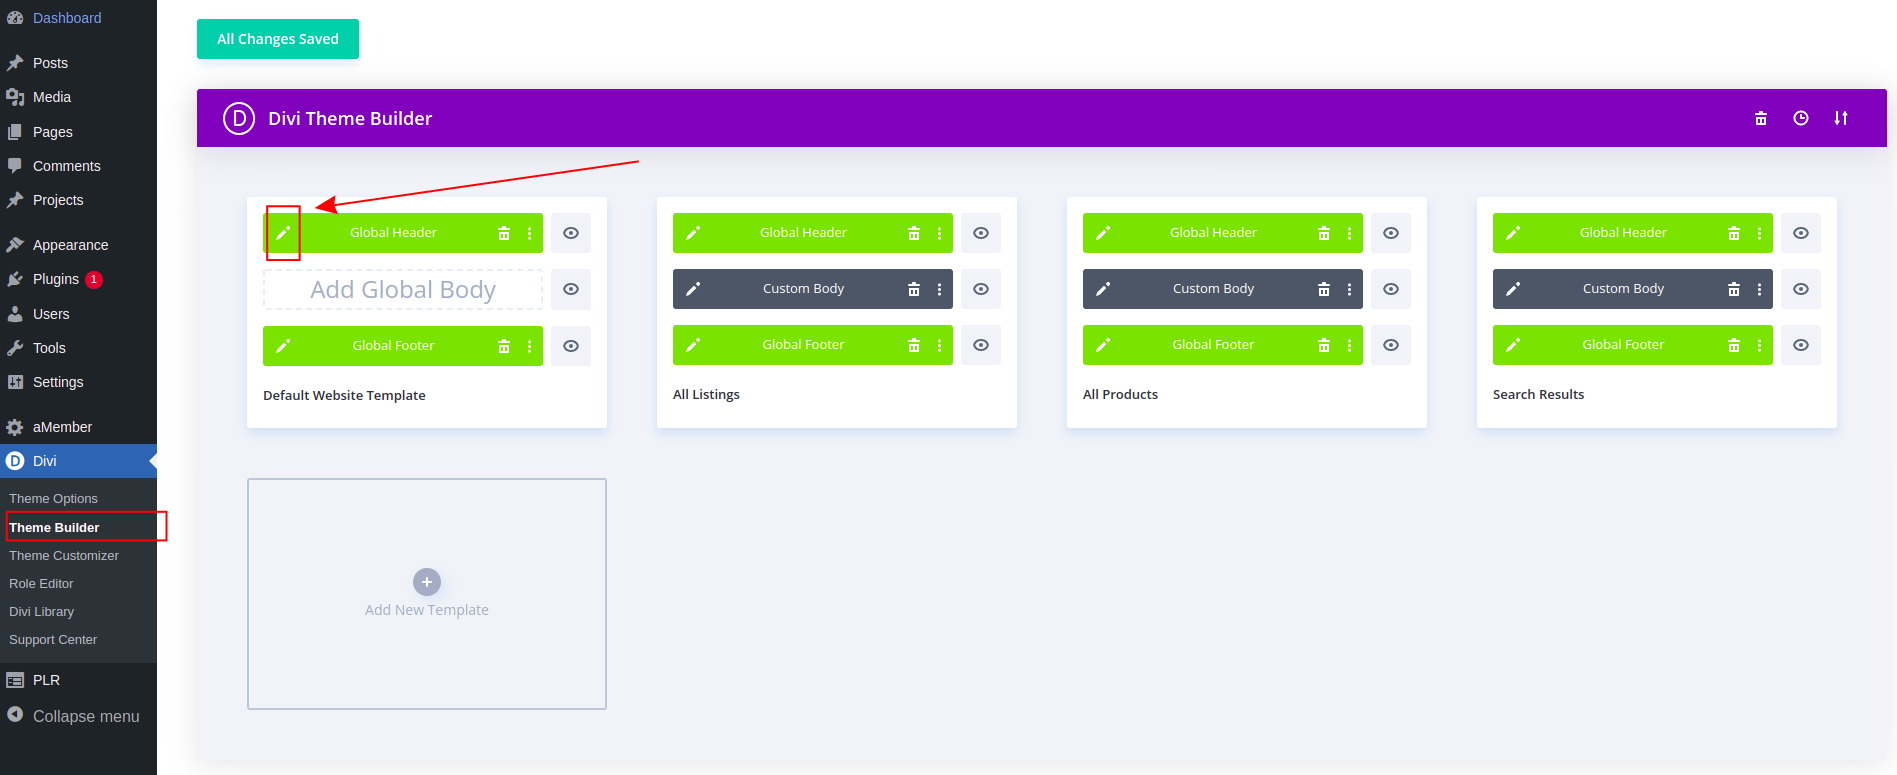
The Membershops plugin uses Divi for building the user interface. The Divi theme will be automatically installed for you during the WordPress plugin installation phase, and the Membershops default theme is a child theme of Divi.
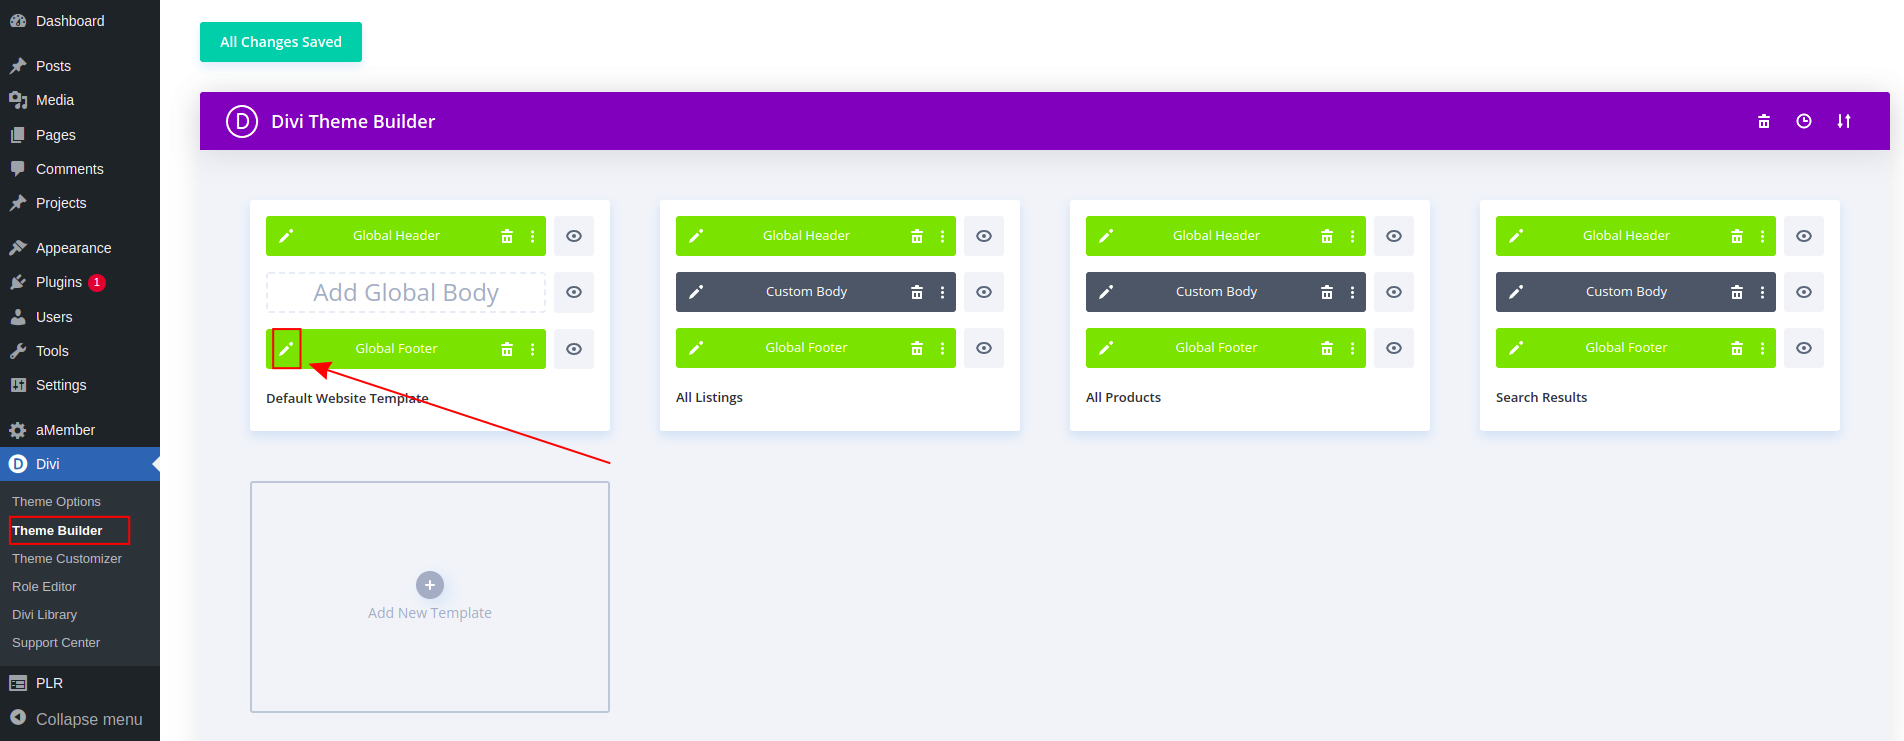
In order to change the website's header and footer, you can open the Divi "Theme Builder" in the sidebar menu. Click on the edit icon next to the "Global Header" template. This will open a Global Header editor where you can change your header for the whole website.
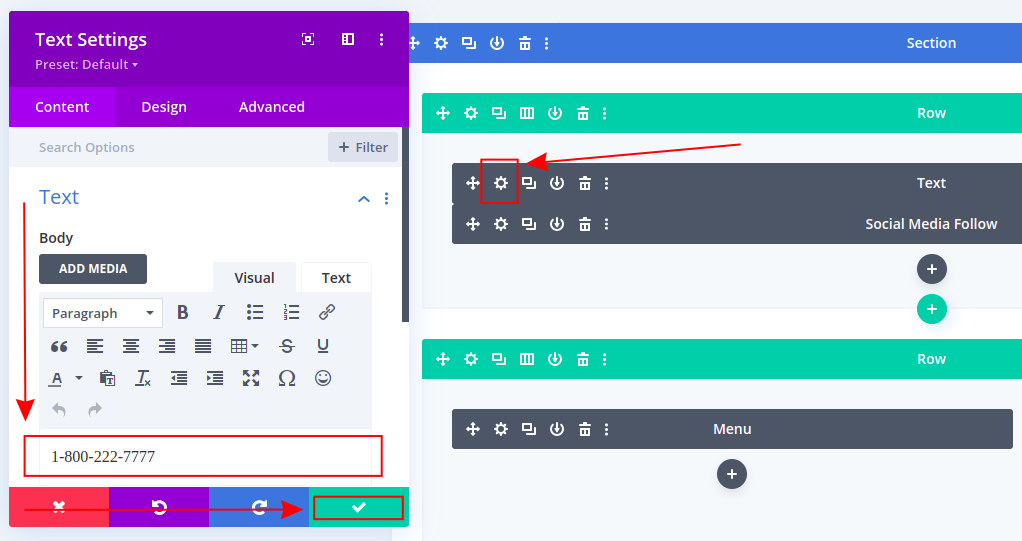
First, click on the "Three dots" button in the middle, then on the wireframe button (image below).
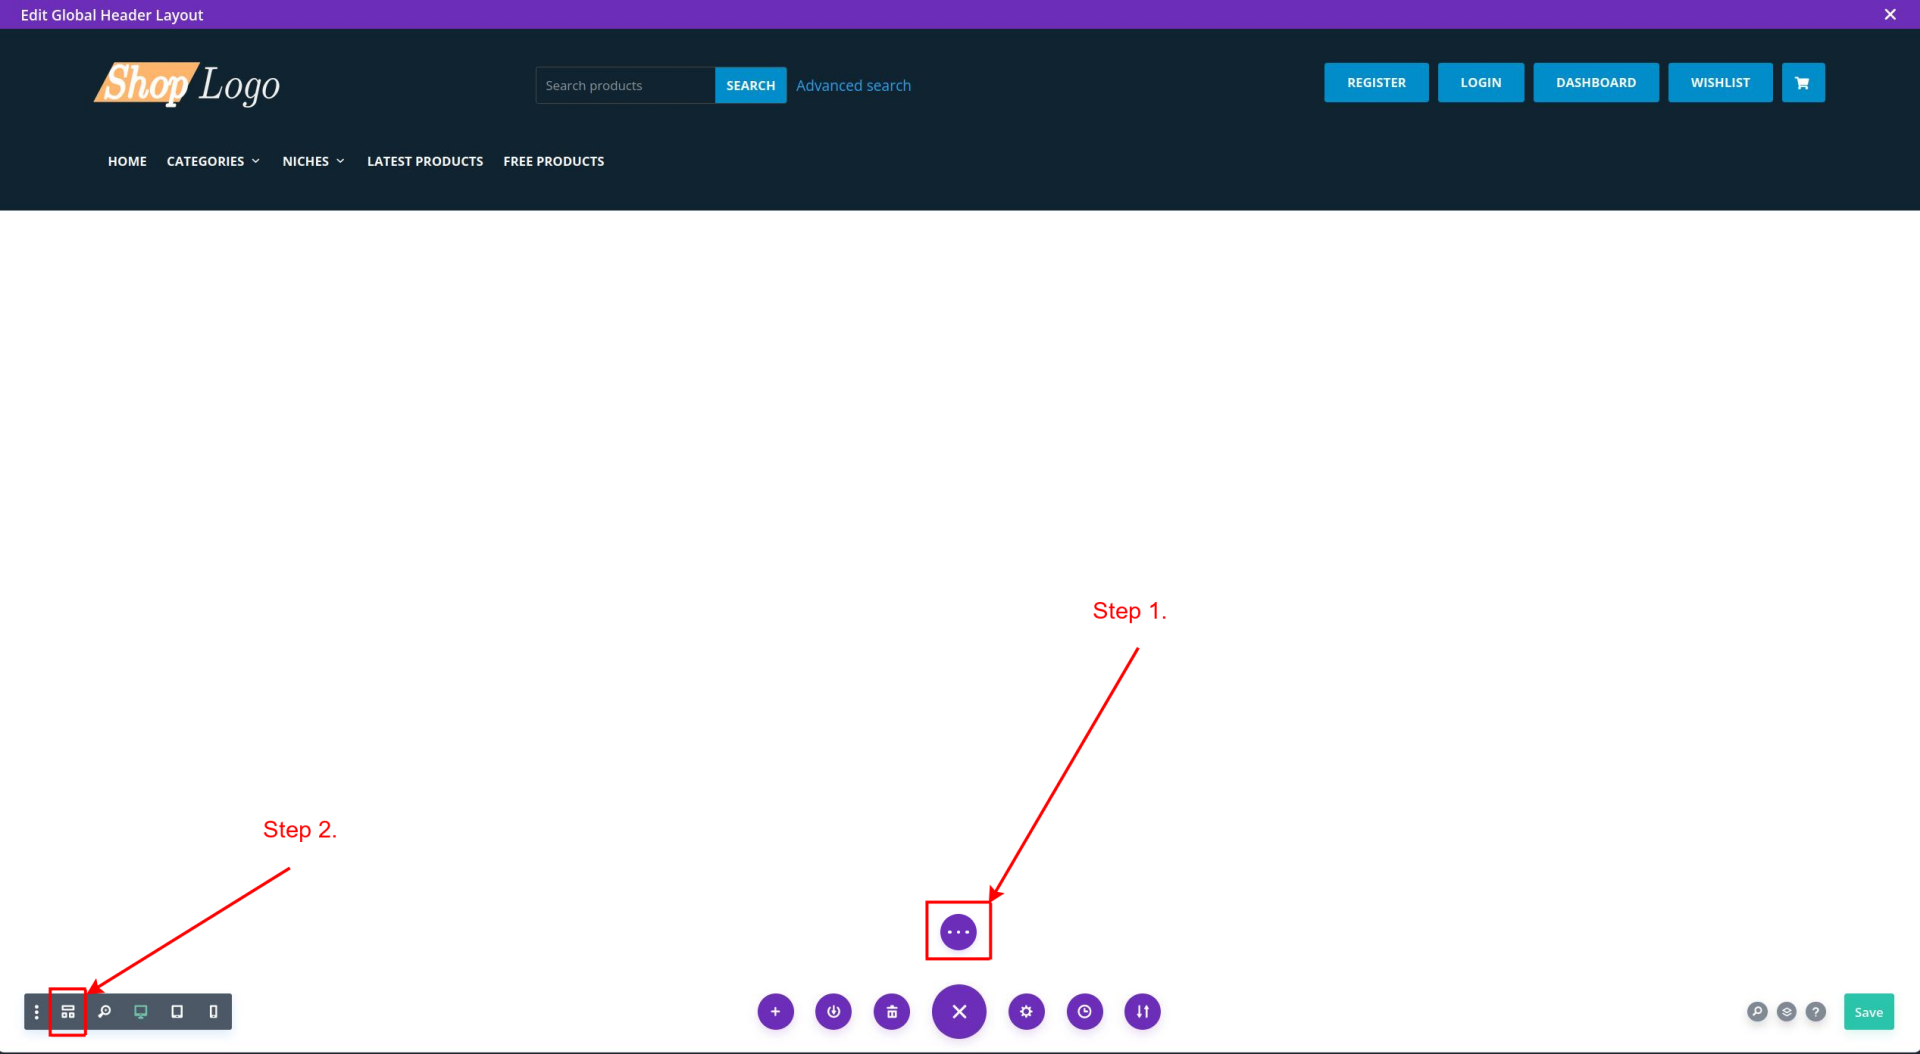
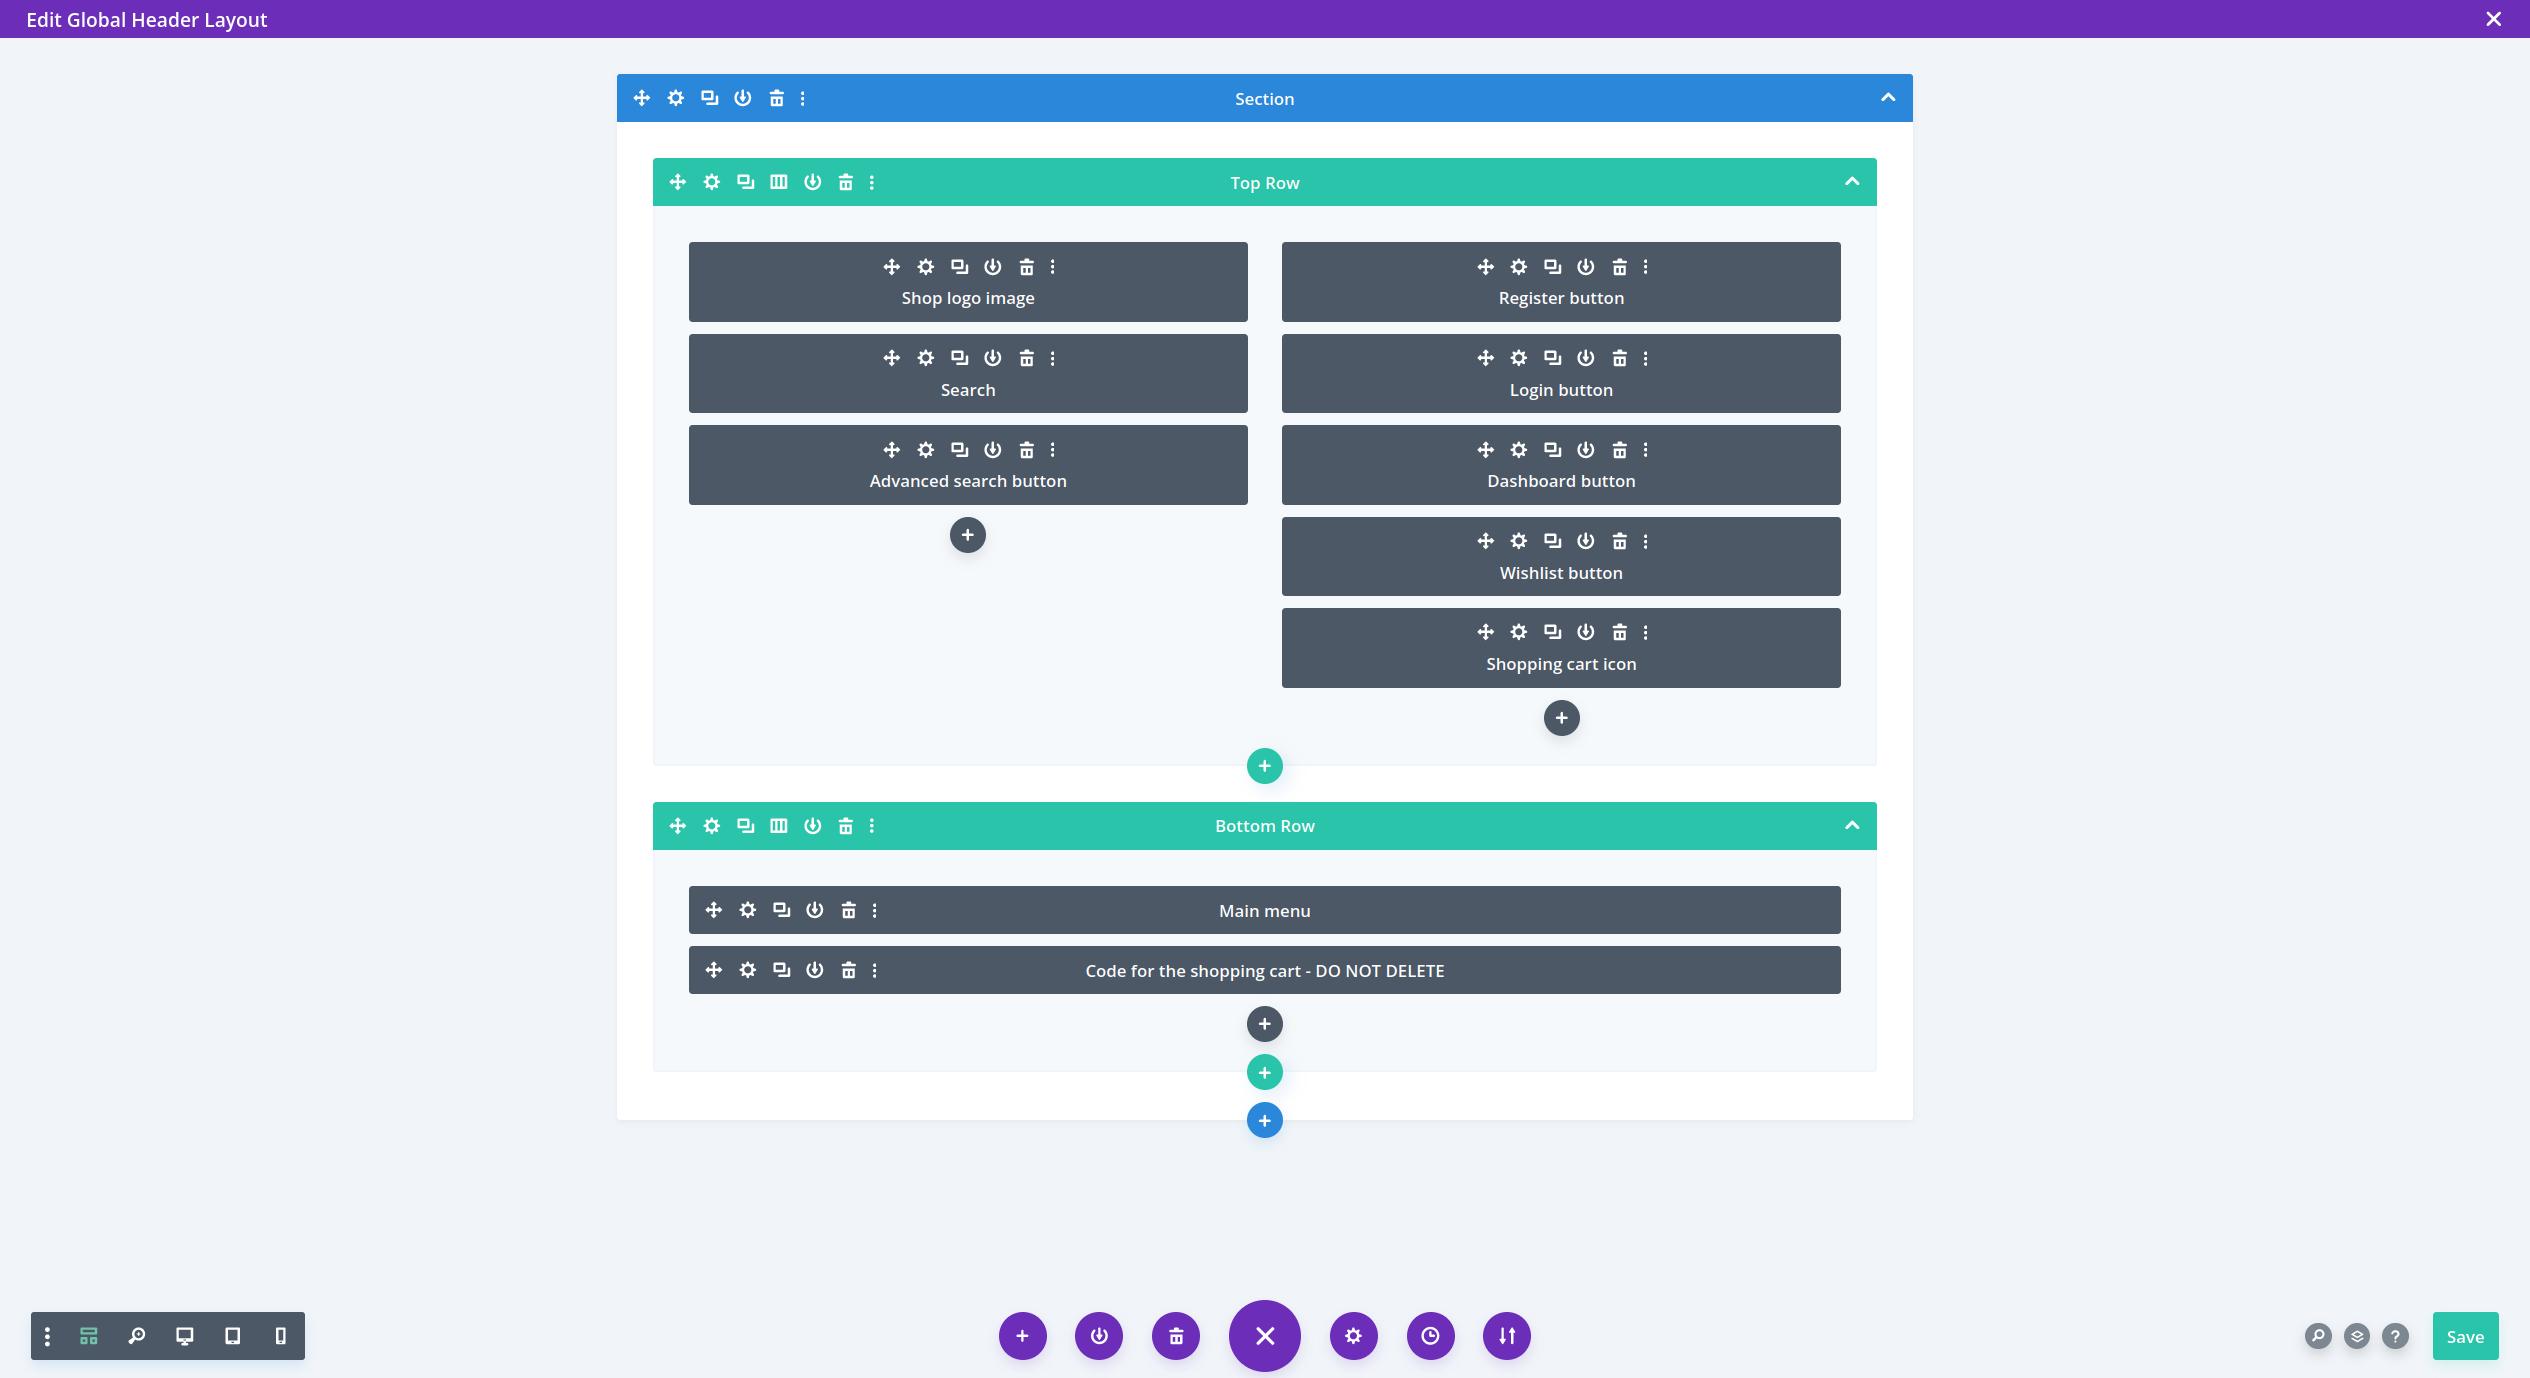
This will bring up the wireframe view where you can customize different things.
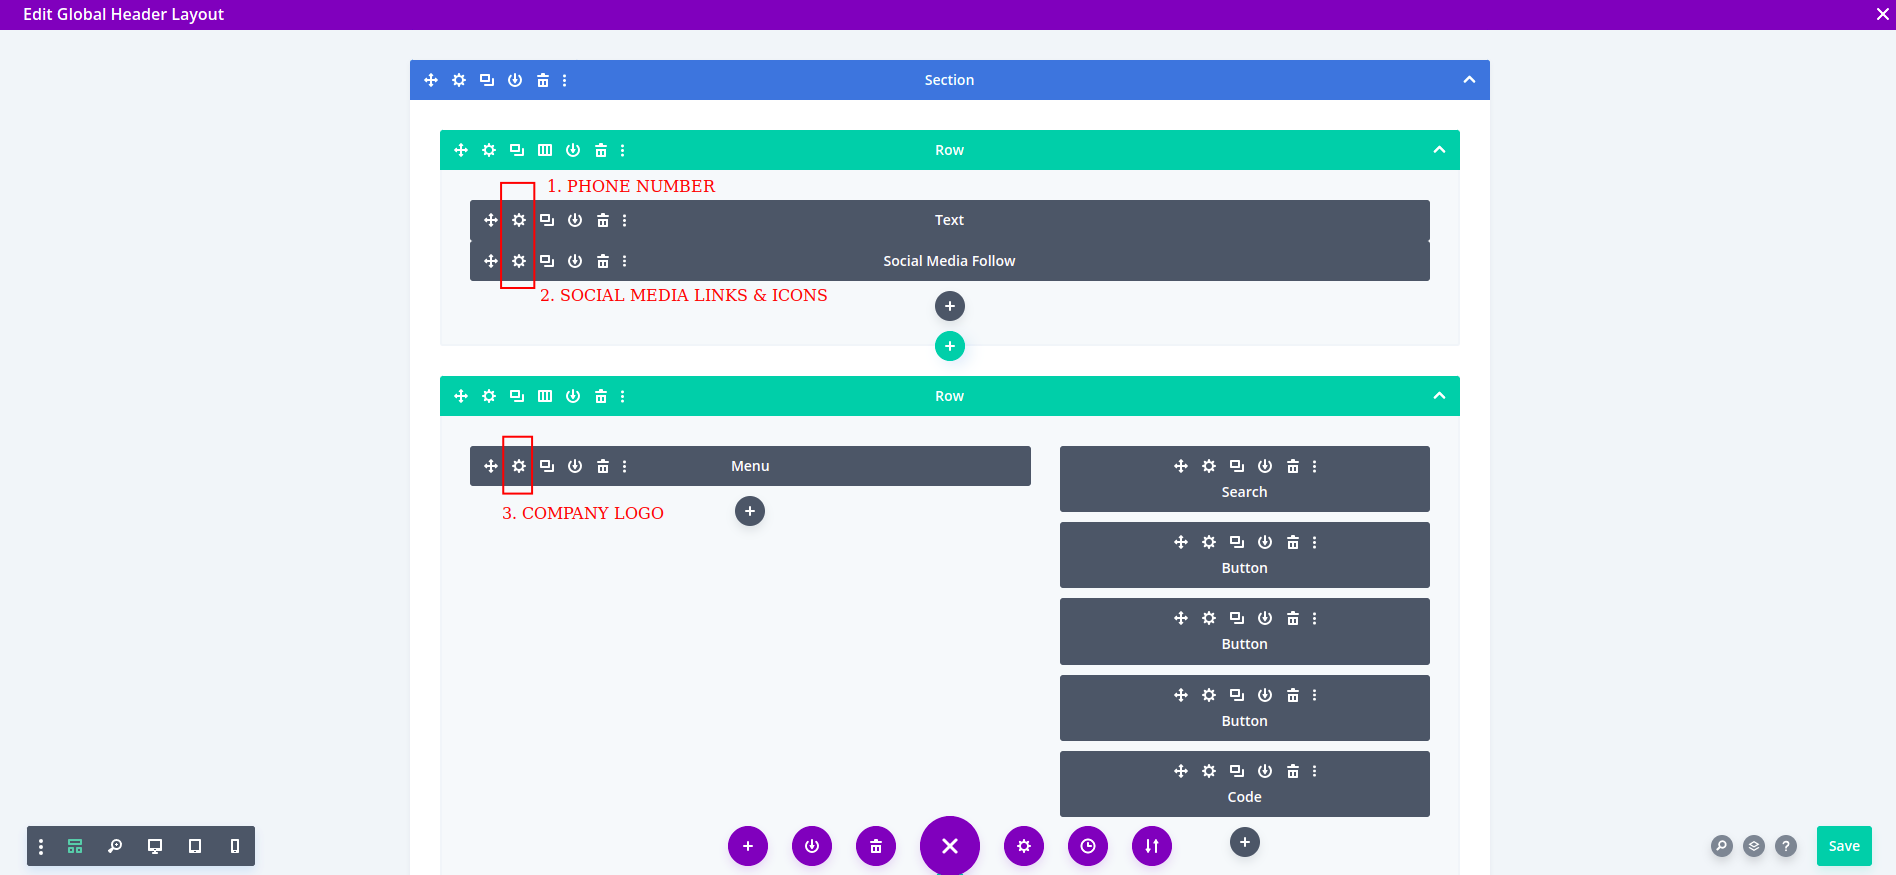
1.) The phone number - you can change your company's phone number or you can put any other text/hyperlink you wish.
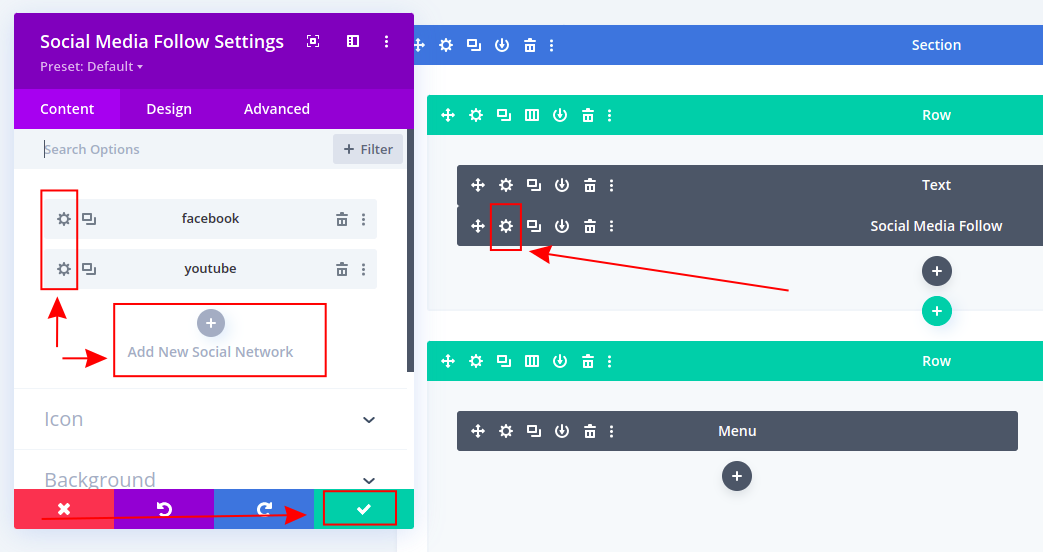
2.) Social media icons - you can add/remove different social media icons and set up their links.
3.) Company logo - you can add/change the company logo by clicking on the "Shop logo image" edit icon.
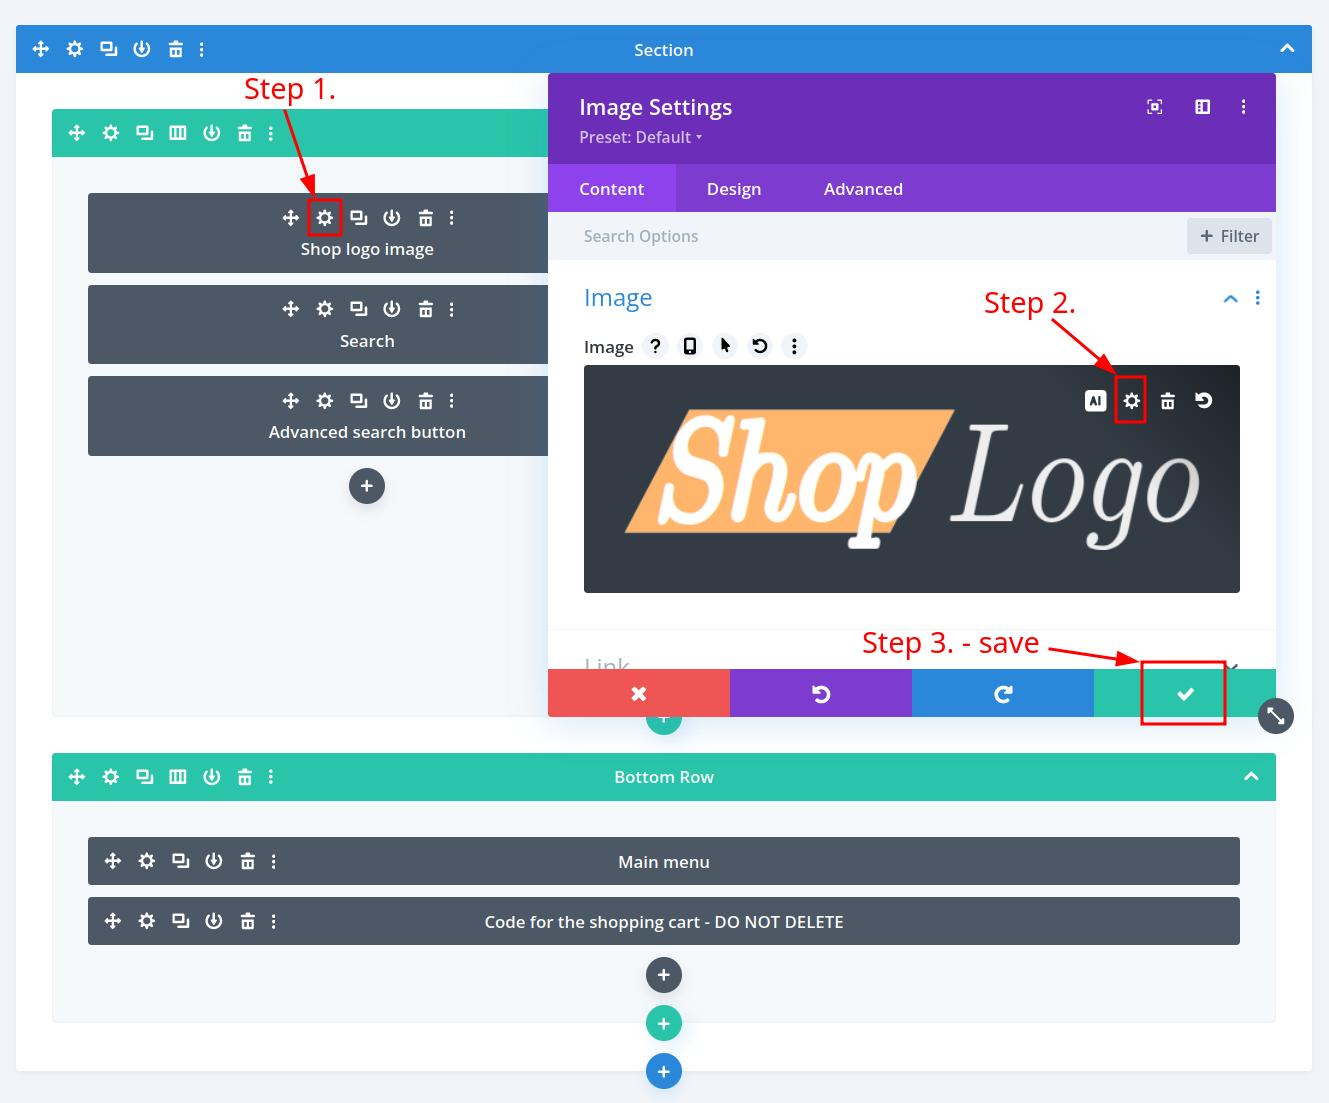
Don't forget to click "Save" every time you change something because otherwise, it will not be visible on the website.

Next, we will describe how to modify web site footer. Click on the edit icon next to the "Global Footer" template. This will open a Global Footer editor where you can change your footer for the whole website.
The footer template is split into 2 parts: section that contains categories and niches menus, and a section that contains the main parts of the footer, like contact information, quick links and legal pages links.
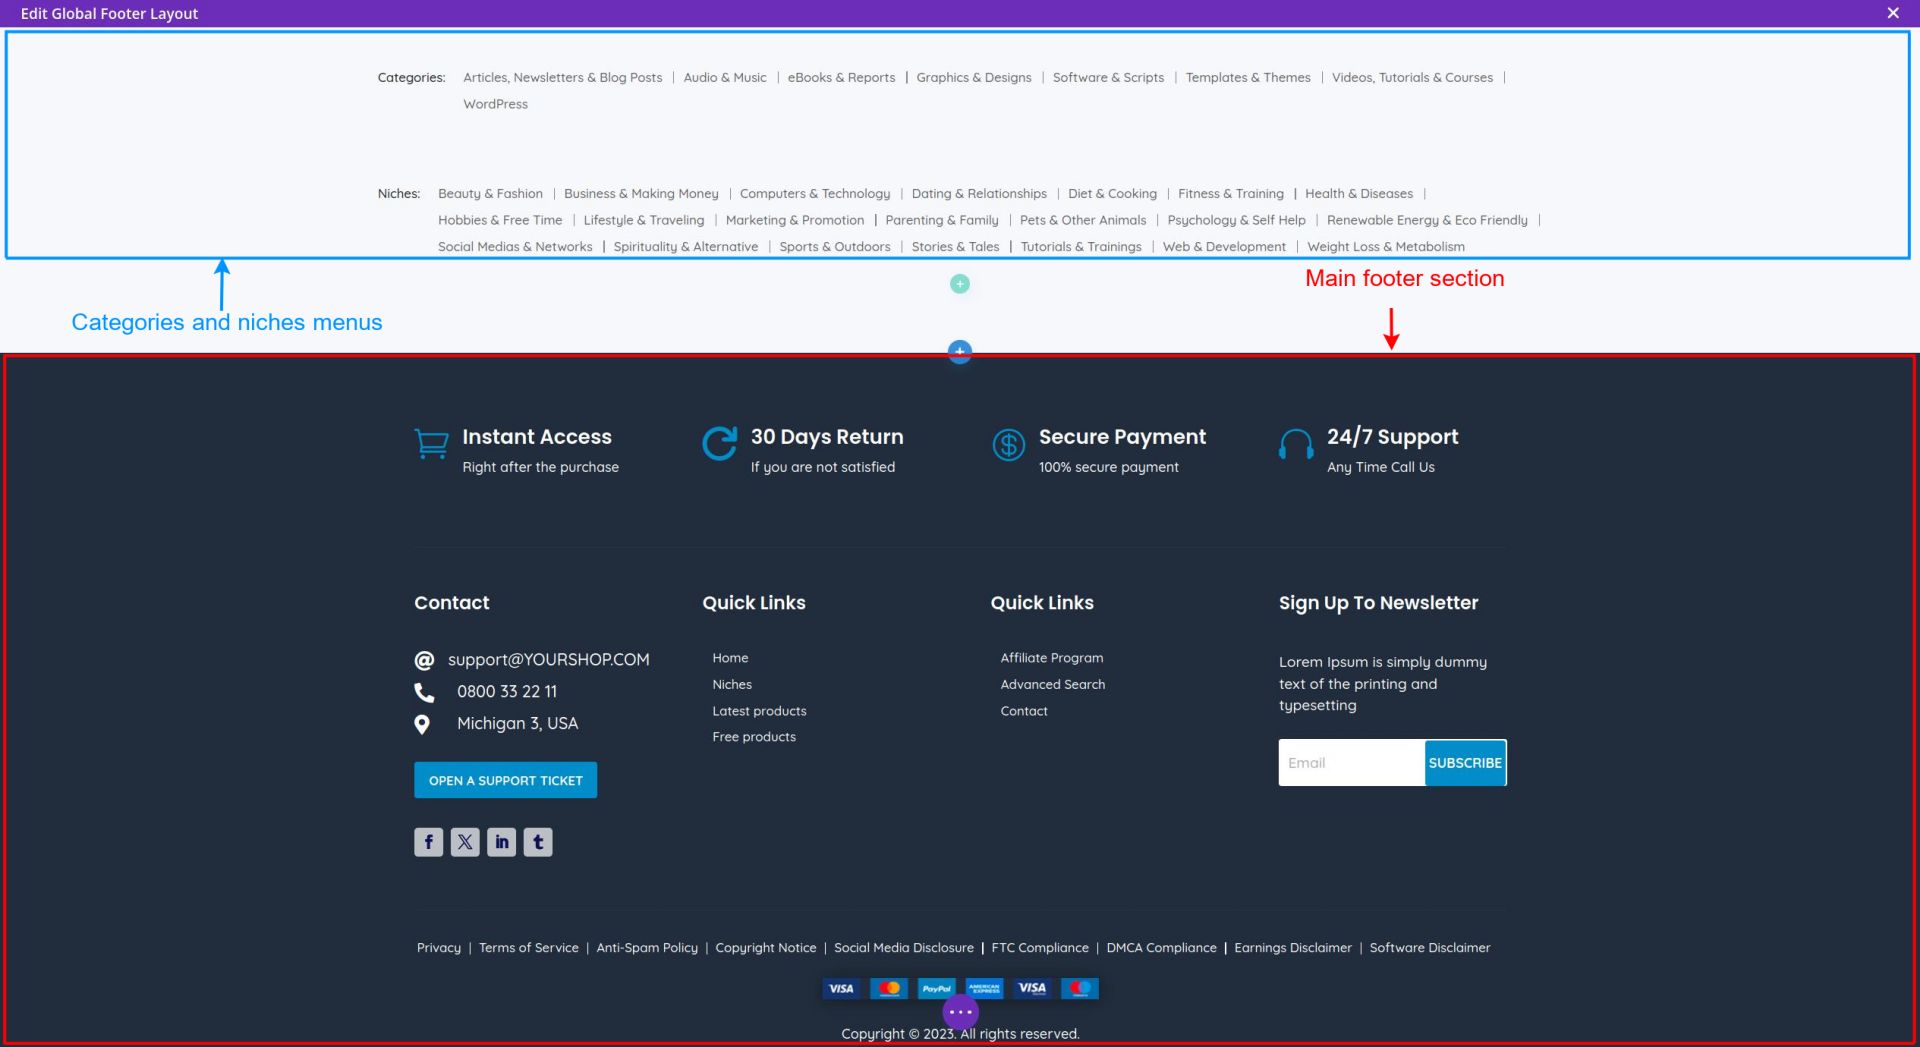
In the footer, you can change the company address and details, links to other pages, contact links, subscribe buttons, add the company logo etc.
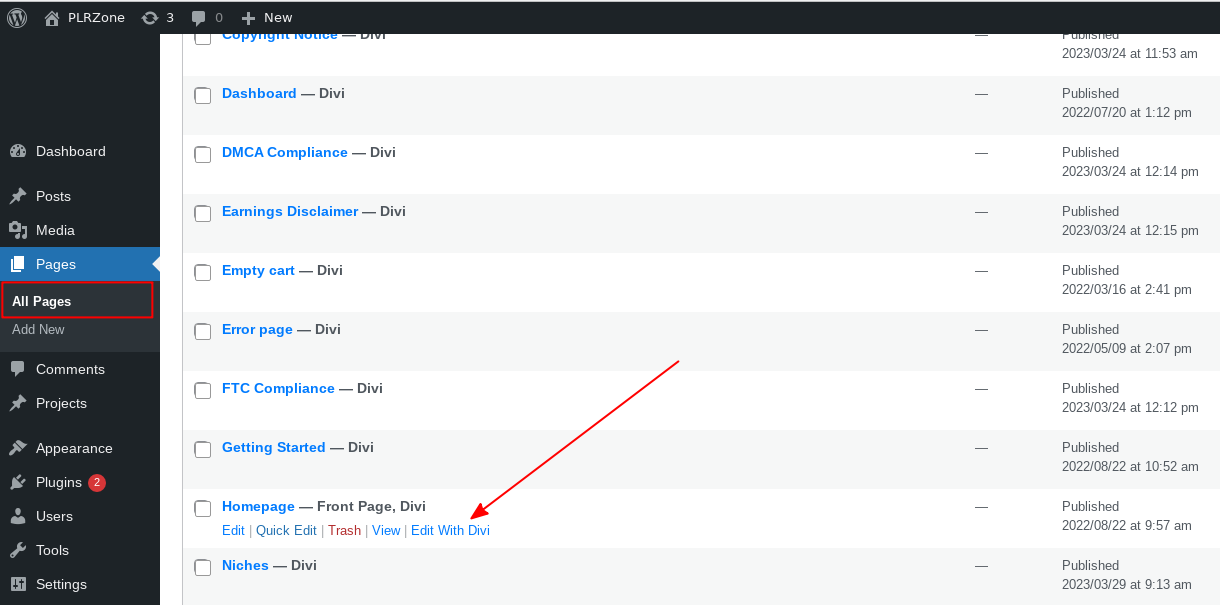
The content of the Homepage and other pages on your shop like Terms of service, Contact details, etc. are managed via WordPress DIVI website builder. This is done via WP area.
To edit your homepage visit Pages on the left menu, pass the mouse over the Homepage and then click on Edit With Divi link to open a Divi builder.
With the installation of the plr.pub plugin, you are not only getting the main plugin; you're also getting a custom WordPress theme, named "PLR Pub Elegance Divi". This theme is a child theme of the "Divi" theme, which means that we can easily add advanced customization to our theme without having to worry about erasing those changes each time we update the Divi Theme.
However, like the Divi theme, we may also occasionally update our child theme with upstream changes. That would mean that you would lose all changes you've made yourself, which is why we have included the "custom.css" file that you can modify yourself and not worry about your changes getting overwritten.
To modify the theme, first we have to go to the "Theme File Editor" sub-menu under the "Appearance" menu in the WP sidebar.
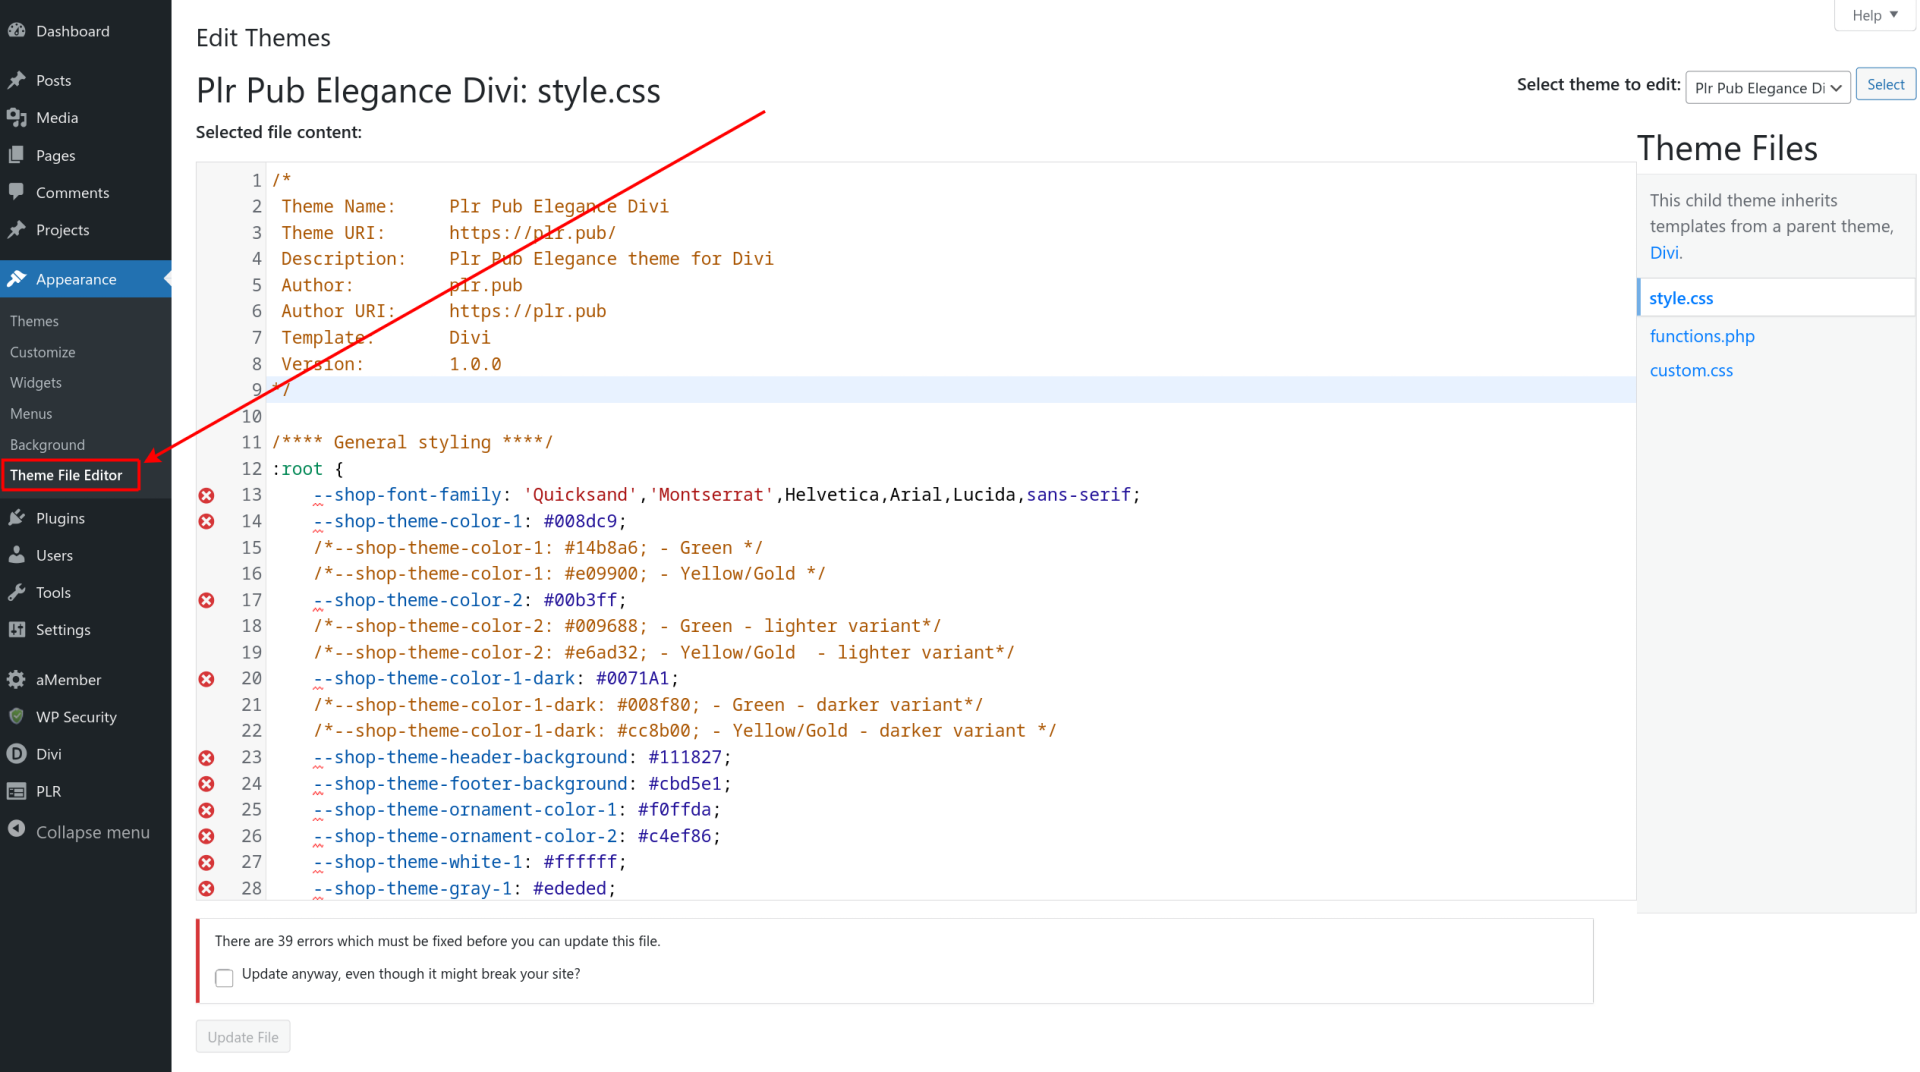
You will be greeted by the main "style.css" file. This is the main file in which we have put over 2000 lines of our custom CSS. Note that this is mainly CSS for things which are hard to do inside the visual "Divi Builder". However, we still recommend you make most of the changes and modifications with the visual builder for your simplicity.
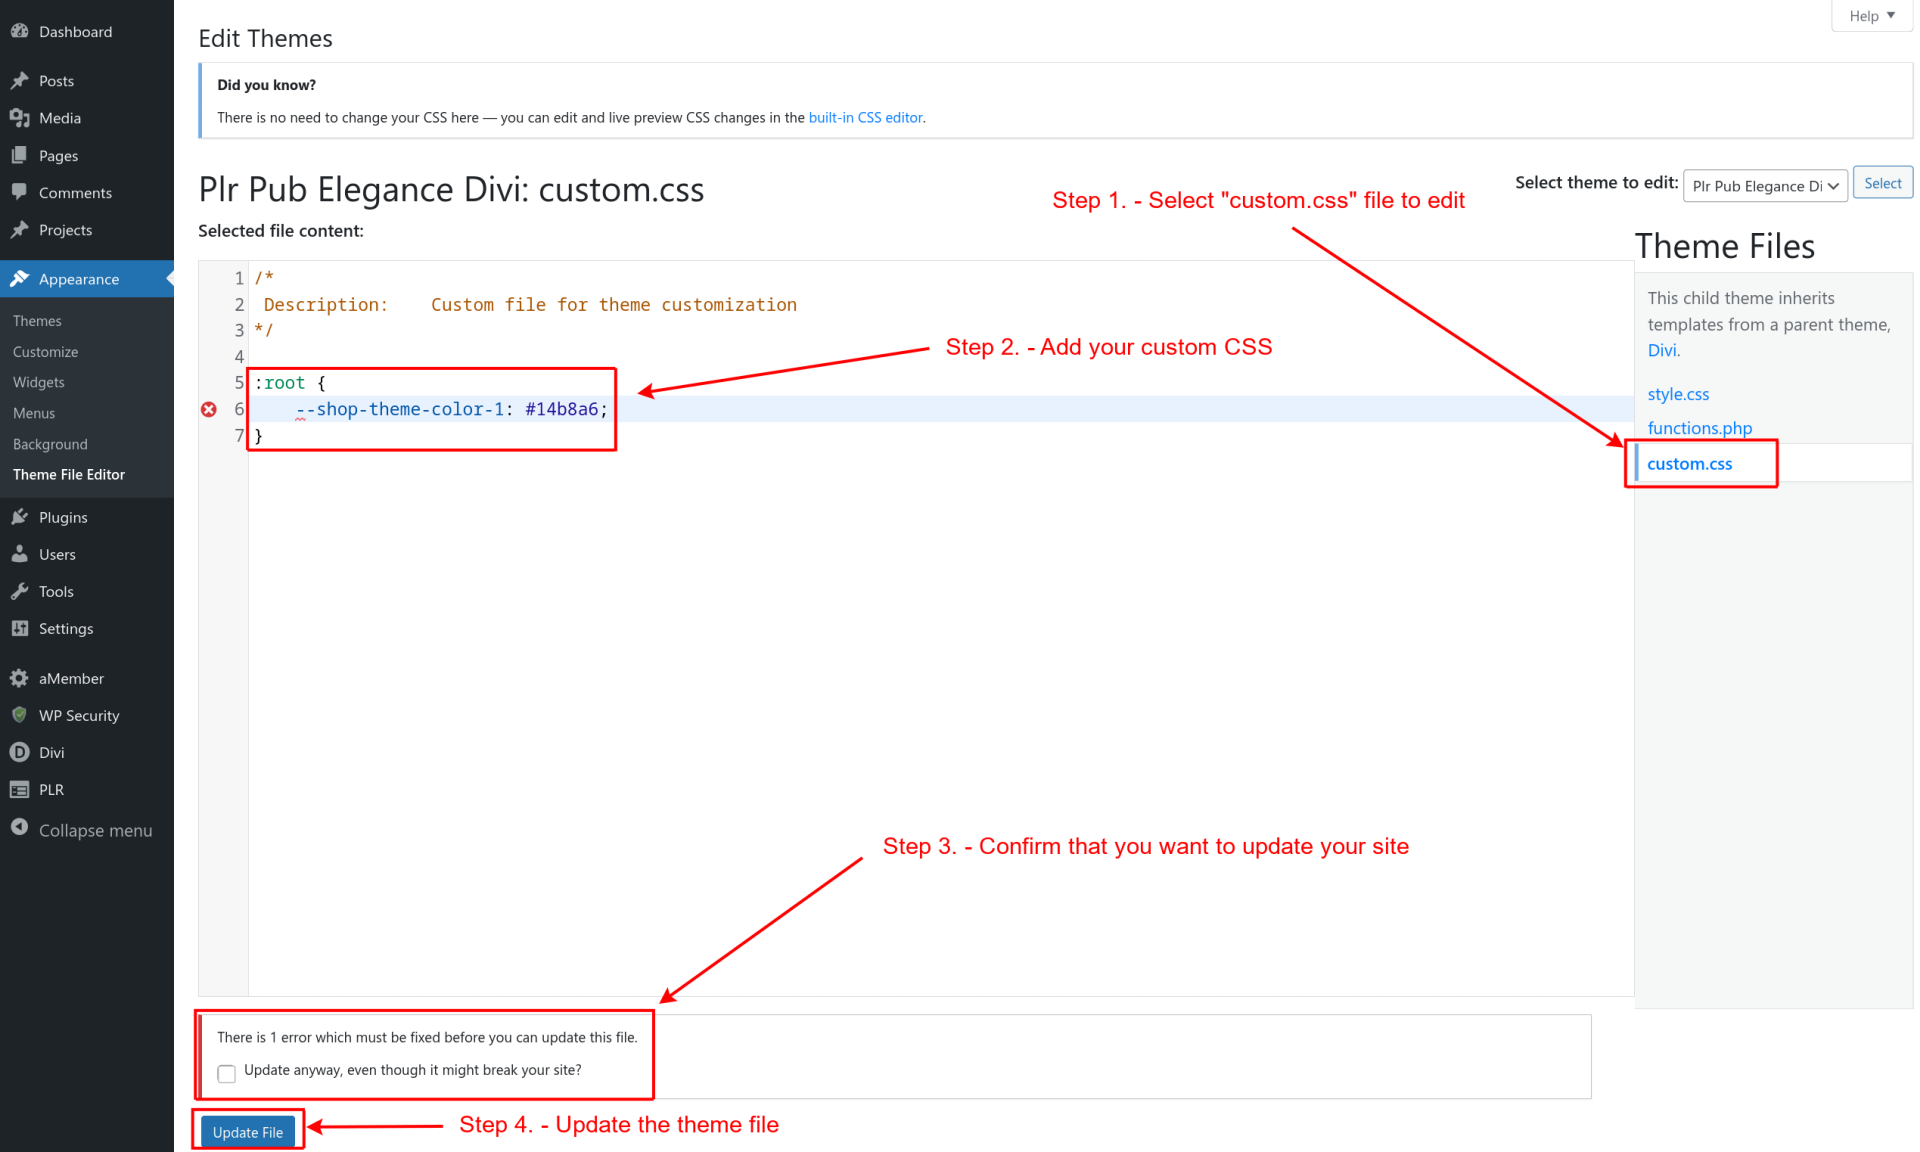
To switch over to the "custom.css" file, simply click on it at the right side of the screen and you can start placing your custom CSS.
As an example, we will simply switch the main color by adding the following CSS:
:root {
	--shop-theme-color-1: #14b8a6;
}
That will change the main color variable and all of the links should be updated. Note that this won't change the color of elements added via the visual builder because their color is set inside of there.
We will be met with the error message, which occurs since WordPress doesn't still officially support CSS variables; don't worry, your changes will be applied successfully. We simply have to check the "Update anyway, even though it might break your site?" checkbox and click on the "Update file" button.
To see whether the changes have been applied, let's go to our website and refresh it.
You will notice that the color of many links has been modified, but the easiest one to check is in our header. As you can see, the link was previously blue, but now it is green:


That means our changes have been applied successfully. Any CSS that uses the color property with the global variable value will have changed color.
You can now add any custom CSS that you want to that file and it will always overwrite whatever CSS we have set in our file.
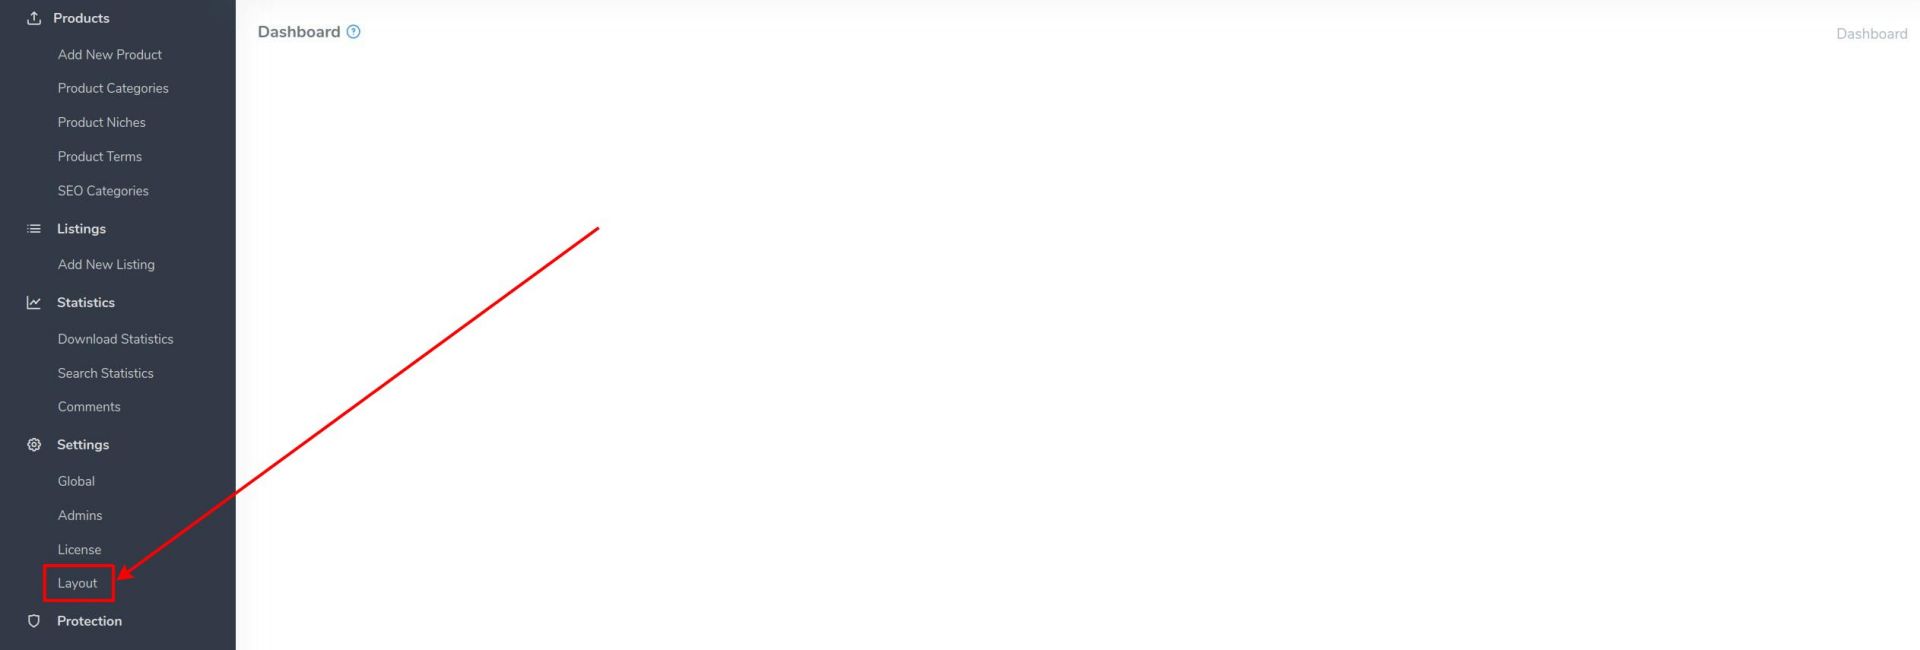
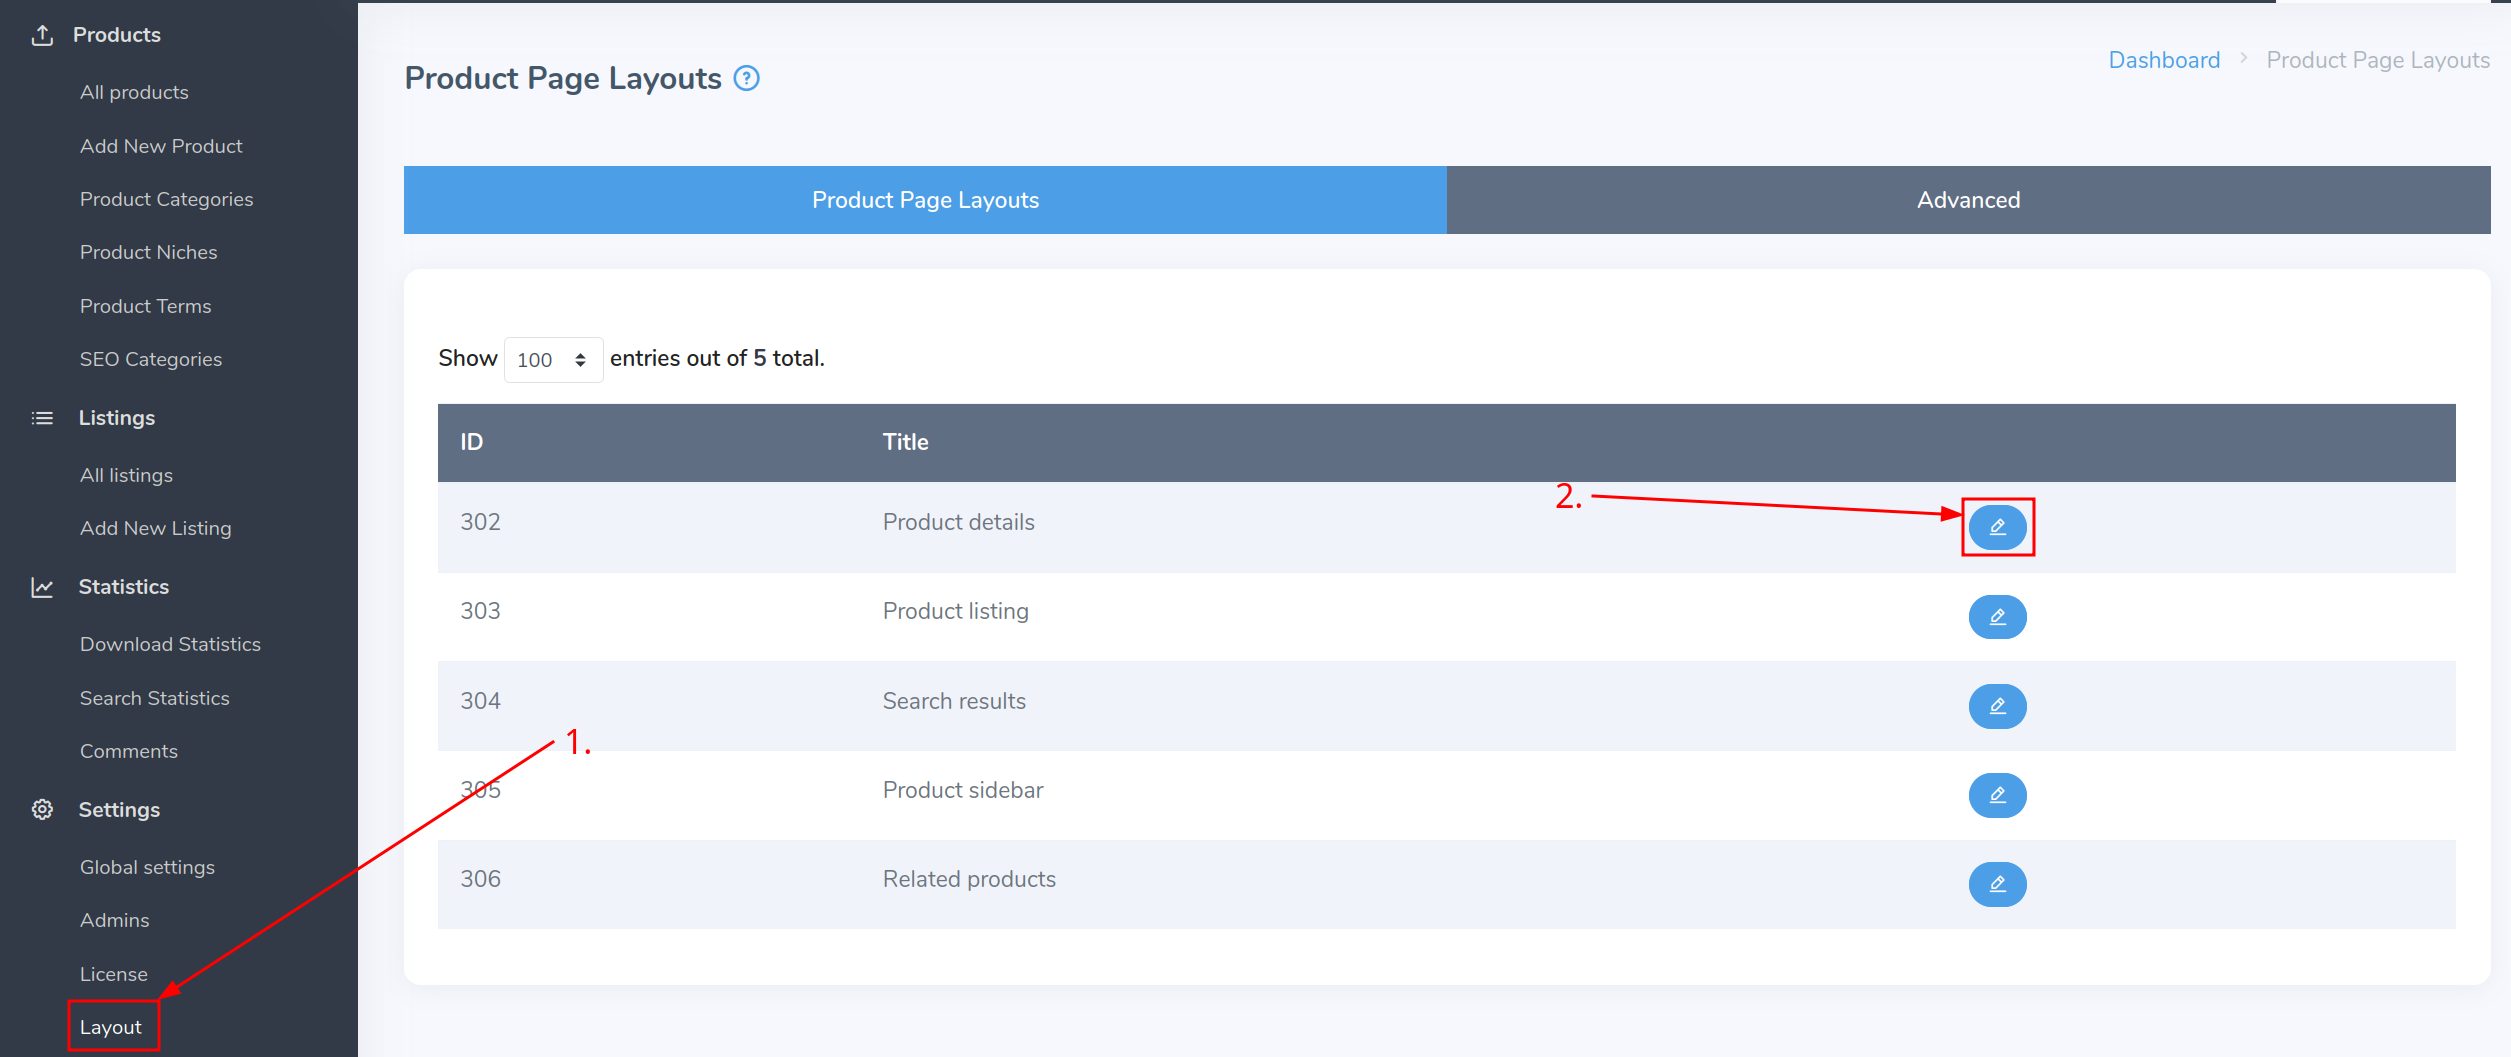
Layouts of the pages that are directly related to the products are modified within the shop area, under the "Layout" menu option in the sidebar.
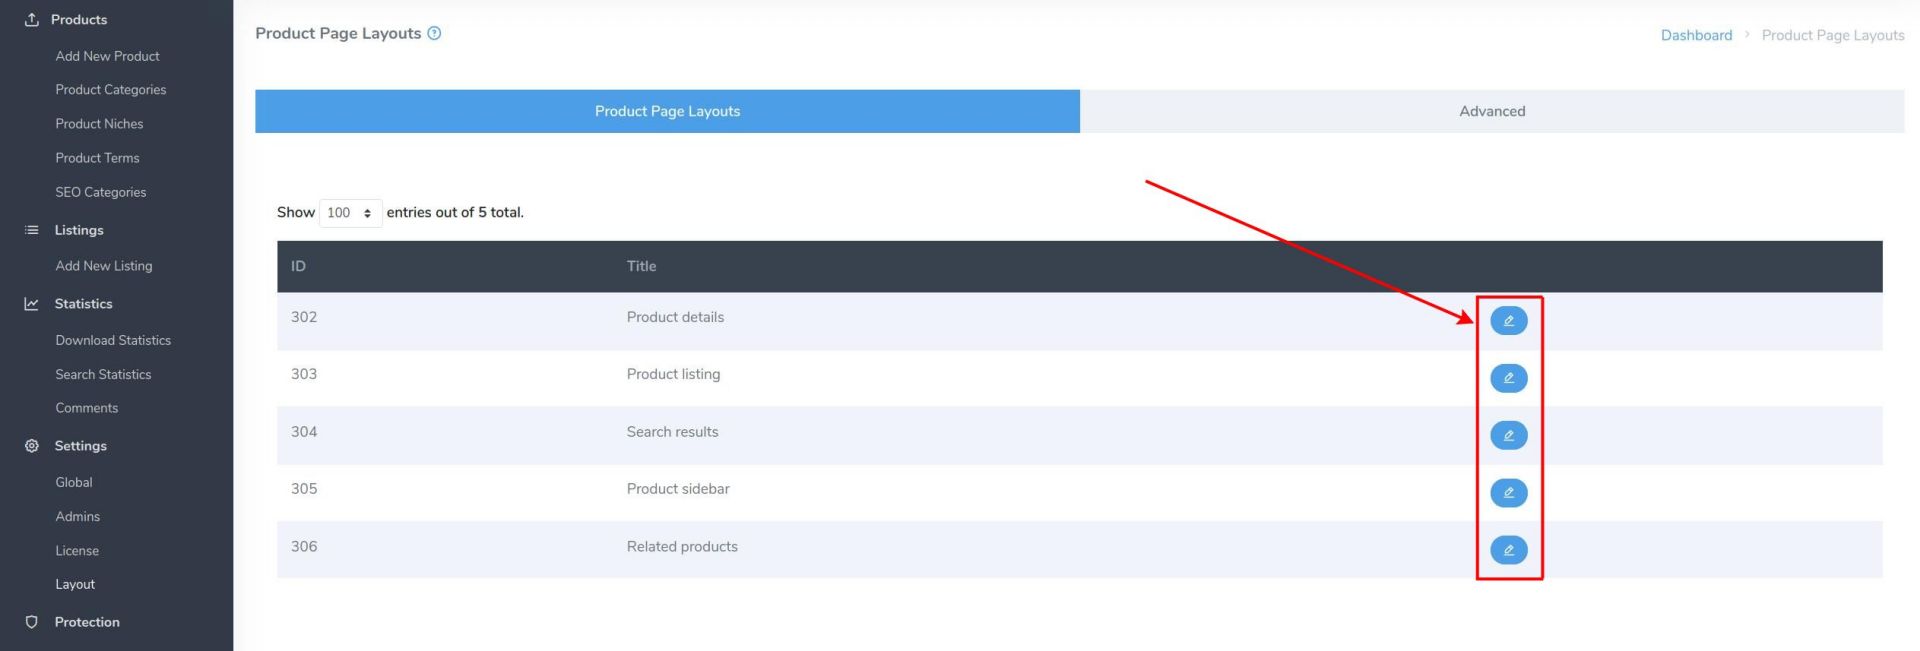
Currently there are 5 layout areas:
- Product details - layout for each individual product
- Product listing - layout for listing pages
- Search results
- Product sidebar
- Related products - layout for the products that appear on product details page under the main product
To edit a particular layout page, click on the pencil icon next to the name of the layout area you want to modify.
Each layout area has 3 pre-defined layouts, which you can switch to by accessing the drop-down menu, choosing your layout and then clicking on the "Set as Default" button.

You can also add your own layouts, rename them and delete them.
To rename or delete the layouts, first select them from the drop-down menu and then click on the appropriate button.

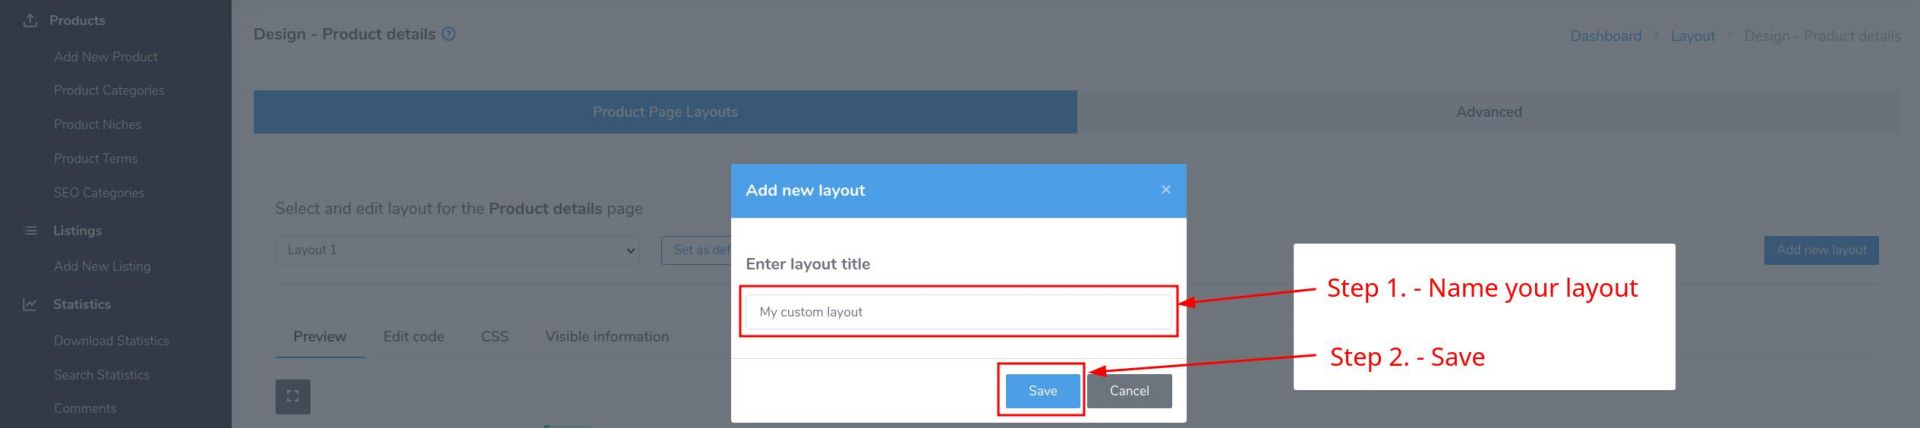
To add a new layout, click on the "Add new layout" button.

Once clicked, a pop-up will appear. Enter the name of your layout and click on the "Save" button.
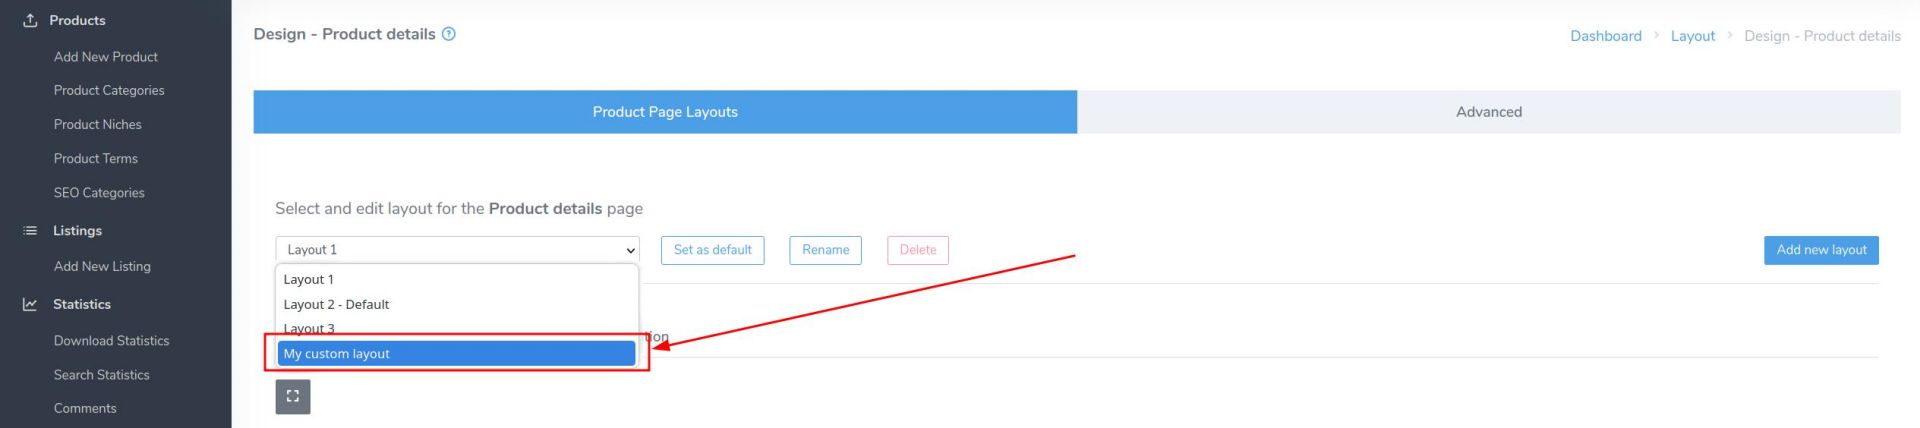
Your layout will now appear in the drop-down menu.
Each layout comes with 4 different "tabs", or areas, in which you can modify different aspects of each layout. Those are:
- Preview - live preview of the layout you are currently editing
- Edit code - most advanced area, which lets you modify the code. This allows you to re-arrange aspects of the layout or add your own custom html elements and CSS classes. Some basic knowledge of HTML/CSS/Javascript is needed.
- CSS - this area allows you to enter your custom CSS directly, so that you don't have to rely on external files. Goes great hand-in-hand with code editor
- Visible information - hide/show different elements of the layout

You can check what each different area looks like in the video below:
Product details miscellaneous tips
Depending on your product details' page layout, you may want to have your image gallery positioned vertically instead of horizontally, which comes as a default in most layouts.
To change the orientation of the gallery, from the sidebar area go to Settings -> Layout -> Product Details and select the appropriate layout that you want to modify.
Once you have selected the correct layout, go to the "Edit code" tab and look for the product gallery shortcode, which is <x-product-gallery />
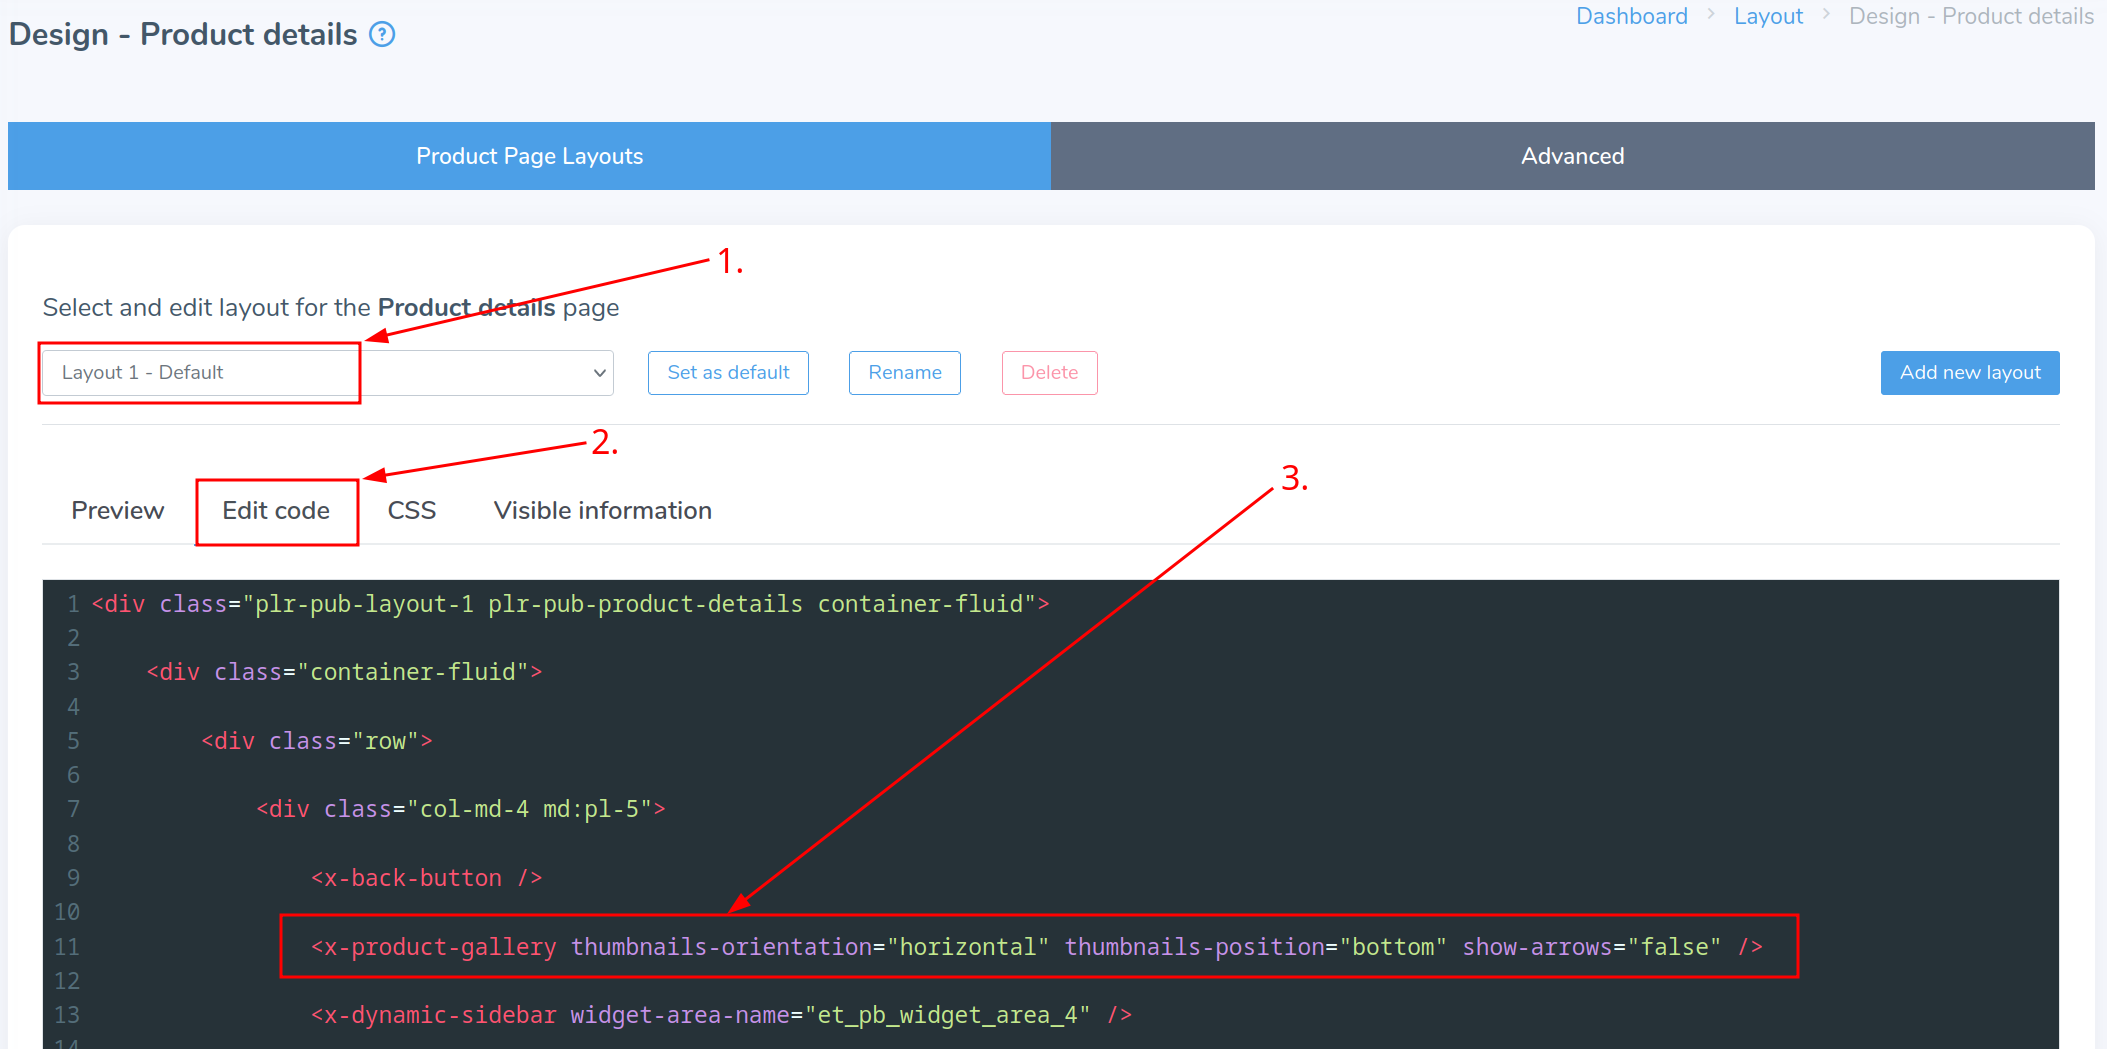
You will see that some custom properties, which define the way your image gallery looks, have already been set. Those include:
- thumbnails-orientation - this property defines the orientation of your gallery, available values are horizontal and vertical
- thumbnails-position - this property defines the location of your gallery, available values are top, bottom, left and right
- show-arrows - this property simply defines whether or not to display the arrows that you can use to cycle between the previous and next image, available values are true and false
To enable the vertical image gallery, simply change the thumbnail-orientation property to vertical and set the thumbnail-position property to either left or right, depending on where you want to display the thumbnails.

Once you have set the correct values, save your modifications and go to any product page to see how it looks.
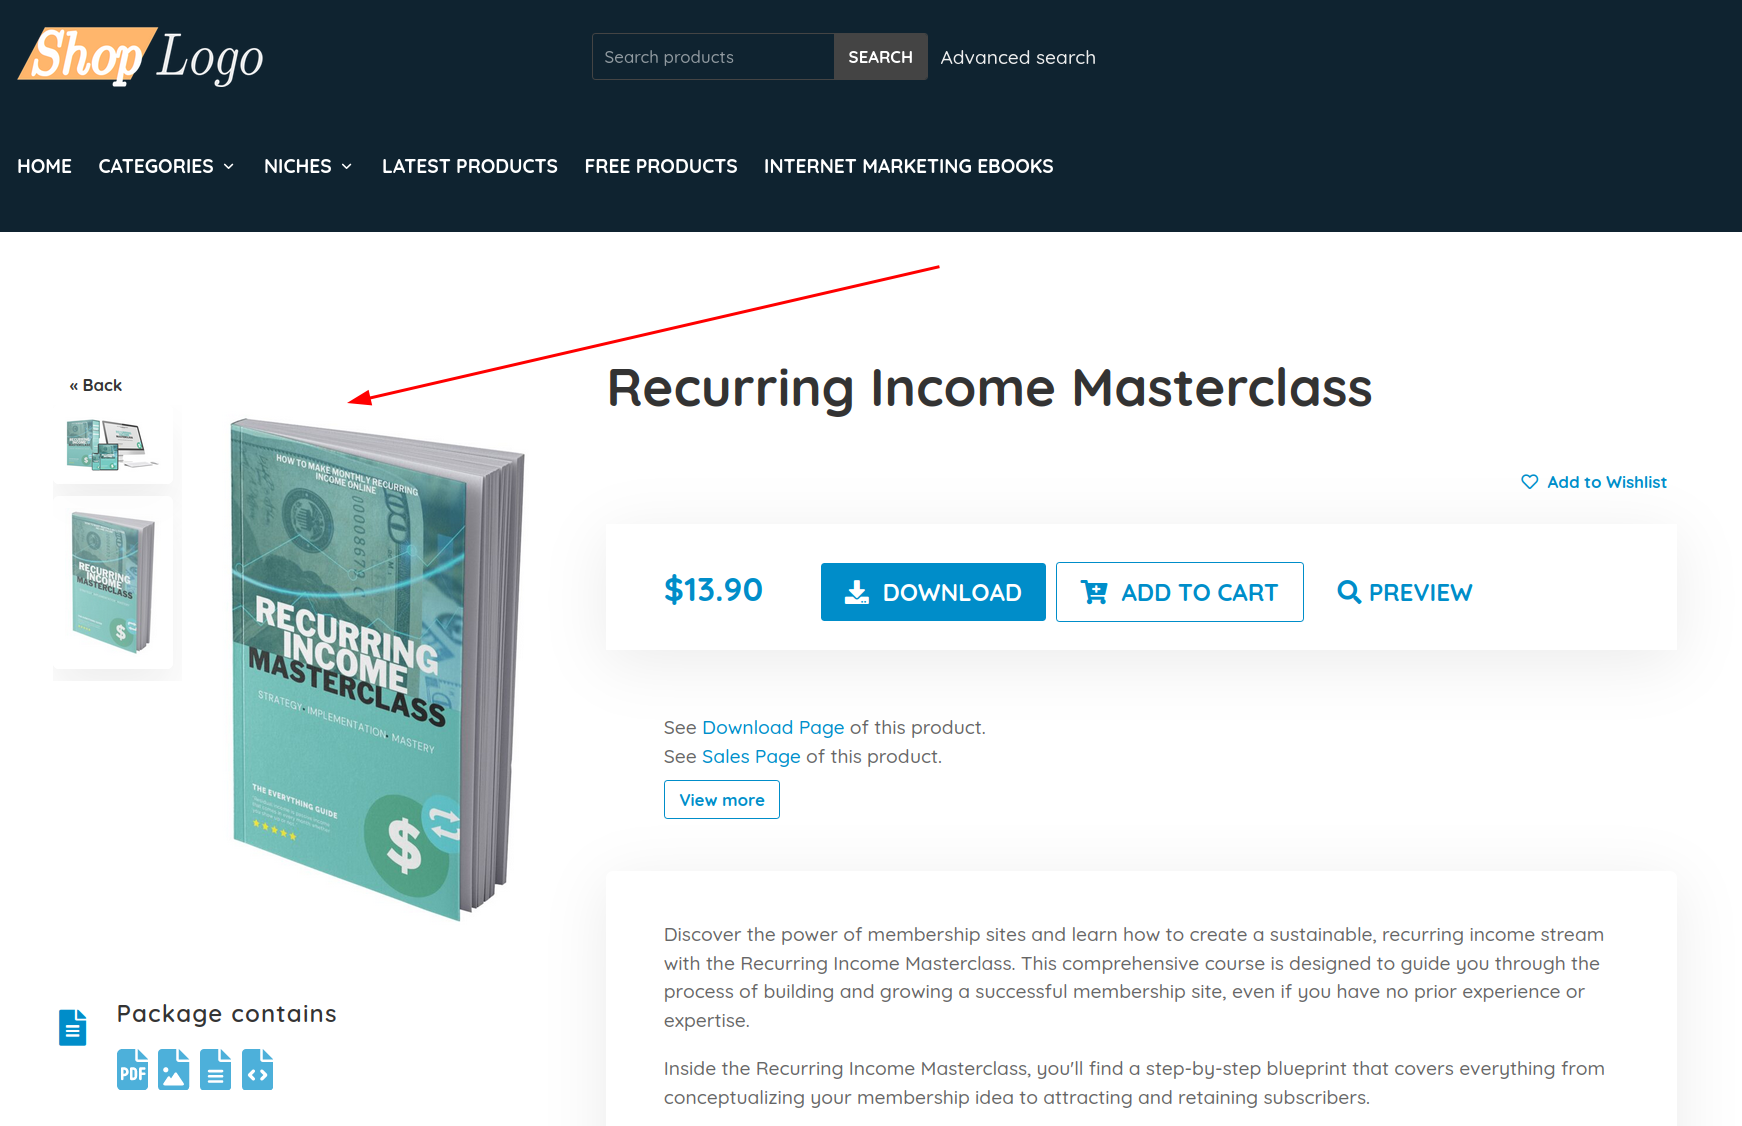
As you can see, the gallery is positioned to the left of the main image and the thumbnails are displayed vertically, just like we specified in our code earlier.
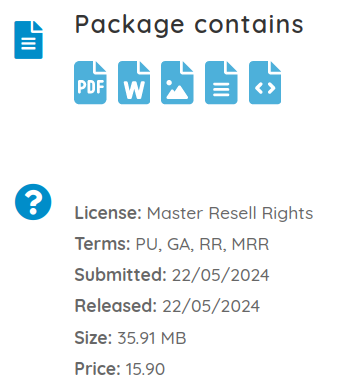
You will notice that by default, some layouts have all of the product's most important properties displayed in a short and concise way. For example, on "Layout 1", the information is displayed below the gallery, like this:
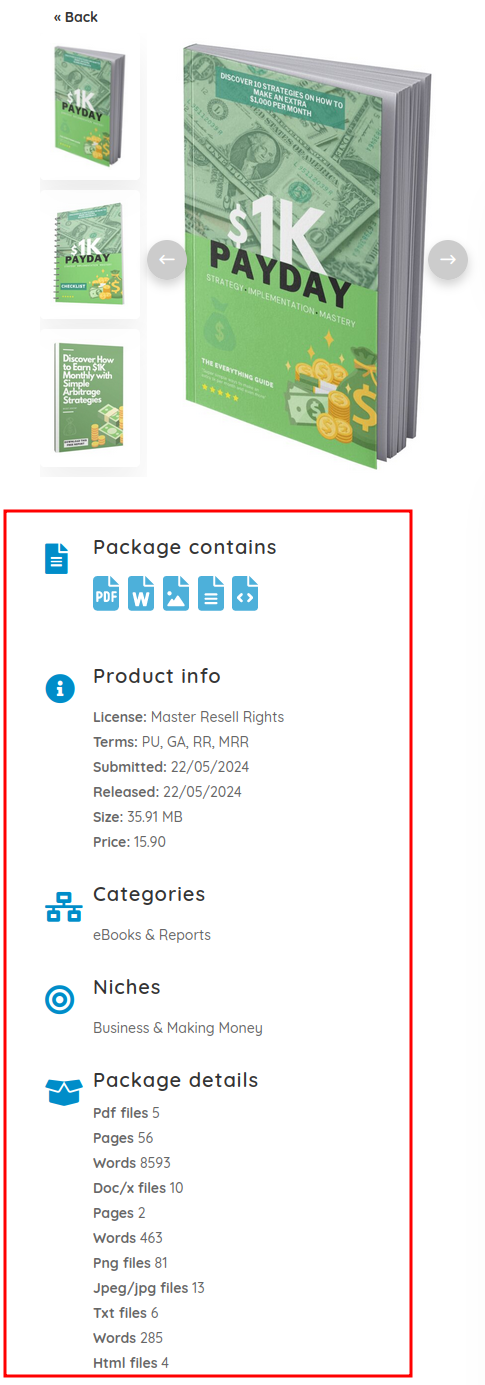
You will notice that each of those properties comes with its own icon and a title. This works great when they are one below the other and when they are separated from the rest of the content, like in this case. But what if you want to put some of the information somewhere else, for example below the product description.
Well, as you can see, then it wouldn't look as nice since there would be a big icon and a title right below the text.
Luckily, each of those 5 properties can have their own custom title and icon, and they can also have the title and icon removed, meaning you only get the content itself. Those 5 properties (shortcodes) are:
- Package contains - <x-product-package-contains />
- Product meta information - <x-product-meta />
- Product categories - <x-product-categories />
- Product niches - <x-product-niches />
- Package details - <x-product-package-details />
You can provide any of these fields with a custom title and an icon by passing them under the "title" and the "icon" properties.
Important to know is that only Font Awesome icons (version 5) are supported. To find your own custom icons that you may want to use, you first have to go to the Font Awesome website: link
Next, you have to select the icon you want to use and copy its code:

All you have to then is simply paste it into our "icon" property and let the magic unfold.
Here's how to provide the field with a custom title and an icon:
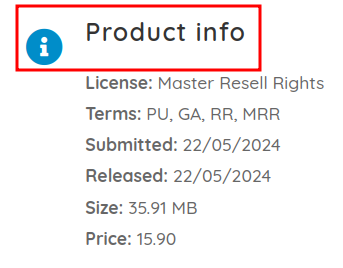
<x-product-meta title="Meta information" icon="fas fa-question-circle" />
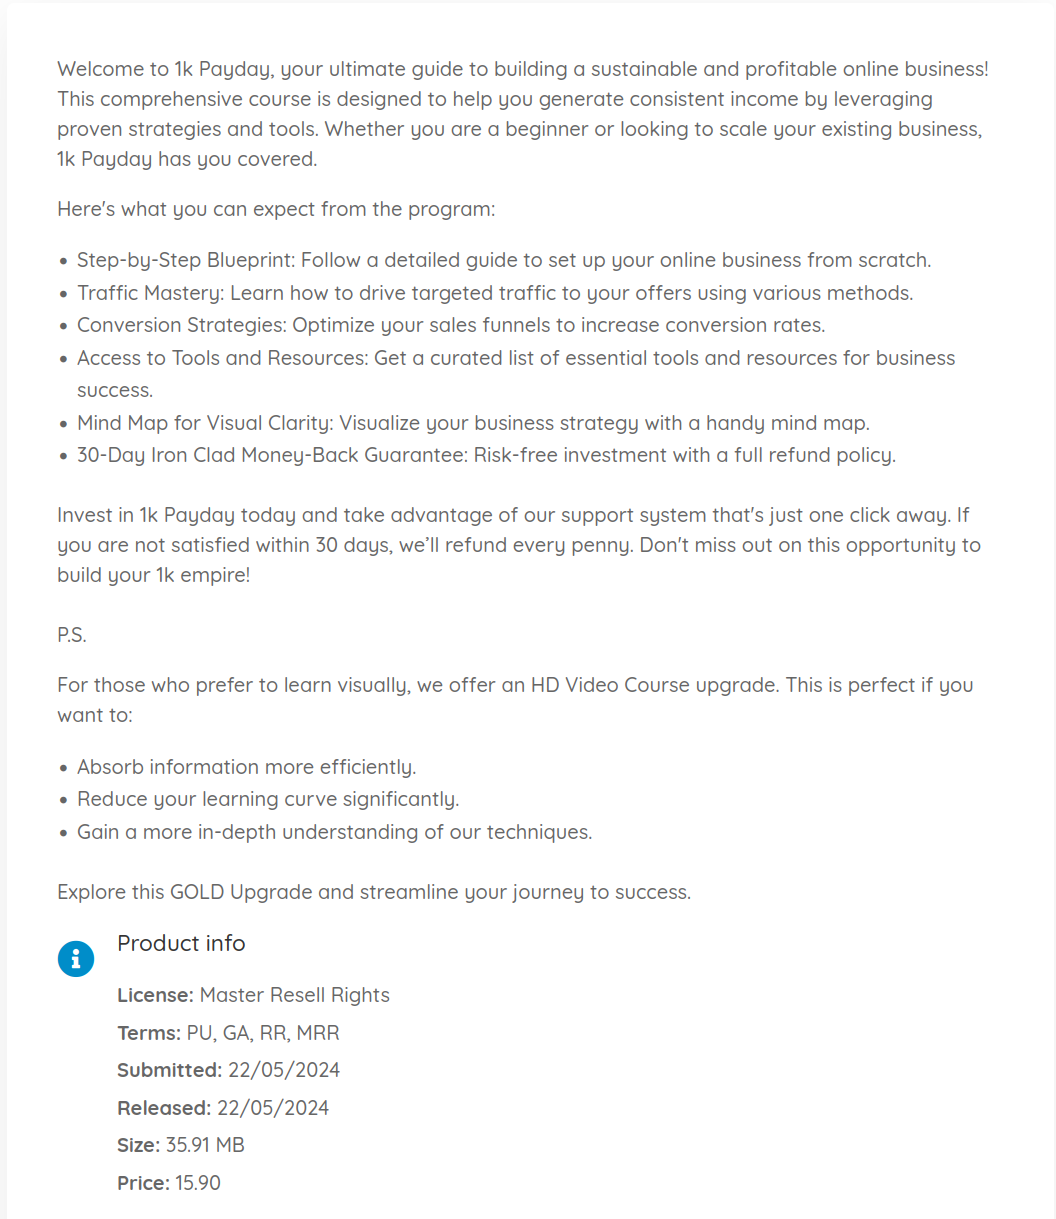
As you can see, I have put the title "Meta information" to the product info field, and I have provided it with the question mark icon from FontAwesome. This is how it looked before:
And here is how it looks after applying the changes:

You will notice that my changes have been applied and the new title and icon are now displayed.
But what if I don't want to display any title or icon? Well, then you simply pass an empty property to the field, like this:
<x-product-meta title="" icon="" />
As you can see, the title and icon properties are there, however they are provided empty values so nothing will get displayed. Here's how that looks:
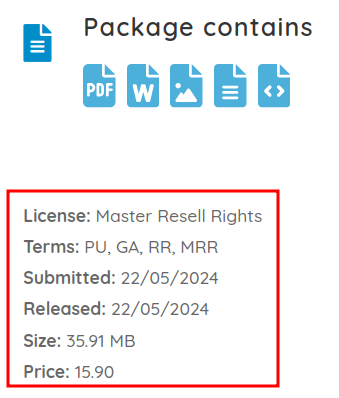
You will immediately notice that the field above (Package contains) gets displayed normally, with both the title and icon, since we haven't modified it. And the product meta information gets displayed just like we wanted it to, without any icon or a title.
You can also combine the 2 properties, so that either the icon or the title get displayed, like this:
   <x-product-meta title="Meta information" icon="" />

   <x-product-meta title="" icon="fas fa-question-circle" />
This will then get displayed like this:
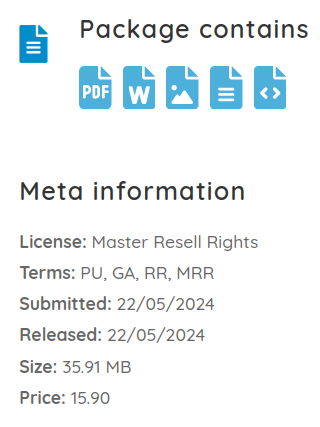
and like this, respectively:
Note that if you don't pass any properties, the default values will get displayed. So if you strictly want to have no icon or no title, you have to pass the properties with empty values.
Here is an example of various possible value combinations, with their own custom code provided so you have a better picture of how this works:
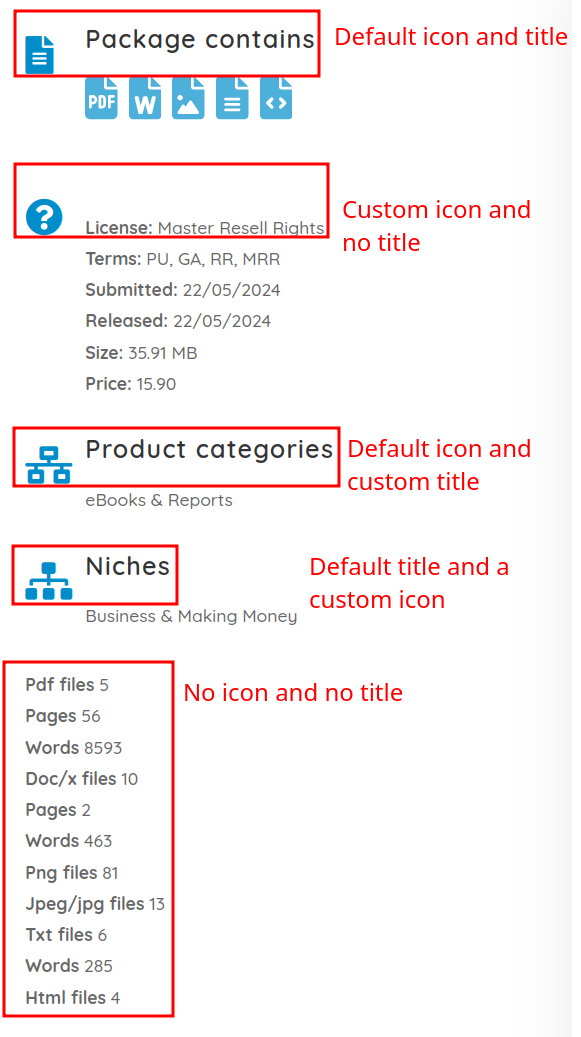
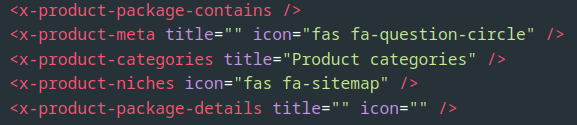
And here is the code, in both the written format (so you can just copy and paste it), as well as in a picture format.
   <x-product-package-contains />
   <x-product-meta title="" icon="fas fa-question-circle" />
   <x-product-categories title="Product categories" />
   <x-product-niches icon="fas fa-sitemap" />
   <x-product-package-details title="" icon="" />
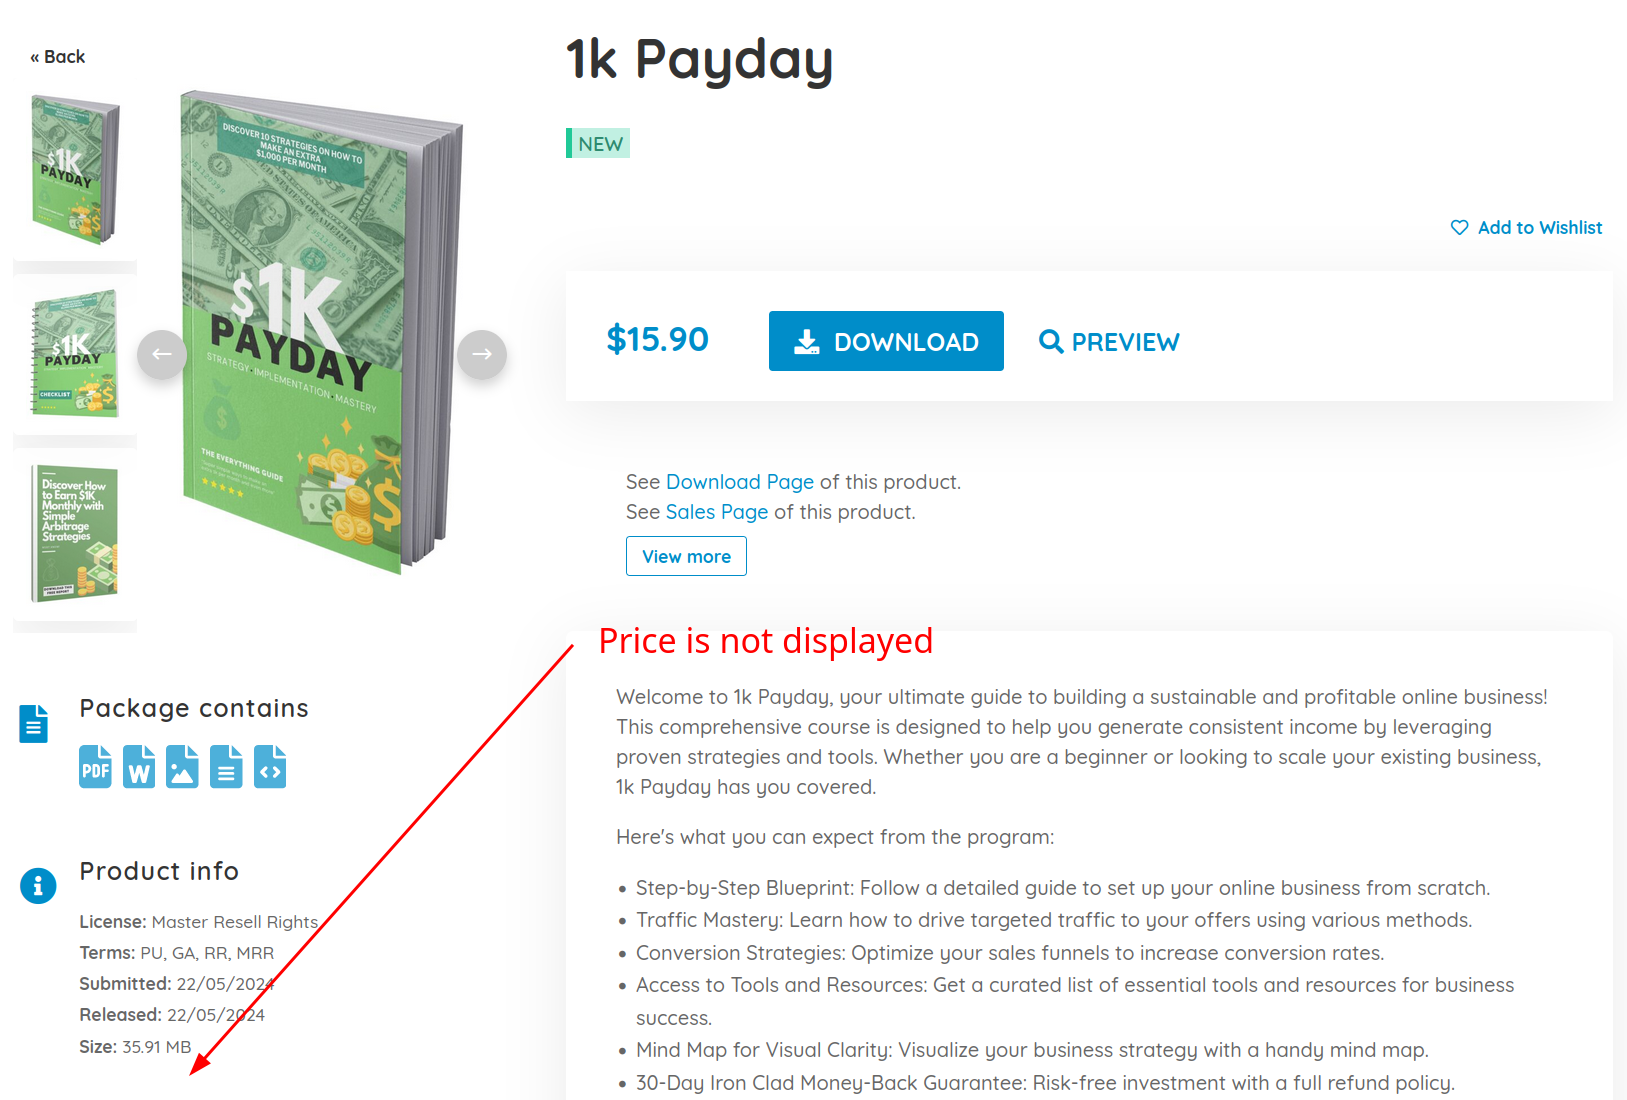
If you have the shopping cart enabled, you will most likely have the price listed on product details page to be immediately visible to your users.
But the price also appears inside the meta information as well. That means we now have duplicate pricing on the product page.
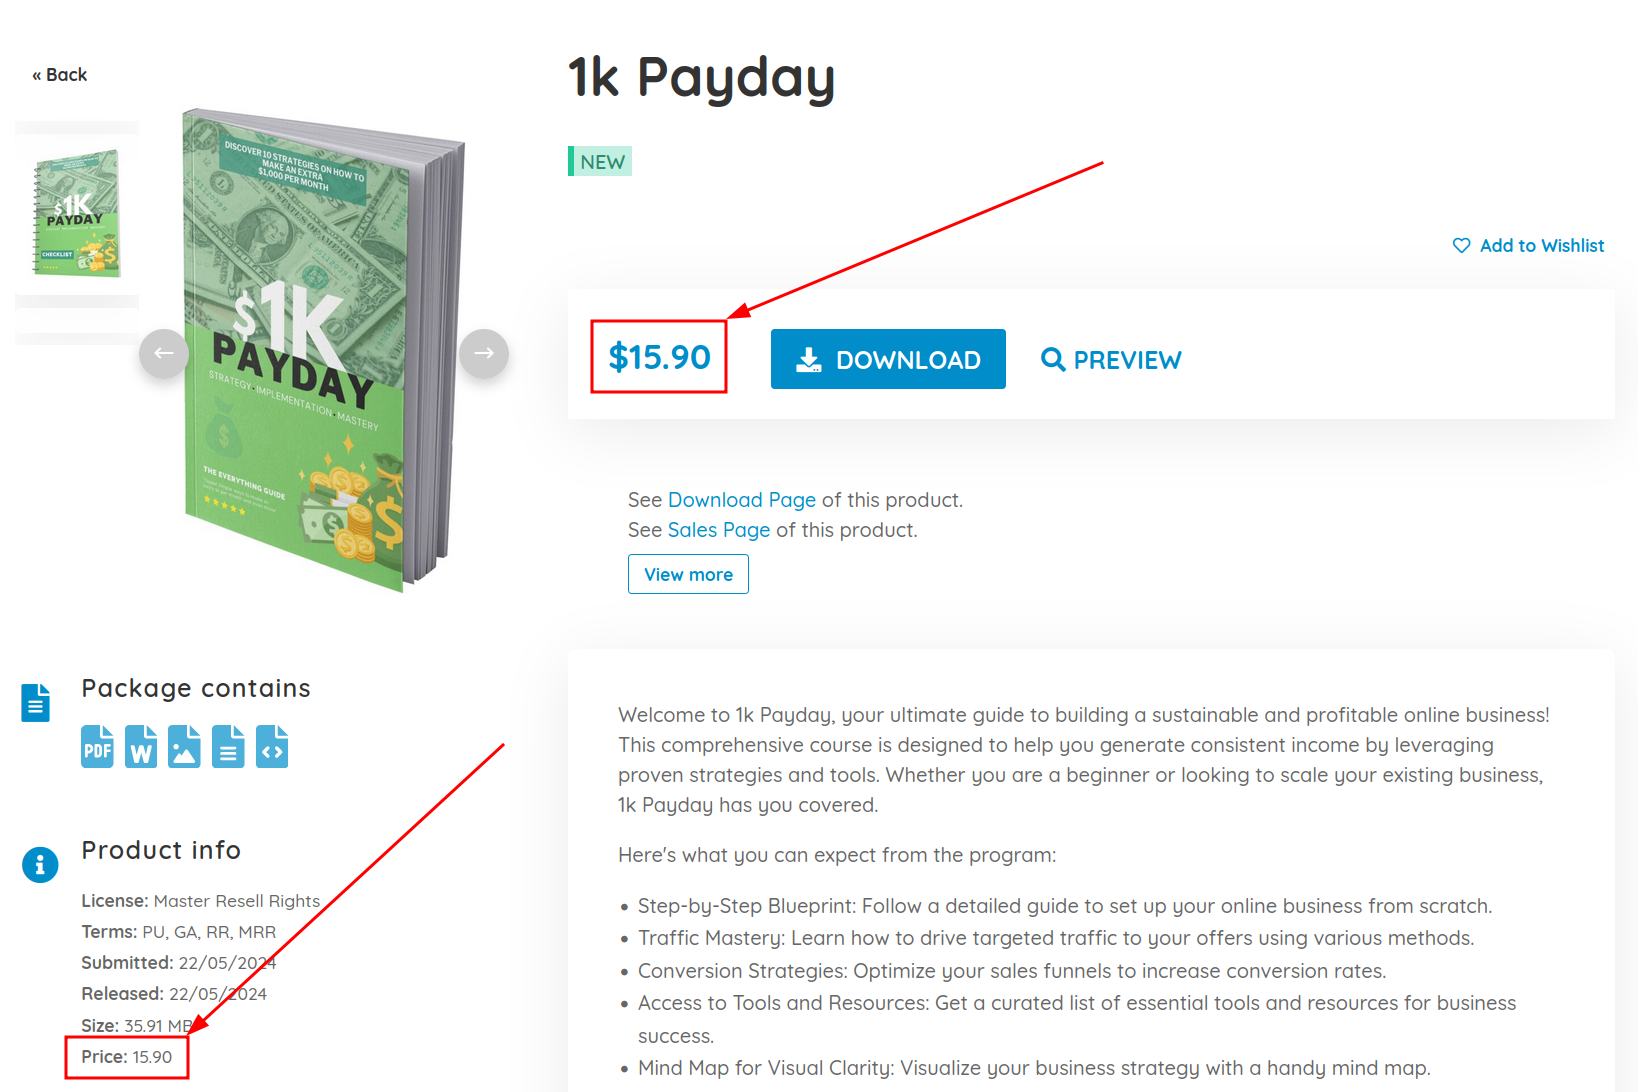
Some people may find that unnecessary, so what to do if you want to hide the price only from the meta information?
Well, you simply pass a custom property named "display-price" with the value "false" to the the "<x-product-meta />" field:
<x-product-meta display-price="false" />
And that's it! The price will now be hidden from the meta information, but it will still be displayed at the top of the product details:
Note that the price will get displayed if you either:
- Don't put the "display-price" property at all
- Or if you set the "display-price" value to "true
In any other scenario, the price will not get displayed.
Of course, if you want to disable the price display on the entire product details page, you can simply uncheck it from the visible information.
By default, product preview will appear as a part of product details' page structure, depending on where you placed it inside your code.
For example, in "Layout 1", by default the preview will get displayed below the bar that contains the product price and buttons:
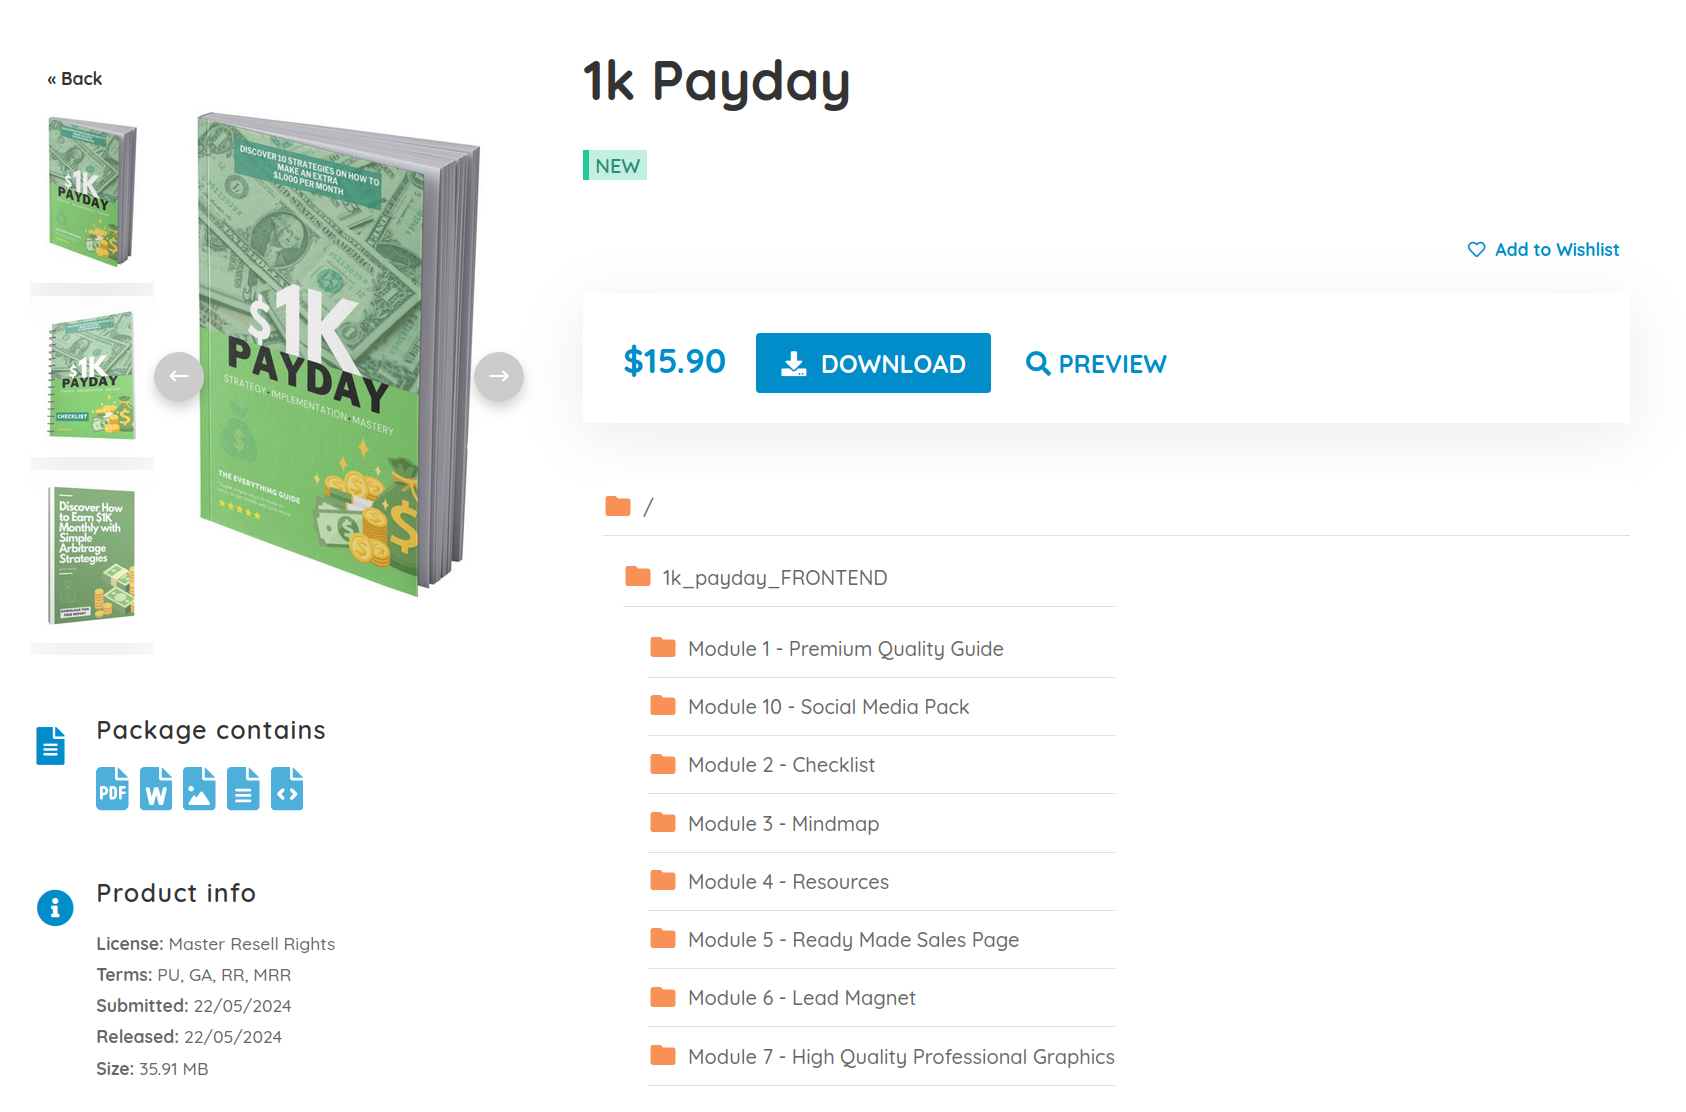
You may, of course, place it anywhere you want inside the code structure and that's where it will appear.
However, some people may prefer if the preview displays in a modal (or a popup), so that it gets immediately focused on and that it doesn't take space for other elements on a page.
Luckily, that is something that's extremely easy to do. All you have to do is to add the "modal" value to the "display-mode" property for the preview shortcode. Here's what that looks like:
<x-product-preview-panel display-mode="modal" />
And that's all it takes. One single property to the shortcode is enough for the preview box to get displayed as a modal. Here's what that actually looks like on the website:
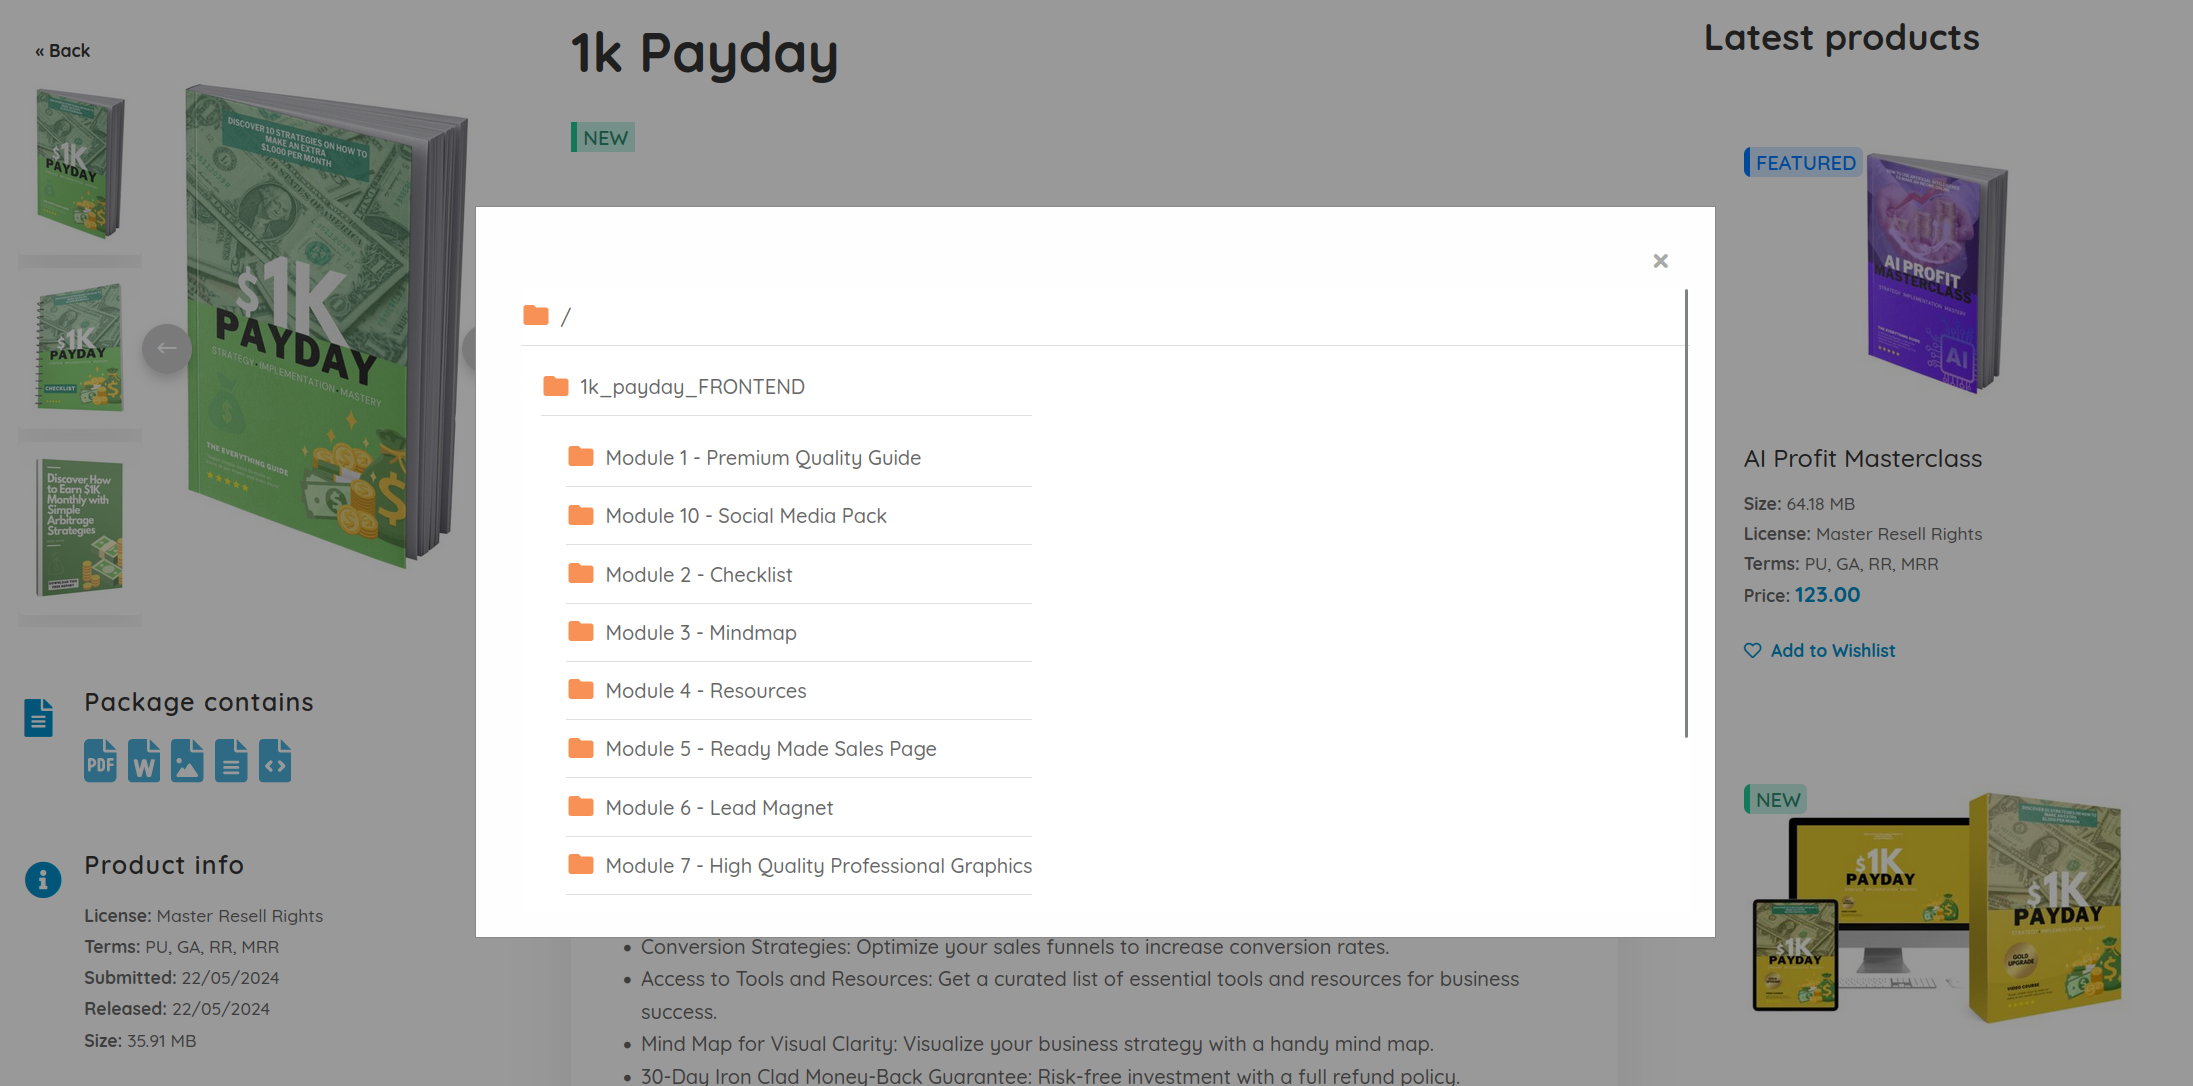
Amazing! To exit out from the modal, you can either click on the "X" button in the modal's top right corner, or you can click anywhere on the dark transparent background and the modal will close automatically.
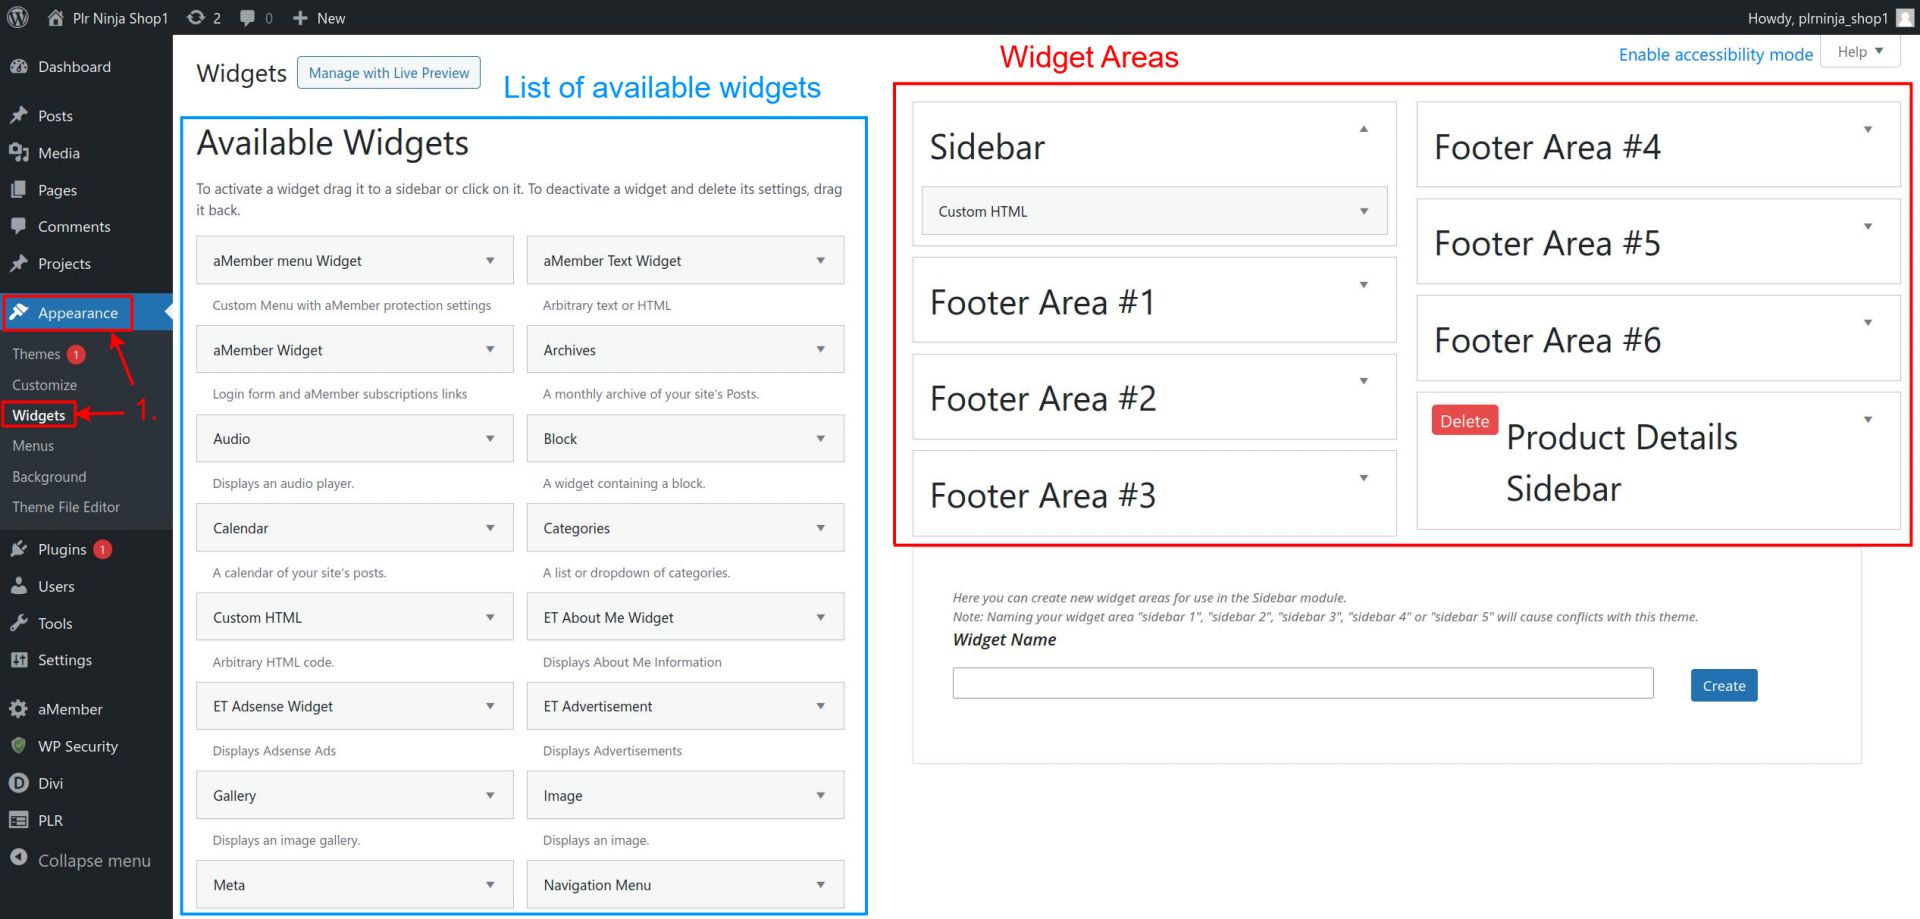
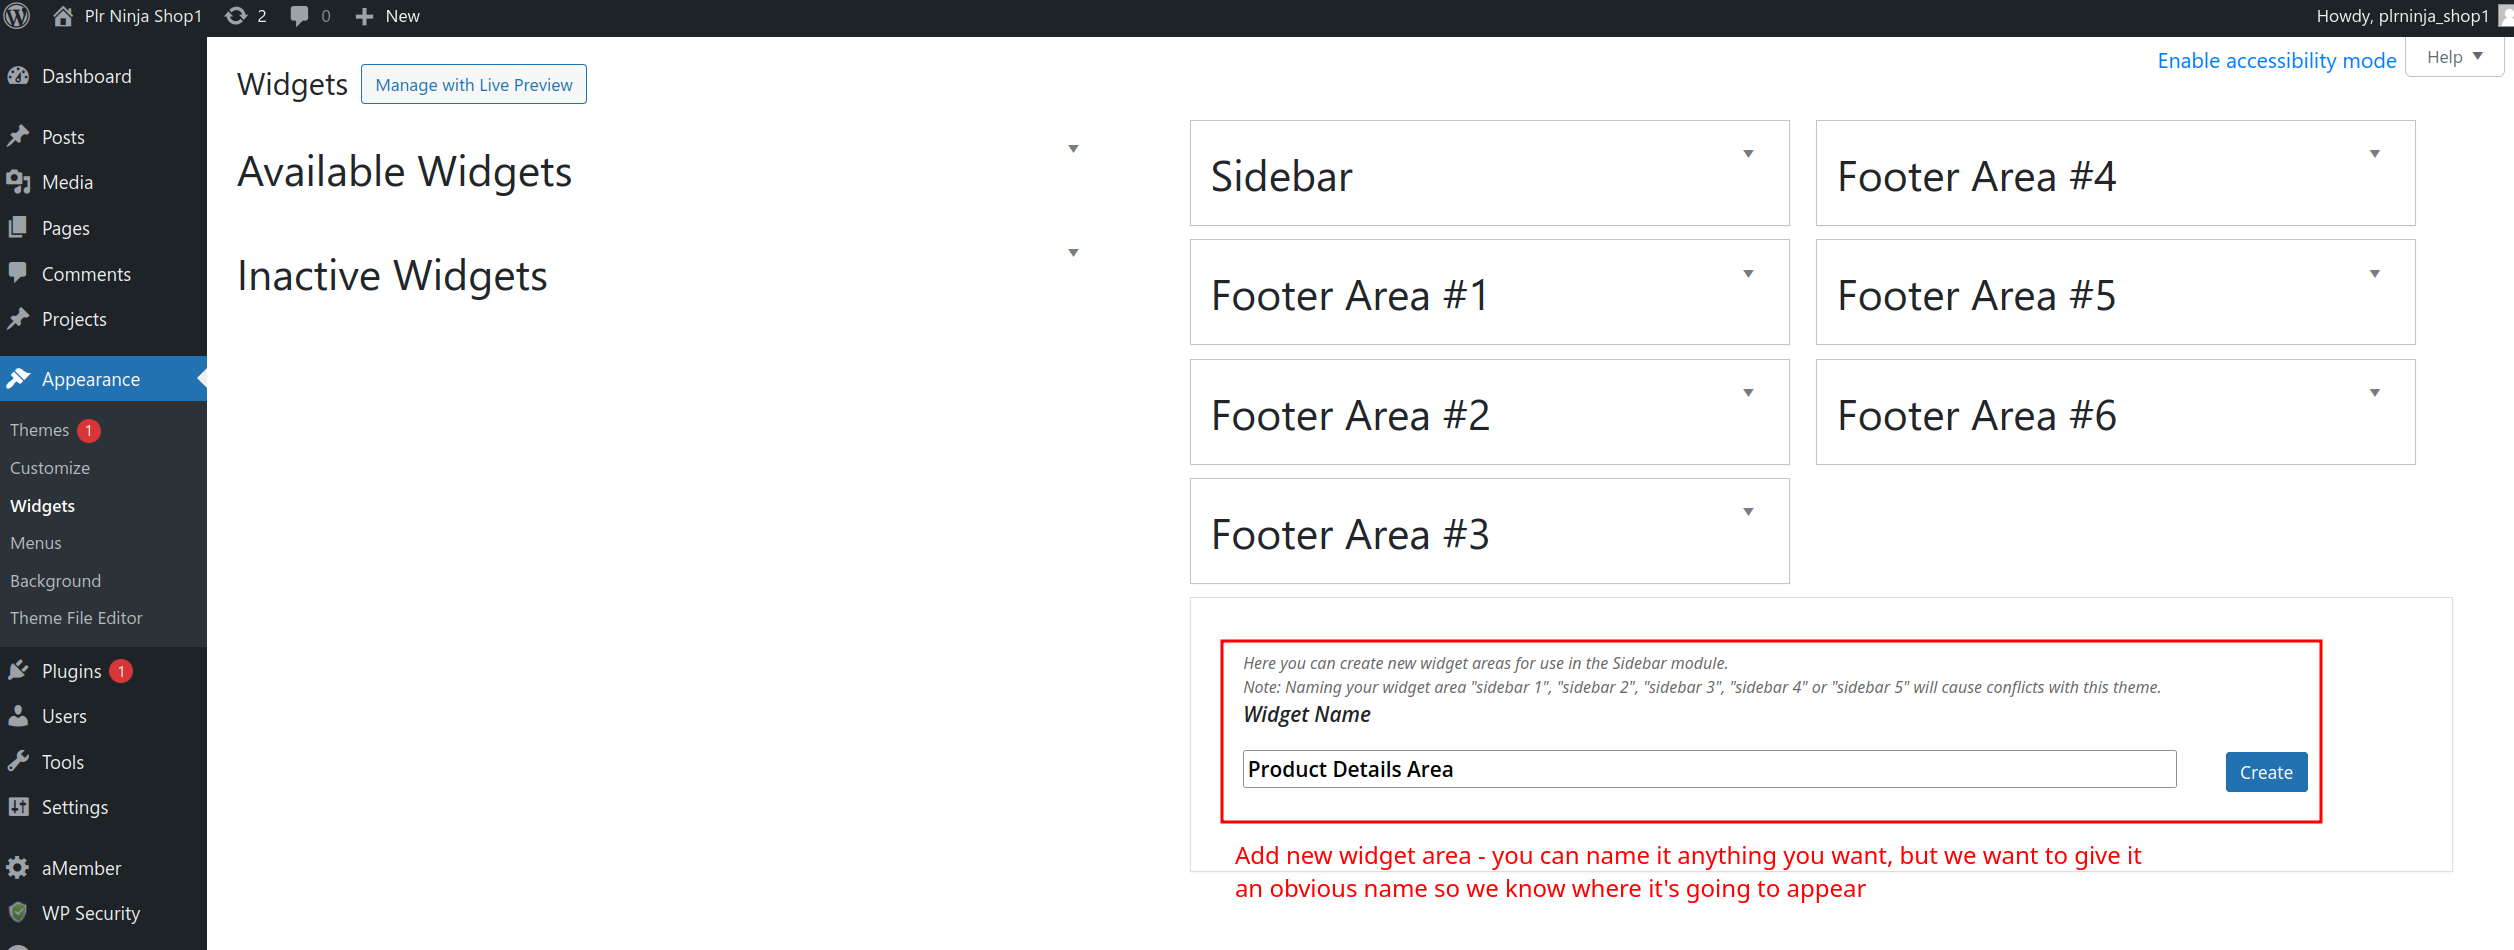
To add widgets to your shop, first we have to create them. That is done inside your WordPress area. Go to "Appearance -> Widgets" and you will be greeted with the widgets screen. There you will see all of the available widgets that you can add, as well as the list of all available widget areas.
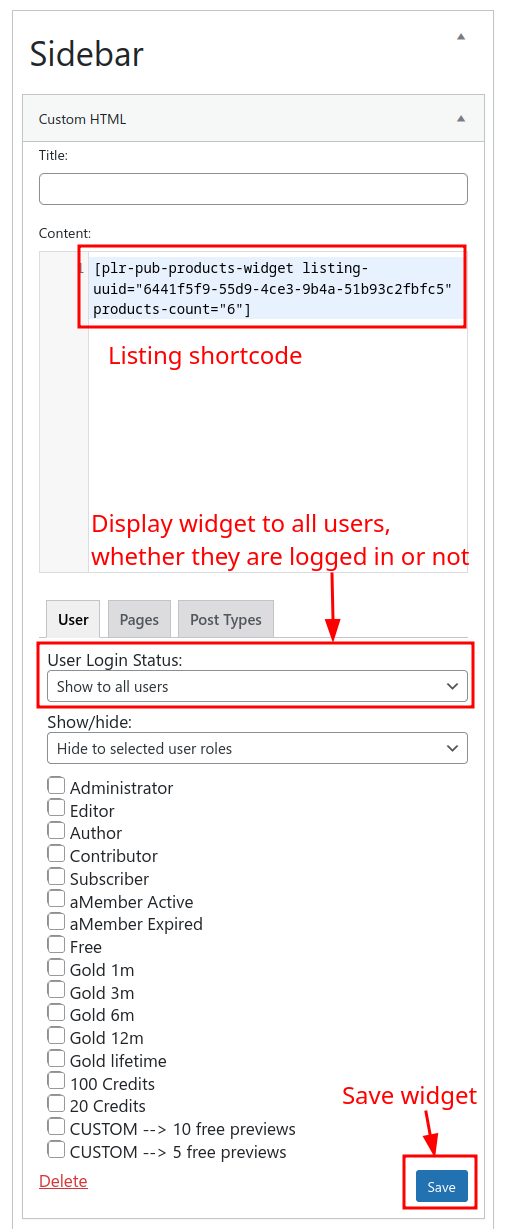
We want to display the list of latest products. To do that, add an "Custom HTML" element and add the shortcode of the listing you want to add (in our case, it is the "Latest Products" listing).
We can also select who can see the widget. You can show/hide the widget based on user status (logged in or not), based on certain role (free user or gold), or you can even show/hide the widgets on a particular page.
In this tutorial, we want to display the widget to all users.
Next, we have to define where to display the sidebar. Depending on the shop layout you have chosen during the installation process, you may or may not have the sidebar area already created for you. In any case, you can follow the guide below to add sidebar to your site.
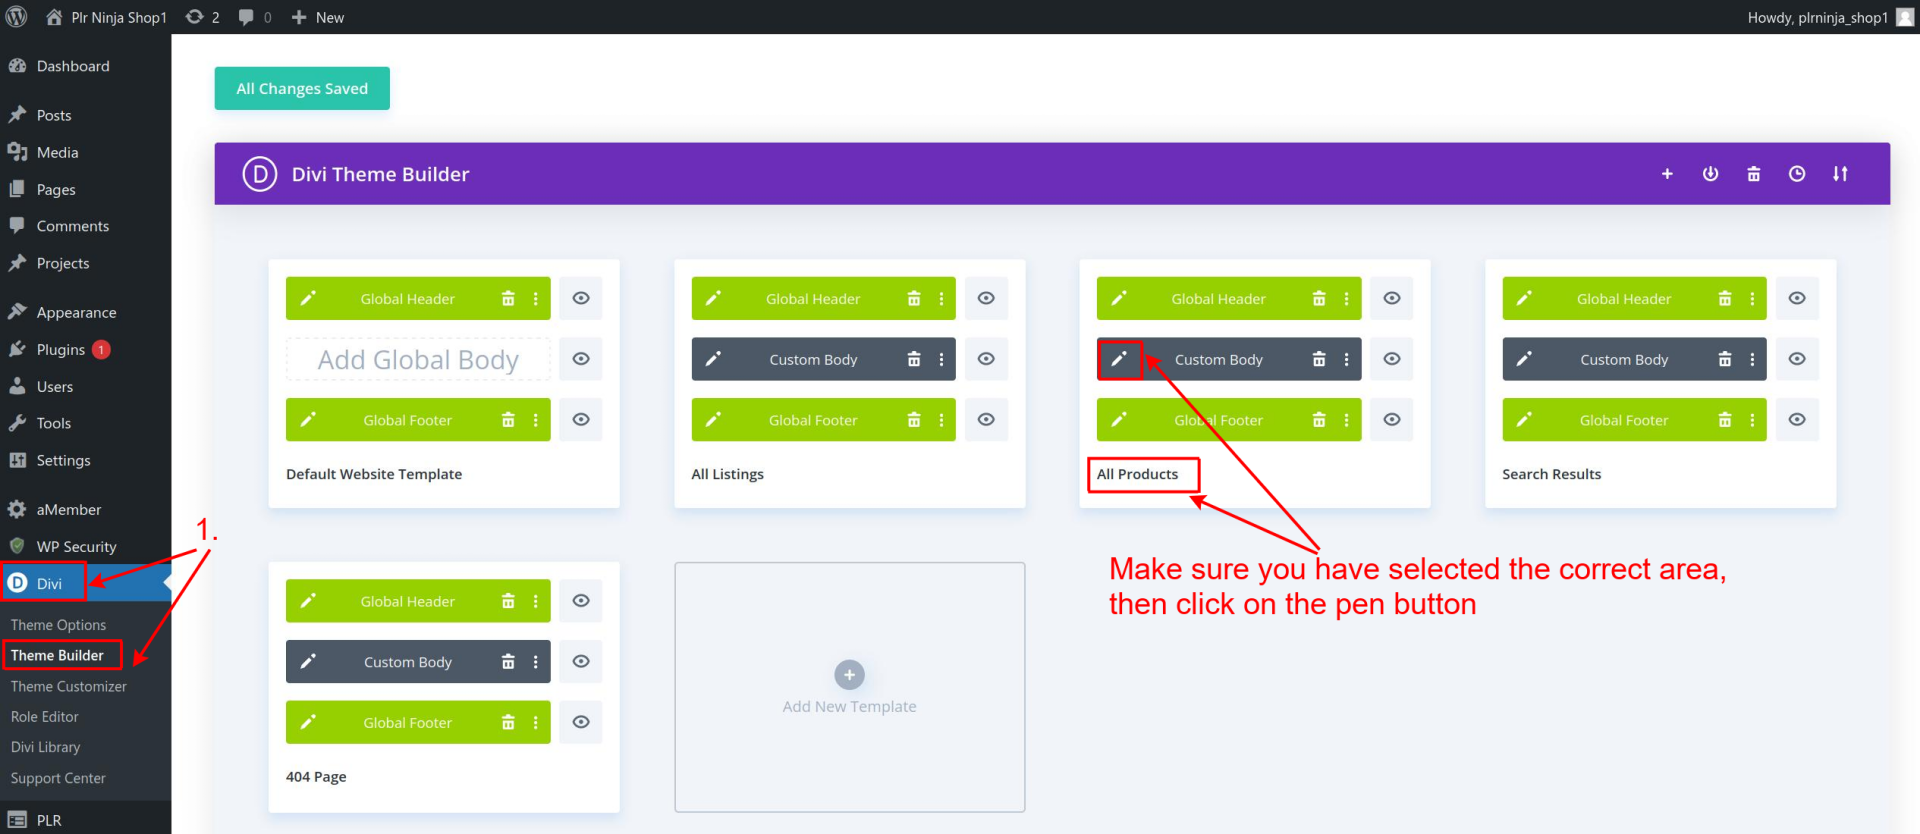
We want the widgets to appear on all products', so we have to edit the "Product Details" body area.
Go to "Divi -> Theme Builder" and click on the pen button next to the "All Products" body layout.
At this point, you should already be familiar with Divi Builder and how it works so this shouldn't be to hard to create.
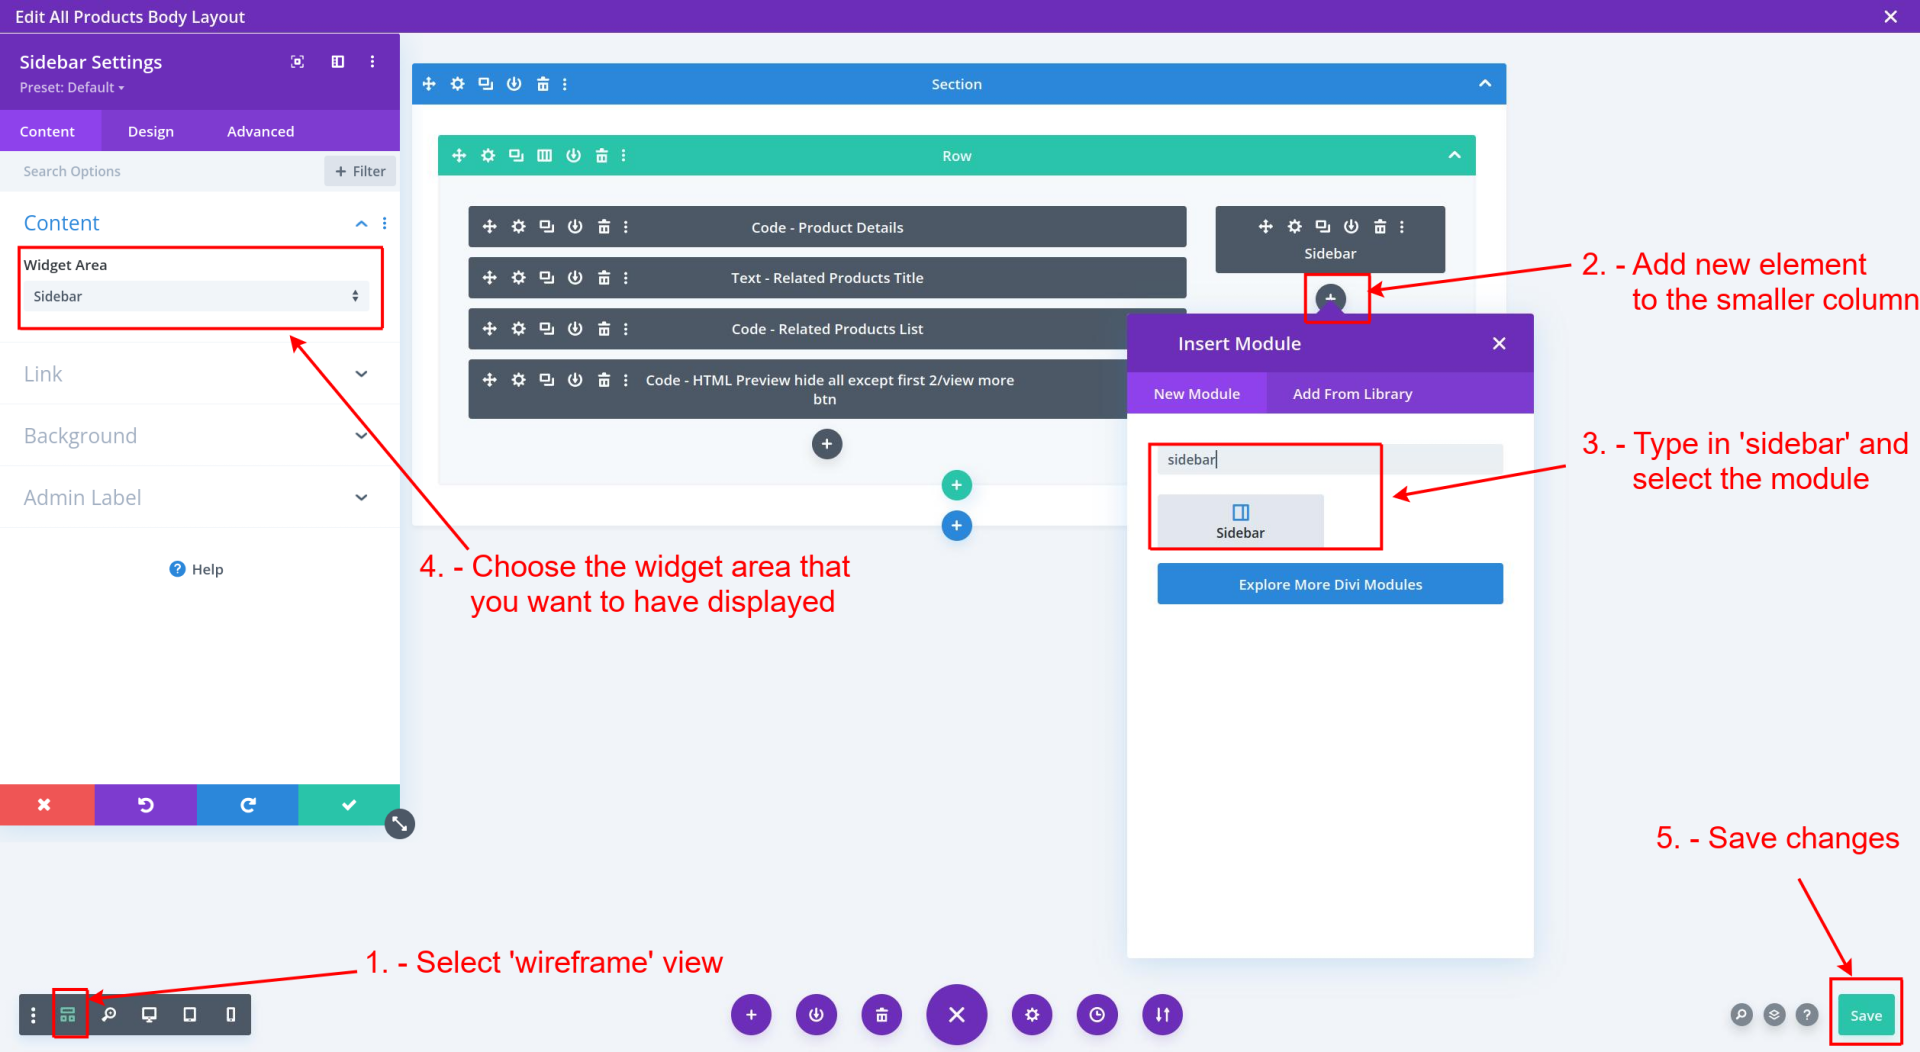
Once the layout editing screen loads, go to wireframe view. You will see that the row (green part) already has 2 columns, one big for main content and one small, which is where our sidebar is going to go. Add new element to the small column, type in "sidebar" and select the element that appears.
Sidebar settings will appear and now we have to select widget area. Since we have placed our shortcode inside the "sidebar" widget area, that is the one that we are going to select. However, if you have created your own widget areas, feel free to select them.
And that's it! Your sidebar widgets will now be display on all product pages.
You can add as many widgets as you want to the single area. You may use the sidebar to display some promotional offers, such as an active sale etc. - the opportunities are endless!
In the guide above, we have shown you how to add widgets to the sidebar of your website.
But what if you want to add widgets to the product details page itself - for example, below the product image?
One option to do that by customizing HTML from inside the layout area - but if you intend to have multiple elements, that may get tedious and hard to maintain.
That is why we have created the option for you to define the widgets inside your WordPress area - and display them anywhere inside any of your layouts.
To get started, go to "Appearance -> Widgets" area and add new widget area. You can name it anything you want, just remember what its "position" (or index) is. So for example, the first widget area you create is going to have an index of 1. If you add another widget area, it'll have the index of 2 etc. - any time you create a new area, its index gets increased by 1.
Again, we want to add custom HTML element as it gives us the most flexibility on what we want to create. Add your code, select who can see the widget and save it.
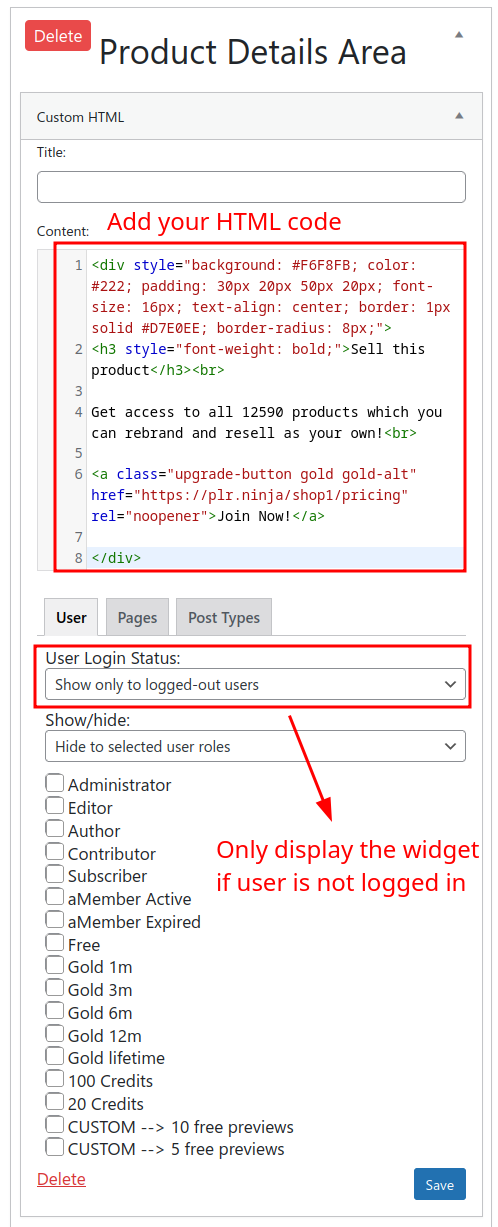
Once we have created and saved the widget, we have to go to the shop area. This is where we'll have to define where the widget gets displayed. Go to "Layout", then click on the edit button next to the area where we want to display the widget - in our case, it's Product Details area.
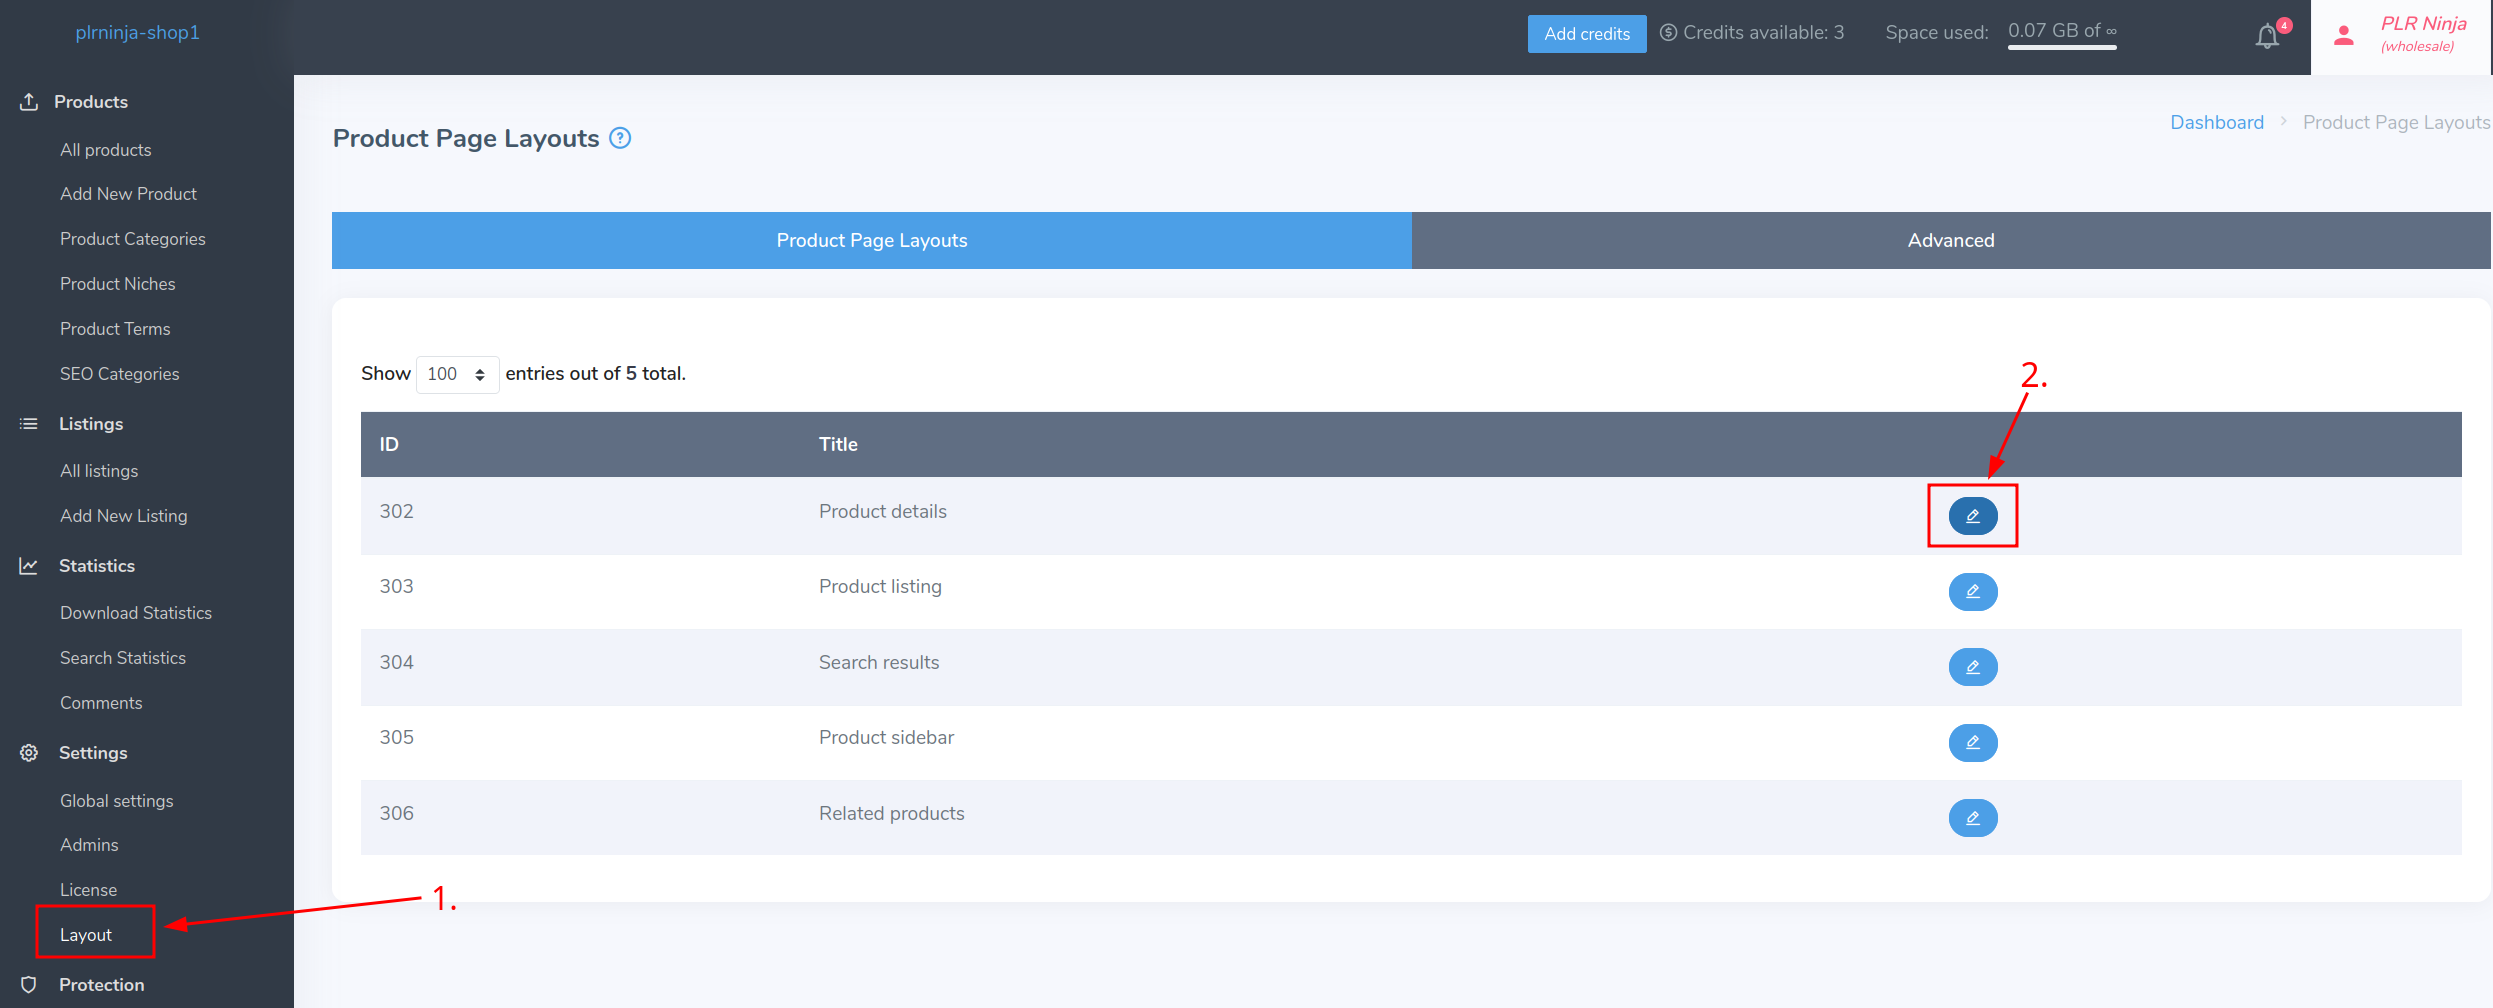
Go to the "Edit Code" tab and add the following line to where you want to display the sidebar:
<x-dynamic-sidebar widget-area-name="et_pb_widget_area_X" />
where the "X" represents the index of the widget, as we have mentioned above.
We want to add the widgets below the image and above the product information that appear on the left. We also know that the index of our widget area is 1 (since it is the first widget area we created), so our shortcode is
<x-dynamic-sidebar widget-area-name="et_pb_widget_area_1" />
and this is what that looks like in our code:
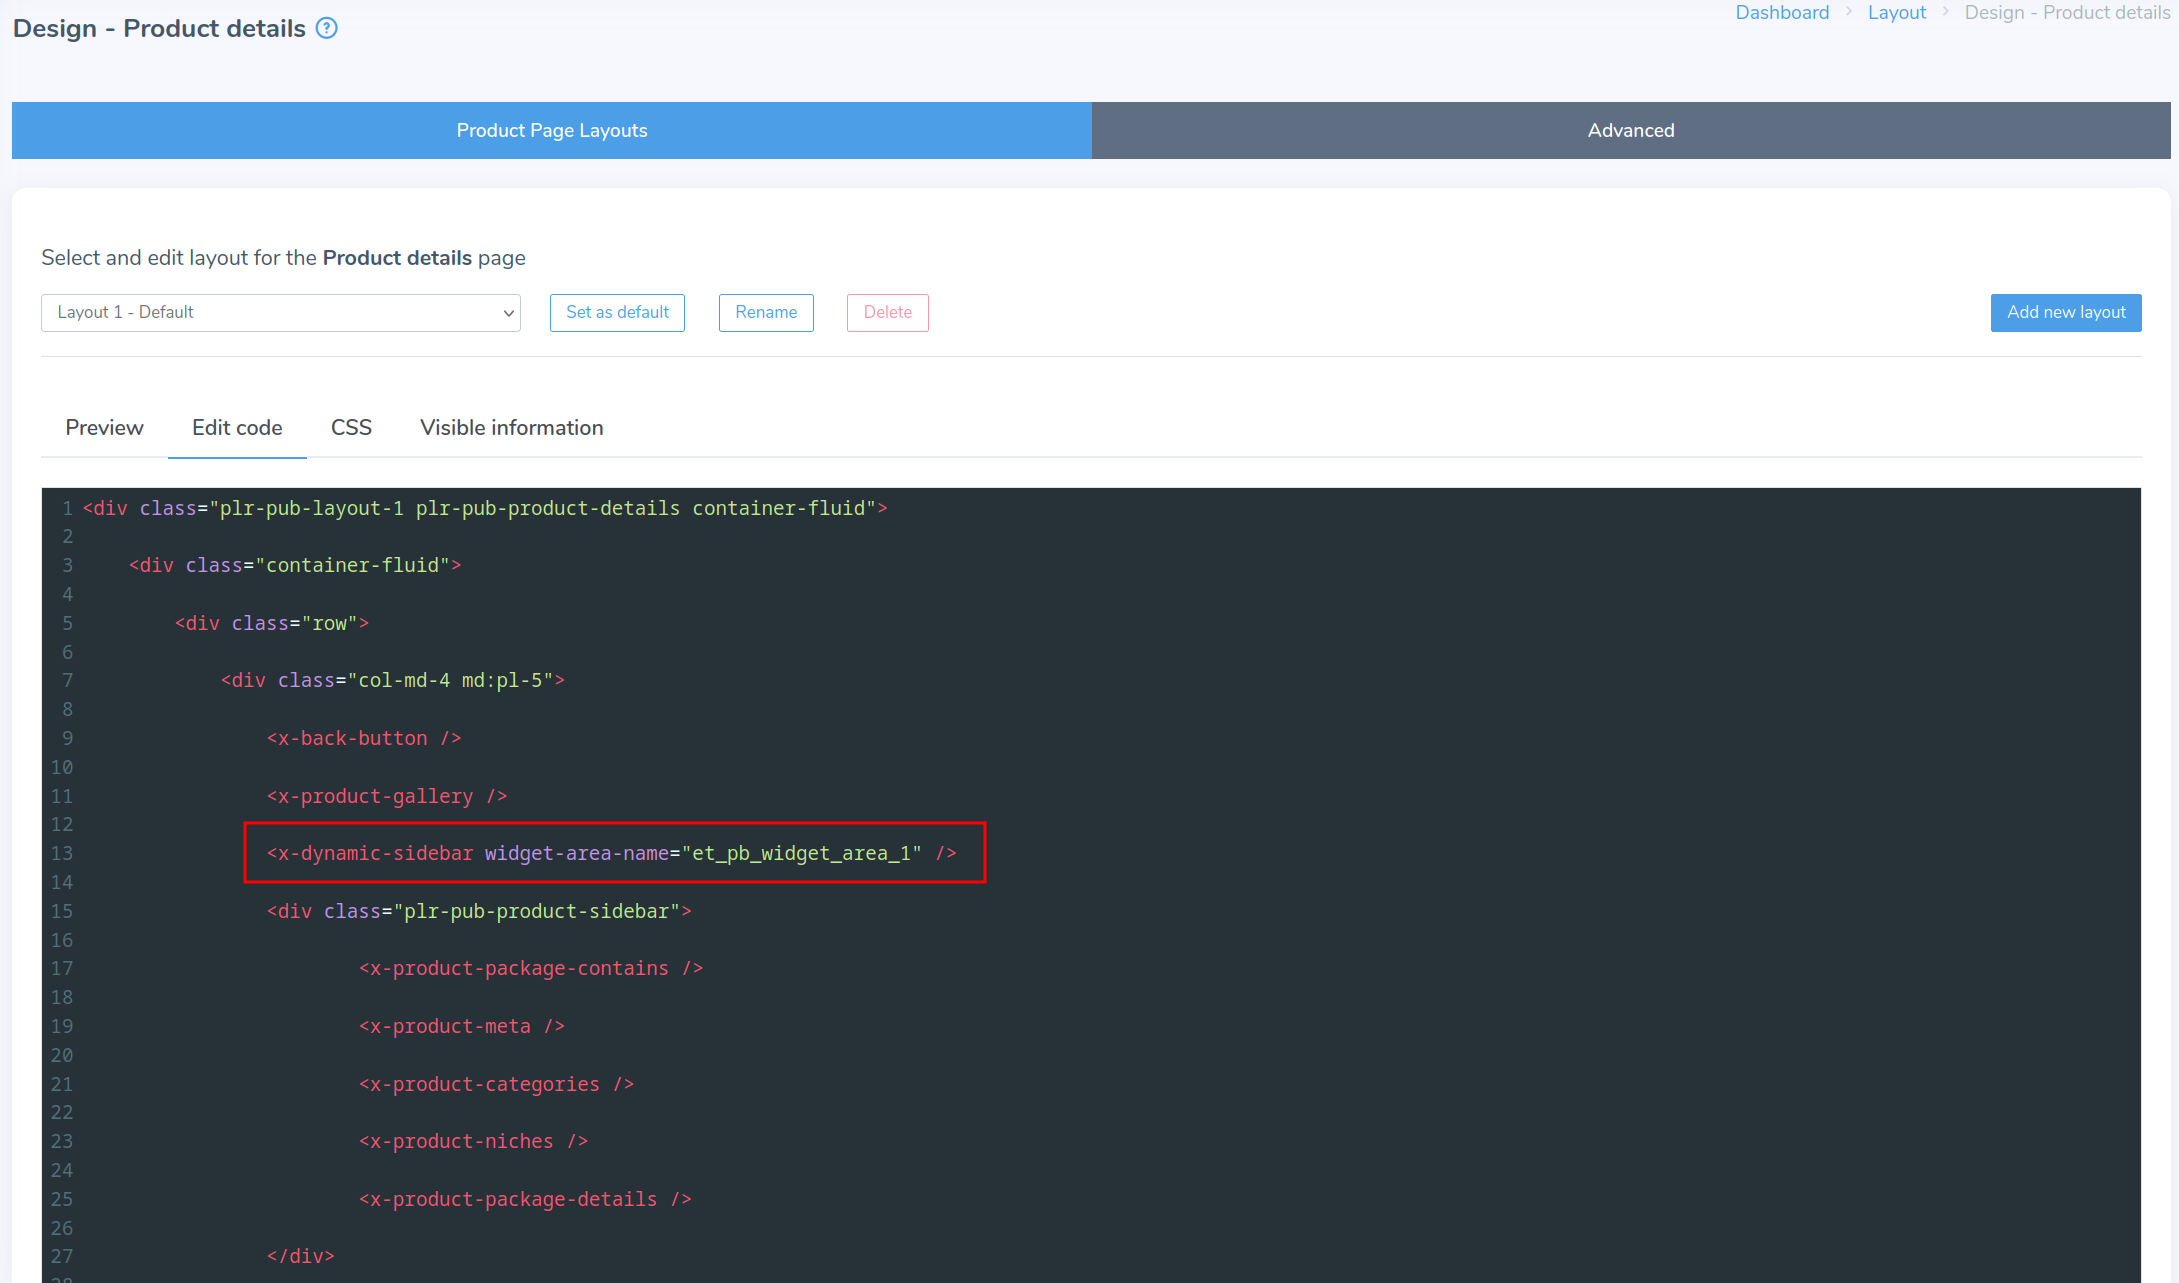
Save the code and you are all done! If you have multiple widget areas created inside your WordPress area, you only have to change the 'widget_area_name' property to appropriate name by modifying the widget area index.
Finally, here's what our finished product details page looks like on the frontend:
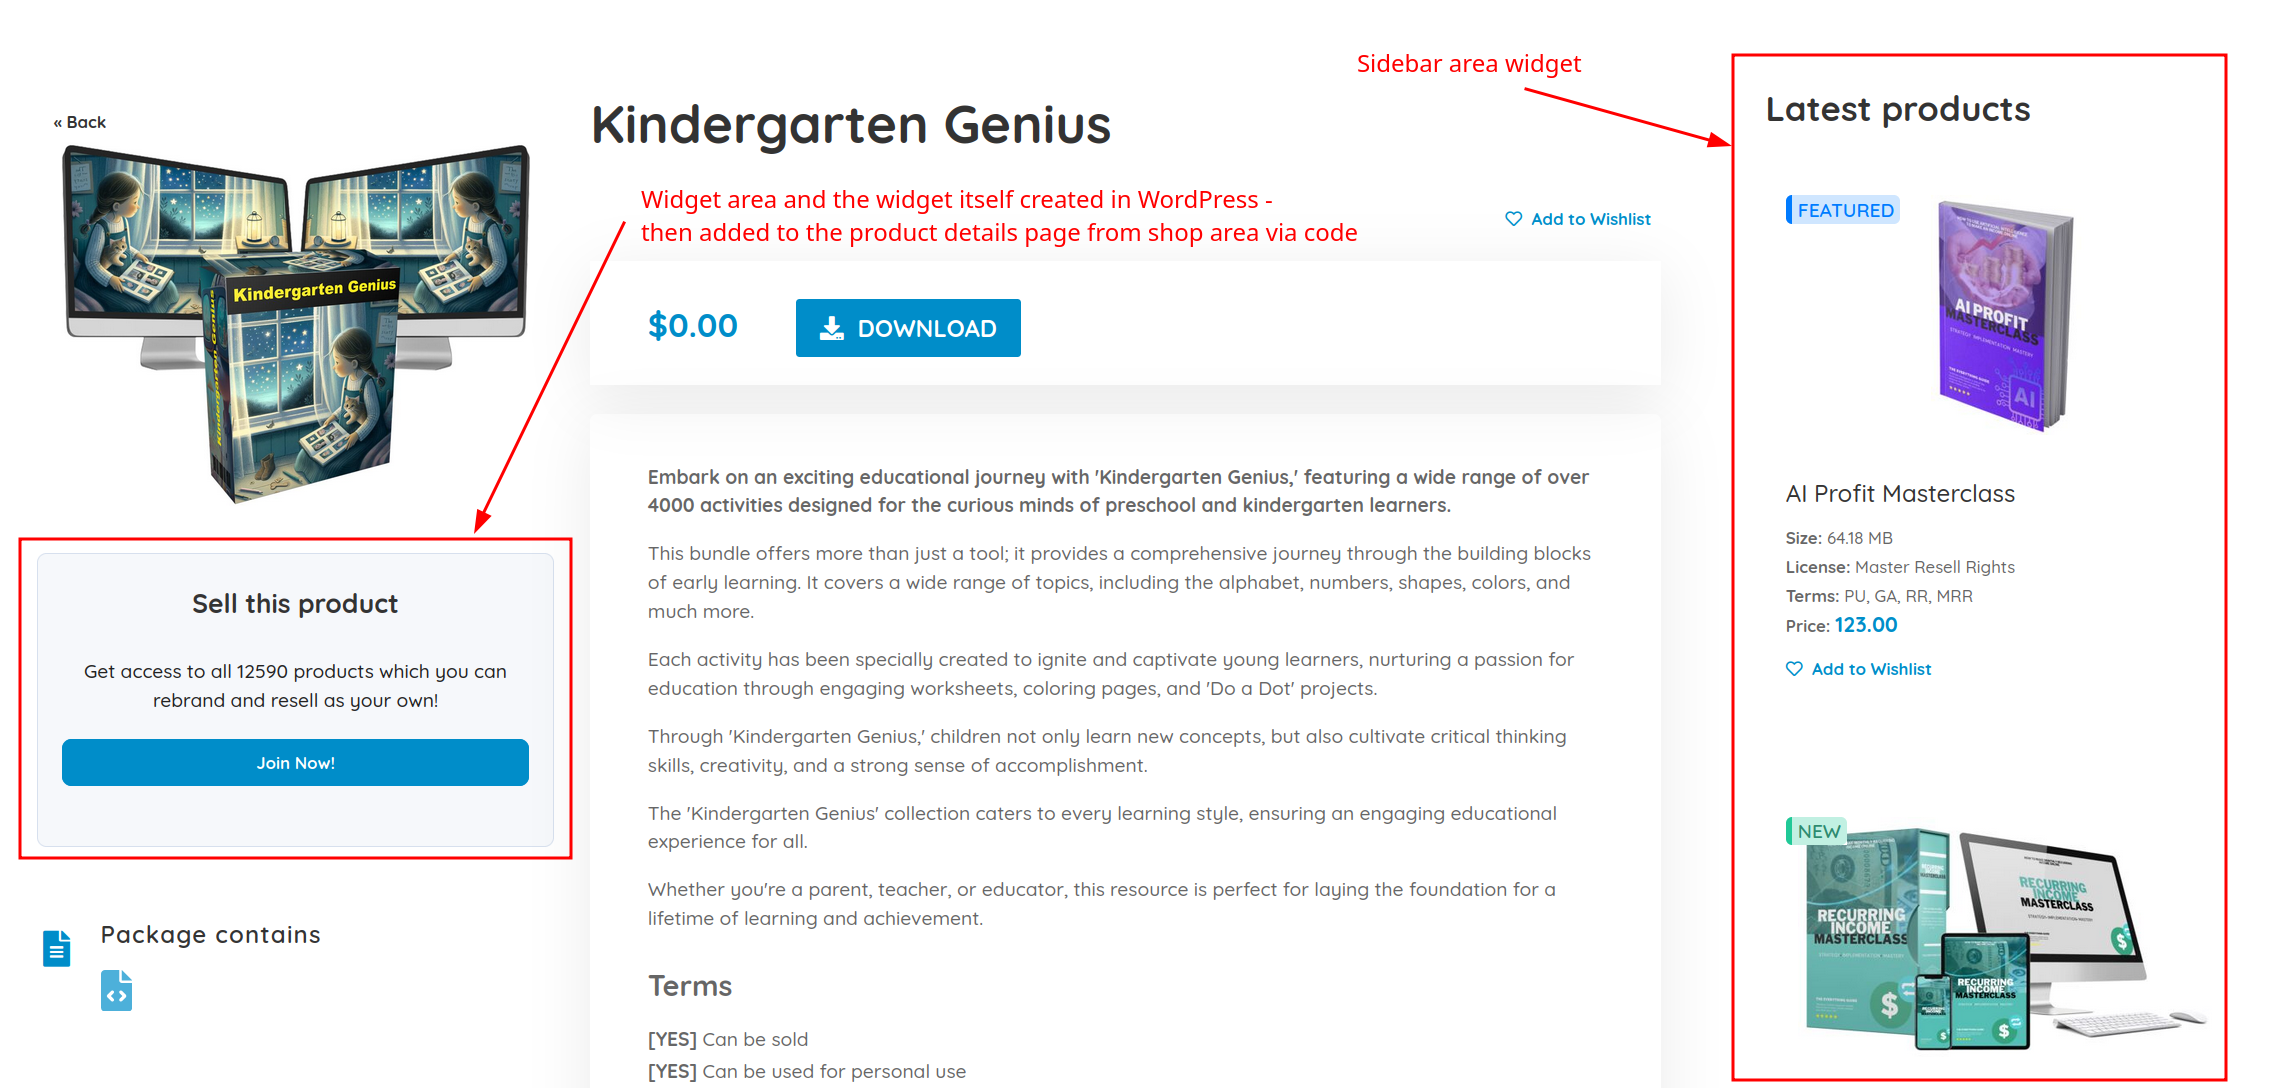
As you can see, both widget areas are being displayed correctly and you can easily modify both of them from inside your WordPress area.